
 Web Front-end
H5 Tutorial
Tutorial on using HTML5 Canvas to fill images with color and texture_html5 tutorial tips
Web Front-end
H5 Tutorial
Tutorial on using HTML5 Canvas to fill images with color and texture_html5 tutorial tips
Tutorial on using HTML5 Canvas to fill images with color and texture_html5 tutorial tips

Fill Color
Art is inseparable from color. Today we will introduce filling color and experience the charm of color.
There are two main types of fill colors:
1. Basic color
2. Gradient color (also divided into linear gradient and radial gradient)
Let’s look at them one by one.
Fill basic color
The Canvas fillStyle property is used to set the basic color and fill of the shape on the canvas. fillStyle uses simple color names. This looks very simple, for example:
- context.fillStyle = "red";
The following is a list of sixteen available color string values from the HTML4 specification. Since HTML5 does not modify the exclusive colors, HTML4 colors can be displayed correctly in HTML5. 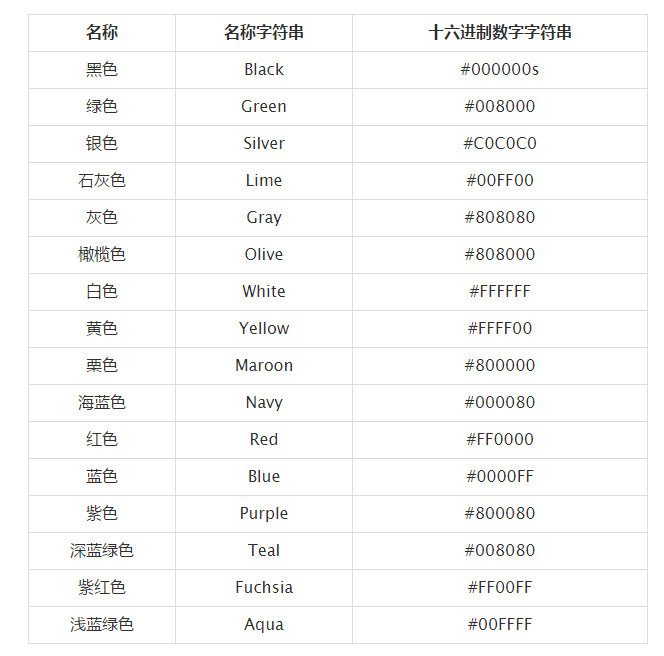
All of these color values can be applied to the strokeStyle and fillStyle properties.
Okay, let me summarize the method of filling basic colors: (can also be used for strokeStyle attribute)
(1) Use color string filling.
- context.fillStyle = "red";
(2) Use hexadecimal digit string padding.
- context.fillStyle = "#FF0000";
(3) Fill with hexadecimal digit string abbreviation.
- context.fillStyle = "#F00";
(4) Use the rgb() method to set the color.
- context.fillStyle = "rgb(255,0,0)";
(5) Use the rgba() method to set the color.
JavaScript CodeCopy content to clipboard
- context.fillStyle = "rgba(255,0,0,1)";
The last parameter of this method is the alpha value, and the transparency range is 1 (opaque) ~ 0 (transparent).
(6) Use the hsl() method to set the color.
- context.fillStyle = "hsl(0,100%,50%)";
HSL represents the color of the three channels of hue (H), saturation (S), and lightness (L).
(7) Use the hsla() method to set the color.
- context.fillStyle = "hsla(0,100%,50%,1)";
The above 7 sentences of code are all filled with "#FF0000" in red.
Fill Gradient Shape
There are two basic options for creating a gradient fill on the canvas: linear or radial. Linear gradients create a horizontal, vertical, or diagonal fill pattern. Radial gradients create a radial fill from a center point. There are three steps to filling a gradient shape: add a gradient line, add a key color to the gradient line, and apply the gradient. Here are some examples of them.
Linear Gradient
Three Step Strategy:
Add Gradient Lines:
- var grd = context.createLinearGradient(xstart,ystart,xend,yend);
Add a key color to the gradient line (similar to a color breakpoint):
- grd.addColorStop(stop,color);
The stop here is a floating point number from 0 to 1, which represents the proportion of the distance from the breakpoint to (xstart, ystart) to the entire gradient length.
Apply gradient:
- context.fillStyle = grd;
- context.strokeStyle = grd;
Write a code to take a look.
- "zh">
- "UTF-8">
-
Fill linear gradient - "canvas-warp">
- Your browser doesn’t support Canvas? ! Change it quickly! !
- <script> </span></li> <li class="alt"> <span> window.onload = </span><span class="keyword">function</span><span>(){ </span> </li> <li> <span> </span><span class="keyword">var</span><span> canvas = document.getElementById(</span><span class="string">"canvas"</span><span>); </span> </li> <li class="alt"><span> canvas.width = 800; </span></li> <li><span> canvas.height = 600; </span></li> <li class="alt"> <span> </span><span class="keyword">var</span><span> context = canvas.getContext(</span><span class="string">"2d"</span><span>); </span> </li> <li><span> </span></li> <li class="alt"><span> context.rect(200,100,400,400); </span></li> <li><span> </span></li> <li class="alt"> <span> </span><span class="comment">//Add gradient line </span><span> </span> </li> <li> <span> </span><span class="keyword">var</span><span> grd = context.createLinearGradient(200,300,600,300); </span> </li> <li class="alt"><span> </span></li> <li> <span> </span><span class="comment">//Add color breakpoints </span><span> </span> </li> <li class="alt"> <span> grd.addColorStop(0,</span><span class="string">"black"</span><span>); </span> </li> <li> <span> grd.addColorStop(0.5,</span><span class="string">"white"</span><span>); </span> </li> <li class="alt"> <span> grd.addColorStop(1,</span><span class="string">"black"</span><span>); </span> </li> <li><span> </span></li> <li class="alt"> <span> </span><span class="comment">//Apply gradient </span><span> </span> </li> <li><span> context.fillStyle = grd; </span></li> <li class="alt"><span> </span></li> <li><span> context.fill(); </span></li> <li class="alt"><span> </span></li> <li><span> } </span></li> <li class="alt"><span></script>
Run result: 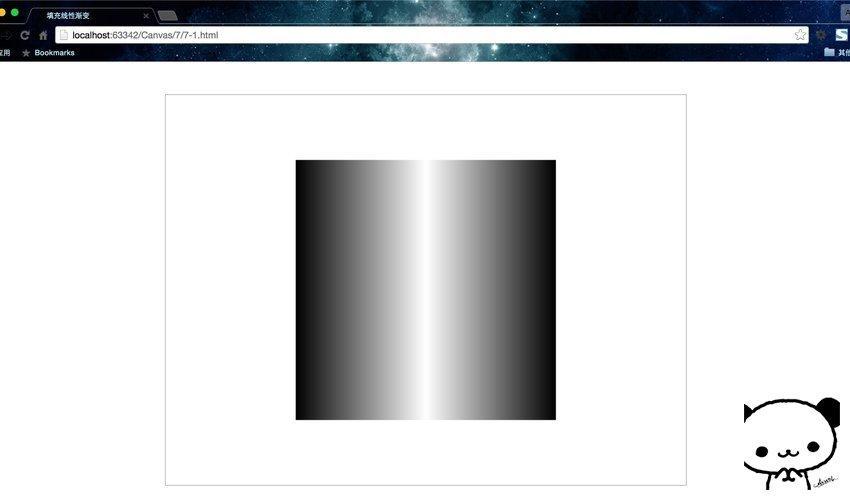
I think it is necessary to make an illustration so that everyone can understand the gradient at one time. 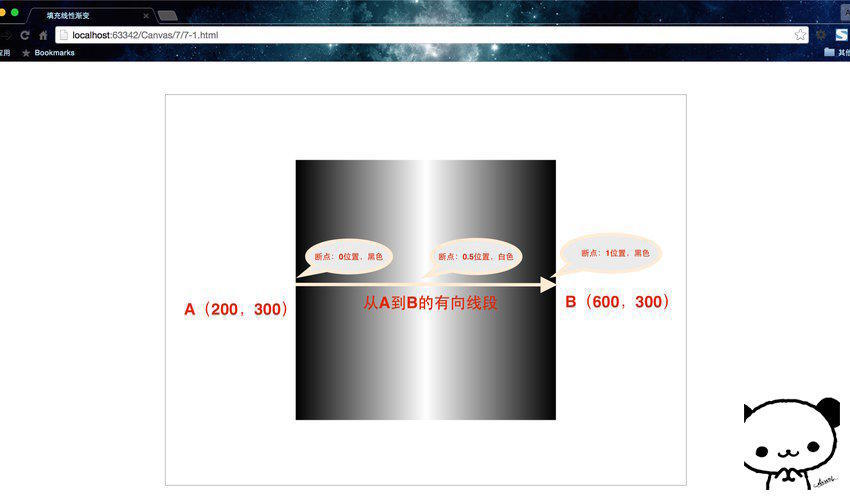
In order to facilitate understanding, it is recommended to regard the gradient line as a directed line segment. If you are familiar with drawing tools such as PS and have used the gradient settings, you should have a good understanding.
The starting point and end point of the gradient line here do not have to be within the image, and the position of the color breakpoint is the same. But if the range of the image is larger than the gradient line, then outside the range of the gradient line, the color of the breakpoint closest to the endpoint will be automatically filled.
Here is another example with two supplementary functions.
Quick way to draw a rectangle
- fillRect(x,y,width,height)、stroke(x,y,width,height)。这两个函数可以分别看做rect()与fill()以及rect()与stroke()的组合。因为rect()仅仅只是规划路径而已,而这两个方法确实实实在在的绘制。
- "zh">
- "UTF-8">
-
填充线性渐变 - "canvas-warp">
- 你的浏览器居然不支持Canvas?!赶快换一个吧!!
- <script> </span></li> <li> <span> window.onload = </span><span class="keyword">function</span><span>(){ </span> </li> <li class="alt"> <span> </span><span class="keyword">var</span><span> canvas = document.getElementById(</span><span class="string">"canvas"</span><span>); </span> </li> <li><span> canvas.width = 800; </span></li> <li class="alt"><span> canvas.height = 600; </span></li> <li> <span> </span><span class="keyword">var</span><span> context = canvas.getContext(</span><span class="string">"2d"</span><span>); </span> </li> <li class="alt"><span> </span></li> <li> <span> </span><span class="comment">//Add gradient line </span><span> </span> </li> <li class="alt"> <span> </span><span class="keyword">var</span><span> grd = context.createLinearGradient(100,300,700,300); </span> </li> <li><span> </span></li> <li class="alt"> <span> </span><span class="comment">//Add color breakpoints </span><span> </span> </li> <li> <span> grd.addColorStop(0,</span><span class="string">"olive"</span><span>); </span> </li> <li class="alt"> <span> grd.addColorStop(0.25,</span><span class="string">"maroon"</span><span>); </span> </li> <li> <span> grd.addColorStop(0.5,</span><span class="string">"aqua"</span><span>); </span> </li> <li class="alt"> <span> grd.addColorStop(0.75,</span><span class="string">"fuchsia"</span><span>); </span> </li> <li> <span> grd.addColorStop(0.25,</span><span class="string">"teal"</span><span>); </span> </li> <li class="alt"><span> </span></li> <li> <span> </span><span class="comment">//Apply gradient </span><span> </span> </li> <li class="alt"><span> context.fillStyle = grd; </span></li> <li><span> context.strokeStyle = grd; </span></li> <li class="alt"><span> </span></li> <li><span> context.strokeRect(200,50,300,50); </span></li> <li class="alt"><span> context.strokeRect(200,100,150,50); </span></li> <li><span> context.strokeRect(200,150,450,50); </span></li> <li class="alt"><span> </span></li> <li><span> context.fillRect(200,300,300,50); </span></li> <li class="alt"><span> context.fillRect(200,350,150,50); </span></li> <li><span> context.fillRect(200,400,450,50); </span></li> <li class="alt"><span> </span></li> <li><span> context.fillRect(0,550,800,25); </span></li> <li class="alt"><span> </span></li> <li><span> } </span></li> <li class="alt"><span></script>
Run result: 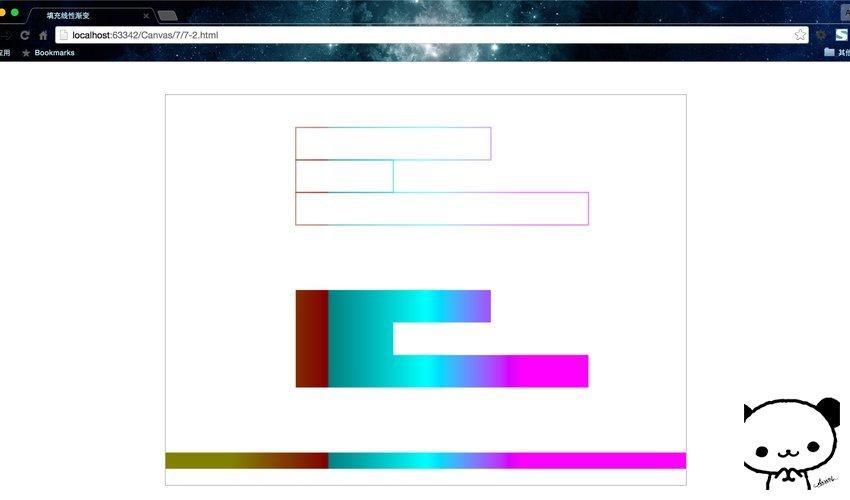
Both pages have horizontal gradients, but it should be clear that linear gradients are not necessarily horizontal, and the direction can be arbitrary. The direction is set through the endpoints of the gradient line.
Radial Gradient
It is also a three-step strategy, but the method used in the first step has changed.
Add gradient circle:
- var grd = context.createRadialGradient(x0,y0,r0,x1,y1,r1);
Add a key color to the gradient line (similar to a color breakpoint):
- grd.addColorStop(stop,color);
Apply gradient:
- context.fillStyle = grd;
- context.strokeStyle = grd;
A linear gradient is defined based on two endpoints, but a radial gradient is defined based on two circles.
Let’s rewrite Example 7-2.
- "zh">
- "UTF-8">
-
Fill Radial Gradient - "canvas-warp">
- Your browser doesn’t support Canvas? ! Change it quickly! !
- <script> </span></li> <li class="alt"> <span> window.onload = </span><span class="keyword">function</span><span>(){ </span> </li> <li> <span> </span><span class="keyword">var</span><span> canvas = document.getElementById(</span><span class="string">"canvas"</span><span>); </span> </li> <li class="alt"><span> canvas.width = 800; </span></li> <li><span> canvas.height = 600; </span></li> <li class="alt"> <span> </span><span class="keyword">var</span><span> context = canvas.getContext(</span><span class="string">"2d"</span><span>); </span> </li> <li><span> </span></li> <li class="alt"> <span> </span><span class="comment">//Add gradient line </span><span> </span> </li> <li> <span> </span><span class="keyword">var</span><span> grd = context.createRadialGradient(400,300,100,400,300,200); </span> </li> <li class="alt"><span> </span></li> <li> <span> </span><span class="comment">//Add color breakpoints </span><span> </span> </li> <li class="alt"> <span> grd.addColorStop(0,</span><span class="string">"olive"</span><span>); </span> </li> <li> <span> grd.addColorStop(0.25,</span><span class="string">"maroon"</span><span>); </span> </li> <li class="alt"> <span> grd.addColorStop(0.5,</span><span class="string">"aqua"</span><span>); </span> </li> <li> <span> grd.addColorStop(0.75,</span><span class="string">"fuchsia"</span><span>); </span> </li> <li class="alt"> <span> grd.addColorStop(0.25,</span><span class="string">"teal"</span><span>); </span> </li> <li><span> </span></li> <li class="alt"> <span> </span><span class="comment">//Apply gradient </span><span> </span> </li> <li><span> context.fillStyle = grd; </span></li> <li class="alt"><span> </span></li> <li><span> context.fillRect(100,100,600,400); </span></li> <li class="alt"><span> </span></li> <li><span> </span></li> <li class="alt"><span> } </span></li> <li><span></script>
Run result: 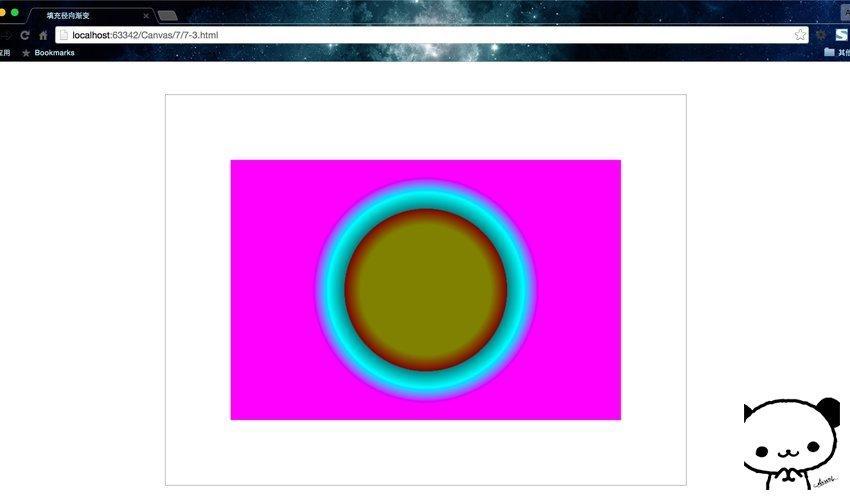
Why do you feel that this color combination is so...forget it, this is called art.
createRadialGradient(x0,y0,r0,x1,y1,r1); method specifies the start and end range of the radial gradient, that is, the gradient between two circles.
To summarize, in this lesson we learned about fillStyle, createLinearGradient(), createRadialGradient(), addColorStop(), fillRect(), strokeRect() and other attributes and methods, and introduced in detail the filling of basic colors, linear gradients, and radial gradient.
Okay, now that we have learned how to color, let’s use colors to our heart’s content and draw our own artwork!
Fill texture
Introduction to createPattern()
Texture is actually a repetition of the pattern, and the fill pattern is initialized through the createPattern() function. It needs to pass in two parameters createPattern(img,repeat-style), the first is an Image object instance, and the second parameter is a String type, indicating how to display the repeat pattern in the shape. You can use this function to load an image or the entire canvas as a fill pattern for a shape.
There are the following 4 image fill types:
1. Repeat on the plane: repeat;
2. Repeat on the x-axis: repeat-x;
3. Repeat on the y-axis: repeat-y;
4. Do not use repeat: no- repeat;
In fact, the first parameter of createPattern() can also be passed in a canvas object or video object. Here we only explain the Image object, and you can try the rest by yourself.
Create and fill patterns
First look at how to load images:
Create an Image object
Specify the image source for the Image object
The code is as follows:
- var img = new Image(); //Create Image object
- img.src = "8-1.jpg"; //Specify the image source for the Image object
Extension: The relative path in HTML
'../directory or file name' or 'directory or file name' refers to the path of the directory where the currently operated file is located
'../directory or file name' It refers to the path of the directory above the directory where the currently operated file is located
Fill texture afterwards:
- var pattern = context.createPattern(img,"repeat");
- context.fillStyle = pattern;
Let’s look directly at a complete program. Here I want to repeatedly fill in this cute giraffe as a texture. It should be noted that when selecting pictures, you must choose pictures that communicate with each other from left to right and from top to bottom as texture, so that there will be no unnatural short connections. 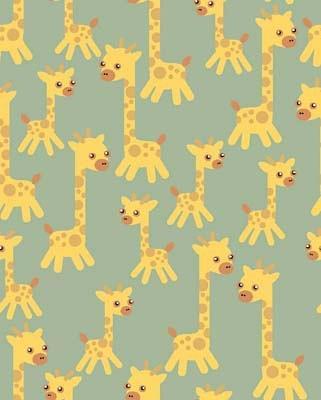
Code provided below.
- "zh">
- "UTF-8">
-
Fill texture - "canvas-warp">
- Your browser doesn’t support Canvas? ! Change it quickly! !
- <script> </span></li>
<li class="alt">
<span> window.onload = </span><span class="keyword">function</span><span>(){ </span>
</li>
<li>
<span> </span><span class="keyword">var</span><span> canvas = document.getElementById(</span><span class="string">"canvas"</span><span>); </span>
</li>
<li class="alt"><span> canvas.width = 800; </span></li>
<li><span> canvas.height = 600; </span></li>
<li class="alt">
<span> </span><span class="keyword">var</span><span> context = canvas.getContext(</span><span class="string">"2d"</span><span>); </span>
</li>
<li><span> </span></li>
<li class="alt">
<span> </span><span class="keyword">var</span><span> img = </span><span class="keyword">new</span><span> Image(); </span>
</li>
<li>
<span> img.src = </span><span class="string">"8-1.jpg"</span><span>; </span>
</li>
<li class="alt">
<span> img.onload = </span><span class="keyword">function</span><span>(){ </span>
</li>
<li>
<span> </span><span class="keyword">var</span><span> pattern = context.createPattern(img, </span><span class="string">"repeat"</span><span>); </span>
</li>
<li class="alt"><span> context.fillStyle = pattern; </span></li>
<li><span> context.fillRect(0,0,800,600); </span></li>
<li class="alt"><span>
</span></li> <li><span>
</span></li> } <li class="alt"><span>
</span></li></script>
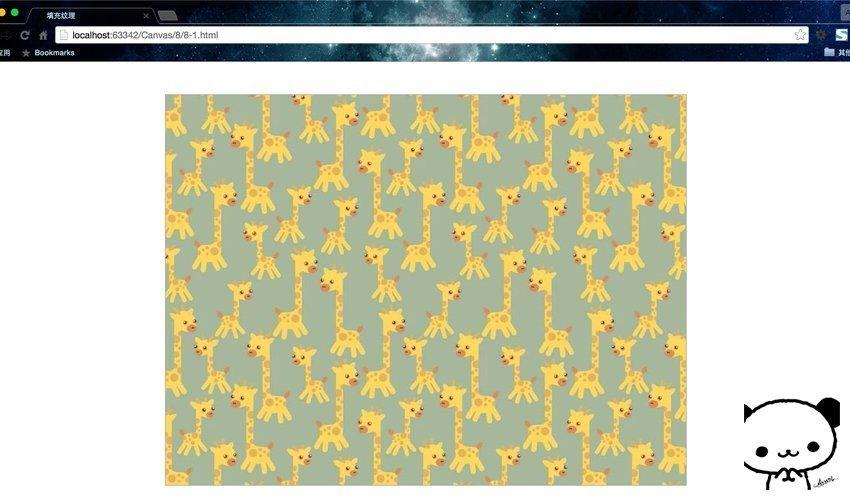 The onload event of Image is used here. Its function is to preload the image, that is, the code body of the subsequent function will be removed immediately after the image is loaded. This is necessary, if not written, the canvas will display a black screen. Because the texture is filled without waiting for the image to be loaded, the browser cannot find the image.

Hot AI Tools

Undresser.AI Undress
AI-powered app for creating realistic nude photos

AI Clothes Remover
Online AI tool for removing clothes from photos.

Undress AI Tool
Undress images for free

Clothoff.io
AI clothes remover

AI Hentai Generator
Generate AI Hentai for free.

Hot Article
Hot Tools

Notepad++7.3.1
Easy-to-use and free code editor

SublimeText3 Chinese version
Chinese version, very easy to use

Zend Studio 13.0.1
Powerful PHP integrated development environment

Dreamweaver CS6
Visual web development tools

SublimeText3 Mac version
God-level code editing software (SublimeText3)
Hot Topics
 1385
1385
 52
52

 Table Border in HTML
Sep 04, 2024 pm 04:49 PM
Table Border in HTML
Sep 04, 2024 pm 04:49 PM
Guide to Table Border in HTML. Here we discuss multiple ways for defining table-border with examples of the Table Border in HTML.
 HTML margin-left
Sep 04, 2024 pm 04:48 PM
HTML margin-left
Sep 04, 2024 pm 04:48 PM
Guide to HTML margin-left. Here we discuss a brief overview on HTML margin-left and its Examples along with its Code Implementation.
 Nested Table in HTML
Sep 04, 2024 pm 04:49 PM
Nested Table in HTML
Sep 04, 2024 pm 04:49 PM
This is a guide to Nested Table in HTML. Here we discuss how to create a table within the table along with the respective examples.
 HTML Table Layout
Sep 04, 2024 pm 04:54 PM
HTML Table Layout
Sep 04, 2024 pm 04:54 PM
Guide to HTML Table Layout. Here we discuss the Values of HTML Table Layout along with the examples and outputs n detail.
 HTML Input Placeholder
Sep 04, 2024 pm 04:54 PM
HTML Input Placeholder
Sep 04, 2024 pm 04:54 PM
Guide to HTML Input Placeholder. Here we discuss the Examples of HTML Input Placeholder along with the codes and outputs.
 HTML Ordered List
Sep 04, 2024 pm 04:43 PM
HTML Ordered List
Sep 04, 2024 pm 04:43 PM
Guide to the HTML Ordered List. Here we also discuss introduction of HTML Ordered list and types along with their example respectively
 Moving Text in HTML
Sep 04, 2024 pm 04:45 PM
Moving Text in HTML
Sep 04, 2024 pm 04:45 PM
Guide to Moving Text in HTML. Here we discuss an introduction, how marquee tag work with syntax and examples to implement.
 HTML onclick Button
Sep 04, 2024 pm 04:49 PM
HTML onclick Button
Sep 04, 2024 pm 04:49 PM
Guide to HTML onclick Button. Here we discuss their introduction, working, examples and onclick Event in various events respectively.
