
 Web Front-end
H5 Tutorial
HTML5 Canvas basic line drawing example tutorial_html5 tutorial skills
Web Front-end
H5 Tutorial
HTML5 Canvas basic line drawing example tutorial_html5 tutorial skills
HTML5 Canvas basic line drawing example tutorial_html5 tutorial skills

How to draw lines? It’s almost the same as painting in reality:
1. Move the brush to the beginning of the painting
2. Determine the stopping point of the first stroke
3. After planning, select the brush (including the Thickness and color, etc.)
4. Confirm drawing
Because Canvas is based on state drawing (very important, will be explained later), the first few steps are to determine the state, and the final step will be the specific drawing.
1. Move the brush (moveTo())
We obtained the brush context before, so we take this as an example to give an example of using the modified method - context.moveTo(100,100). The meaning of this code is to move the brush to the point (100,100) (unit is px). Remember, the upper left corner of the canvas is the origin of the Cartesian coordinate system, and the positive direction of the y-axis is downward and the positive direction of the x-axis is to the right.
2. Stroke stop point (lineTo())
Similarly, context.lineTo(600,600). This sentence means to draw from the stopping point of the previous stroke to (600,600). But be clear, the moveTo() and lineTo() here are just status, it’s planning, I’m preparing to draw, I haven’t started drawing yet, it’s just a plan!
3. Select the brush
Here we only set the color and thickness of the brush.
context.lineWidth = 5, this sentence means to set the thickness of the brush (line) to 10px.
context.strokeStyle = "#AA394C", this sentence means to set the color of the brush (line) to rose red.
Because Canvas is state-based drawing, when we select the brush thickness and color, we actually also select the line thickness and color.
4. Confirm drawing
There are only two methods to confirm drawing, fill() and stroke(). Those with some basic knowledge of drawing should know that the former refers to filling and the latter refers to stroke. Since we're just drawing lines, just stroke them. Just call the code context.stroke().
Draw a line
Isn’t it just a line segment! So much nonsense! Then let's start painting.
- "zh">
- "UTF-8">
-
Start from line - "canvas-warp">
- Your browser doesn’t support Canvas? ! Change it quickly! !
- <script> </span></li> <li class="alt"> <span> window.onload = </span><span class="keyword">function</span><span>(){ </span> </li> <li> <span> </span><span class="keyword">var</span><span> canvas = document.getElementById(</span><span class="string">"canvas"</span><span>); </span> </li> <li class="alt"><span> canvas.width = 800; </span></li> <li><span> canvas.height = 600; </span></li> <li class="alt"> <span> </span><span class="keyword">var</span><span> context = canvas.getContext(</span><span class="string">"2d"</span><span>); </span> </li> <li><span> </span></li> <li class="alt"><span> context.moveTo(100,100); </span></li> <li><span> context.lineTo(600,600); </span></li> <li class="alt"><span> context.lineWidth = 5; </span></li> <li> <span> context.strokeStyle = </span><span class="string">"#AA394C"</span><span>; </span> </li> <li class="alt"><span> context.stroke(); </span></li> <li><span> } </span></li> <li class="alt"><span></script>
Run result: 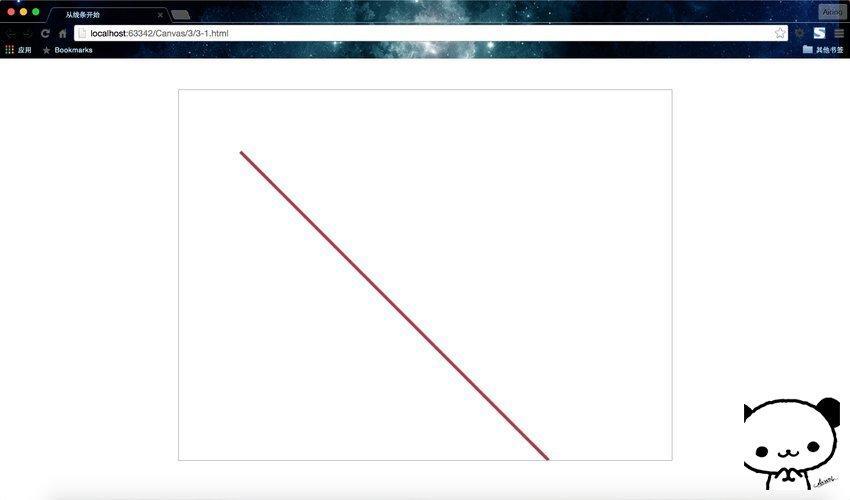
(My friends have always asked me what the bear is in the lower right corner of the page? Oh, I forgot to explain before, that is my anti-counterfeiting watermark!)
I also marked a page analysis diagram for your reference. . 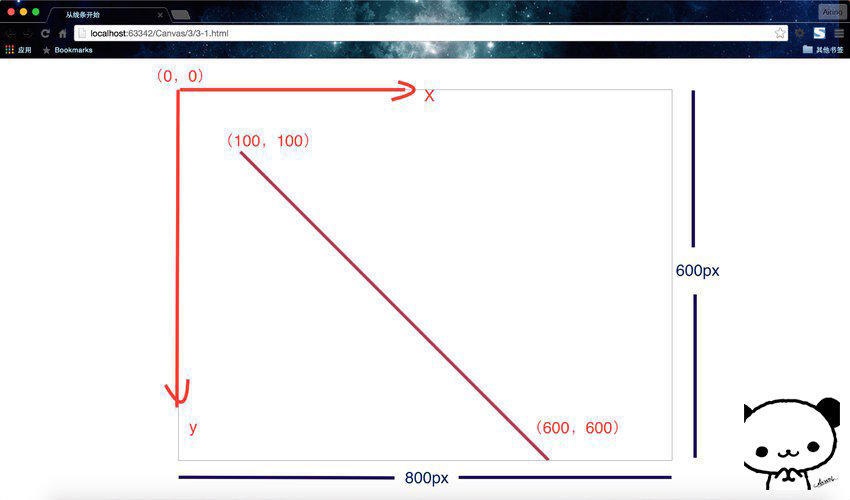
Here I removed the width and height from the original
Summary: To set the size of the canvas, there are only two methods
1. Set in the
2. Set the properties of canvas in JS code.
How about it? Isn’t it very cool? Next we have to speed up and draw a graphic composed of multiple lines. Do you feel like you are one step closer to being an artist? Although this is just a simple line segment, this painting is only a small step for us, but it is a giant leap for mankind!
Drawing a polyline
We have successfully drawn a line segment above. So, what if I want to draw a polyline with two strokes or even many strokes?
Smart friends must have thought of it. This is not simple. Just reuse lineTo(). Next, I just drew a beautiful polyline~
- "zh">
- "UTF-8">
-
Draw a polyline - "canvas-warp">
- Your browser doesn’t support Canvas? ! Change it quickly! !
- <script> </span></li> <li class="alt"> <span> window.onload = </span><span class="keyword">function</span><span>(){ </span> </li> <li> <span> </span><span class="keyword">var</span><span> canvas = document.getElementById(</span><span class="string">"canvas"</span><span>); </span> </li> <li class="alt"><span> canvas.width = 800; </span></li> <li><span> canvas.height = 600; </span></li> <li class="alt"> <span> </span><span class="keyword">var</span><span> context = canvas.getContext(</span><span class="string">"2d"</span><span>); </span> </li> <li><span> </span></li> <li class="alt"><span> context.moveTo(100,100); </span></li> <li><span> context.lineTo(300,300); </span></li> <li class="alt"><span> context.lineTo(100,500); </span></li> <li><span> context.lineWidth = 5; </span></li> <li class="alt"> <span> context.strokeStyle = </span><span class="string">"#AA394C"</span><span>; </span> </li> <li><span> context.stroke(); </span></li> <li class="alt"><span> } </span></li> <li><span></script>
Run result: 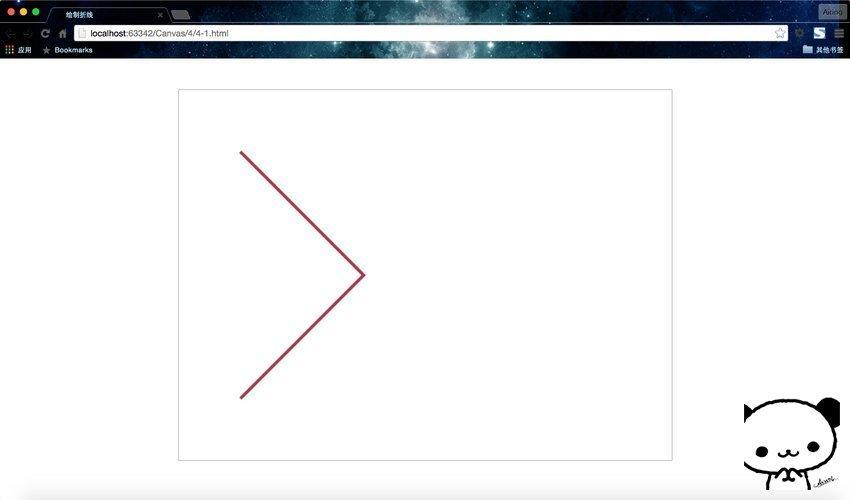
Draw multiple polylines
In the same way, what if we want to draw multiple polylines with different styles? For example, we draw three polylines here, namely red, blue, and black. Smart friends must have thought that this is not simple. You only need to pan and change the brush color. The code format is the same, just copy it. The code is as follows.
- "zh">
- "UTF-8">
-
绘制折线 - "canvas-warp">
- 你的浏览器居然不支持Canvas?!赶快换一个吧!!
- <script> </span></li> <li class="alt"> <span> window.onload = </span><span class="keyword">function</span><span>(){ </span> </li> <li> <span> </span><span class="keyword">var</span><span> canvas = document.getElementById(</span><span class="string">"canvas"</span><span>); </span> </li> <li class="alt"><span> canvas.width = 800; </span></li> <li><span> canvas.height = 600; </span></li> <li class="alt"> <span> </span><span class="keyword">var</span><span> context = canvas.getContext(</span><span class="string">"2d"</span><span>); </span> </li> <li><span> </span></li> <li class="alt"><span> context.moveTo(100,100); </span></li> <li><span> context.lineTo(300,300); </span></li> <li class="alt"><span> context.lineTo(100,500); </span></li> <li><span> context.lineWidth = 5; </span></li> <li class="alt"> <span> context.strokeStyle = </span><span class="string">"red"</span><span>; </span> </li> <li><span> context.stroke(); </span></li> <li class="alt"><span> </span></li> <li><span> context.moveTo(300,100); </span></li> <li class="alt"><span> context.lineTo(500,300); </span></li> <li><span> context.lineTo(300,500); </span></li> <li class="alt"><span> context.lineWidth = 5; </span></li> <li> <span> context.strokeStyle = </span><span class="string">"blue"</span><span>; </span> </li> <li class="alt"><span> context.stroke(); </span></li> <li><span> </span></li> <li class="alt"><span> context.moveTo(500,100); </span></li> <li><span> context.lineTo(700,300); </span></li> <li class="alt"><span> context.lineTo(500,500); </span></li> <li><span> context.lineWidth = 5; </span></li> <li class="alt"> <span> context.strokeStyle = </span><span class="string">"black"</span><span>; </span> </li> <li><span> context.stroke(); </span></li> <li class="alt"><span> } </span></li> <li><span></script>
Run result: 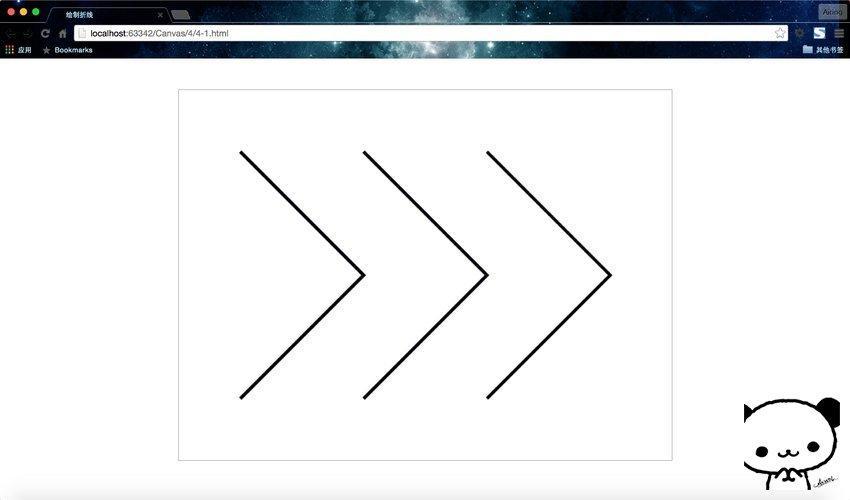
Huh? Isn't it strange? What about red first, then blue, then black? Why is it all black? In fact, the reason here is something I have always emphasized before - Canvas is state-based drawing.
What does it mean? In fact, every time this code uses stroke(), it will draw the previously set state again. During the first stroke(), a red polyline is drawn; during the second stroke(), the previous red polyline will be redrawn, but at this time the brush has been replaced with a blue one, so draw The polylines drawn are all blue. In other words, the strokeStyle property is overridden. In the same way, when drawing for the third time, the pen color is the final black, so three black polylines will be redrawn. Therefore, the three polylines seen here are actually drawn three times, and a total of 6 polylines are drawn.
So, I want to draw three polylines, is there no other way? Is this the end of the artist’s soul? Is there no hope? No, there is a way.
Use beginPath() to start drawing
In order to prevent the drawing method from repeated drawing, we can add beginPath() before each drawing, which means that the starting point of the next drawing is the code after beginPath(). We add context.beginPath() before drawing three times.
- "zh">
- "UTF-8">
-
绘制折线 - "canvas-warp">
- 你的浏览器居然不支持Canvas?!赶快换一个吧!!
- <script> </span></li> <li class="alt"> <span> window.onload = </span><span class="keyword">function</span><span>(){ </span> </li> <li> <span> </span><span class="keyword">var</span><span> canvas = document.getElementById(</span><span class="string">"canvas"</span><span>); </span> </li> <li class="alt"><span> canvas.width = 800; </span></li> <li><span> canvas.height = 600; </span></li> <li class="alt"> <span> </span><span class="keyword">var</span><span> context = canvas.getContext(</span><span class="string">"2d"</span><span>); </span> </li> <li><span> </span></li> <li class="alt"><span> context.beginPath(); </span></li> <li><span> context.moveTo(100,100); </span></li> <li class="alt"><span> context.lineTo(300,300); </span></li> <li><span> context.lineTo(100,500); </span></li> <li class="alt"><span> context.lineWidth = 5; </span></li> <li> <span> context.strokeStyle = </span><span class="string">"red"</span><span>; </span> </li> <li class="alt"><span> context.stroke(); </span></li> <li><span> </span></li> <li class="alt"><span> context.beginPath(); </span></li> <li><span> context.moveTo(300,100); </span></li> <li class="alt"><span> context.lineTo(500,300); </span></li> <li><span> context.lineTo(300,500); </span></li> <li class="alt"><span> context.lineWidth = 5; </span></li> <li> <span> context.strokeStyle = </span><span class="string">"blue"</span><span>; </span> </li> <li class="alt"><span> context.stroke(); </span></li> <li><span> </span></li> <li class="alt"><span> context.beginPath(); </span></li> <li><span> context.moveTo(500,100); </span></li> <li class="alt"><span> context.lineTo(700,300); </span></li> <li><span> context.lineTo(500,500); </span></li> <li class="alt"><span> context.lineWidth = 5; </span></li> <li> <span> context.strokeStyle = </span><span class="string">"black"</span><span>; </span> </li> <li class="alt"><span> context.stroke(); </span></li> <li><span> } </span></li> <li class="alt"><span></script>
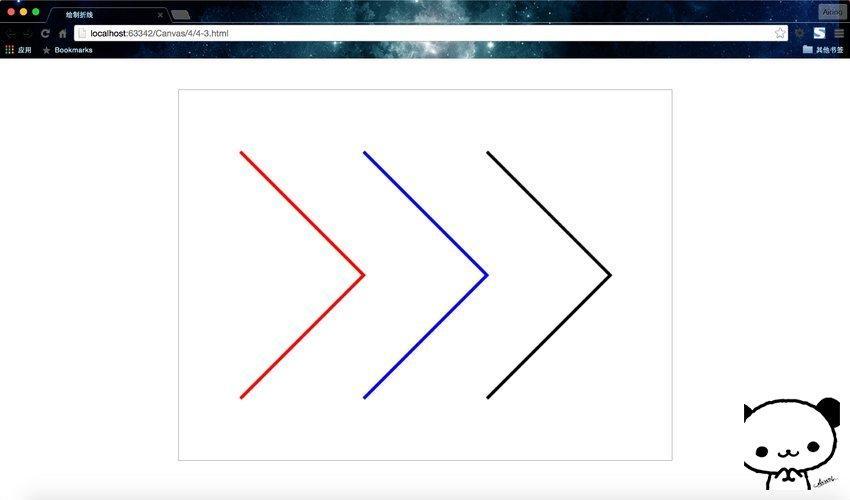
可以看到,这里得到了我们预想的结果。因为使用了beginPath(),所以这里的绘制过程如我们所想的那样,只绘制了三次,而且每次只绘制一条折线。beginPath()是绘制设置状态的起始点,它之后代码设置的绘制状态的作用域结束于绘制方法stroke()、fill()或者closePath(),至于closePath()之后会讲到。
所以我们每次开始绘制前都务必要使用beginPath(),为了代码的完整性,建议大家在每次绘制结束后使用closePath()。

Hot AI Tools

Undresser.AI Undress
AI-powered app for creating realistic nude photos

AI Clothes Remover
Online AI tool for removing clothes from photos.

Undress AI Tool
Undress images for free

Clothoff.io
AI clothes remover

Video Face Swap
Swap faces in any video effortlessly with our completely free AI face swap tool!

Hot Article
Hot Tools

Notepad++7.3.1
Easy-to-use and free code editor

SublimeText3 Chinese version
Chinese version, very easy to use

Zend Studio 13.0.1
Powerful PHP integrated development environment

Dreamweaver CS6
Visual web development tools

SublimeText3 Mac version
God-level code editing software (SublimeText3)
Hot Topics
 1392
1392
 52
52

 Table Border in HTML
Sep 04, 2024 pm 04:49 PM
Table Border in HTML
Sep 04, 2024 pm 04:49 PM
Guide to Table Border in HTML. Here we discuss multiple ways for defining table-border with examples of the Table Border in HTML.
 Nested Table in HTML
Sep 04, 2024 pm 04:49 PM
Nested Table in HTML
Sep 04, 2024 pm 04:49 PM
This is a guide to Nested Table in HTML. Here we discuss how to create a table within the table along with the respective examples.
 HTML margin-left
Sep 04, 2024 pm 04:48 PM
HTML margin-left
Sep 04, 2024 pm 04:48 PM
Guide to HTML margin-left. Here we discuss a brief overview on HTML margin-left and its Examples along with its Code Implementation.
 HTML Table Layout
Sep 04, 2024 pm 04:54 PM
HTML Table Layout
Sep 04, 2024 pm 04:54 PM
Guide to HTML Table Layout. Here we discuss the Values of HTML Table Layout along with the examples and outputs n detail.
 HTML Input Placeholder
Sep 04, 2024 pm 04:54 PM
HTML Input Placeholder
Sep 04, 2024 pm 04:54 PM
Guide to HTML Input Placeholder. Here we discuss the Examples of HTML Input Placeholder along with the codes and outputs.
 Moving Text in HTML
Sep 04, 2024 pm 04:45 PM
Moving Text in HTML
Sep 04, 2024 pm 04:45 PM
Guide to Moving Text in HTML. Here we discuss an introduction, how marquee tag work with syntax and examples to implement.
 HTML Ordered List
Sep 04, 2024 pm 04:43 PM
HTML Ordered List
Sep 04, 2024 pm 04:43 PM
Guide to the HTML Ordered List. Here we also discuss introduction of HTML Ordered list and types along with their example respectively
 HTML onclick Button
Sep 04, 2024 pm 04:49 PM
HTML onclick Button
Sep 04, 2024 pm 04:49 PM
Guide to HTML onclick Button. Here we discuss their introduction, working, examples and onclick Event in various events respectively.
