

Using Pjax technology in ThinkPHP6

With the continuous development of Web technology, website access speeds are becoming faster and faster. However, for some applications that require frequent page refreshes, such as blogs, news sites, or social media, even with a fast website, users still need to wait for each page to be fully loaded before they can obtain information or perform some operations. Pjax technology can help solve this problem, and using Pjax in ThinkPHP6 is also quite easy.
What is Pjax?
The whole process of Pjax is PushState Ajax. Simply put, it is a technique that partially refreshes the page to update the content of the website without refreshing the entire page. Pjax uses JavaScript and XMLHttpRequest technology to achieve this, combined with the new pushState API in HTML5 to enable the browser's URL to remain unchanged.
In Pjax, each page is divided into multiple parts, called "containers". Only update specific containers when the user clicks a link or submits a form. For example, in a blog page, one container can contain a list of all posts, while another container can display details of a selected post. The benefit of this is that specific content can be loaded faster, thereby improving the speed and performance of the website, while also improving the user experience.
Using Pjax in ThinkPHP6
To use Pjax in ThinkPHP6, you first need to install the Pjax plug-in. Install it like this:
composer require ngyuki/pjax
Then add the following code in the controller to enable pjax:
if ($this->request->isPjax()) {
    // 如果是Pjax请求,禁用布局文件
    $this->view->engine->layout(false);
}In the view file, add the following code to determine which containers should be updated in the Pjax request:
// 设置pjax容器
<div id="pjax-container">
    <?php echo $content; ?>
</div>

// 将pjax链接添加到页面
<a href="http://www.example.com/page" data-pjax="#pjax-container">下一页</a>Here, #pjax-container is the ID of the container that needs to be updated, and the data-pjax attribute tells the browser which links should be processed in the Pjax request. When a user clicks a link, only the content within the container will update, while other page elements such as the header and footer will remain unchanged.
When you need to use the backend to render the view, you can set a pjax variable on the template. If pjax is enabled, ajax layout can be used. For example:
// 启用Pjax时使用不同的布局
if ($pjax) {
    $this->view->engine->layout('layouts/ajax');
}In an ajax layout file, all header files, navigation and footer tags are usually removed to improve loading speed, and the corresponding content is replaced with JavaScript code.
Summary
Pjax technology can help you achieve faster page loading speeds and improve user experience. Using Pjax in ThinkPHP6 is also quite easy. You just need to install the Pjax plug-in, enable Pjax requests and determine the Pjax container. When using Pjax, you can also use corresponding backend rendering views to further improve performance.
The above is the detailed content of Using Pjax technology in ThinkPHP6. For more information, please follow other related articles on the PHP Chinese website!

Hot AI Tools

Undresser.AI Undress
AI-powered app for creating realistic nude photos

AI Clothes Remover
Online AI tool for removing clothes from photos.

Undress AI Tool
Undress images for free

Clothoff.io
AI clothes remover

Video Face Swap
Swap faces in any video effortlessly with our completely free AI face swap tool!

Hot Article
Hot Tools

Notepad++7.3.1
Easy-to-use and free code editor

SublimeText3 Chinese version
Chinese version, very easy to use

Zend Studio 13.0.1
Powerful PHP integrated development environment

Dreamweaver CS6
Visual web development tools

SublimeText3 Mac version
God-level code editing software (SublimeText3)
Hot Topics
 1386
1386
 52
52

 How to run thinkphp project
Apr 09, 2024 pm 05:33 PM
How to run thinkphp project
Apr 09, 2024 pm 05:33 PM
To run the ThinkPHP project, you need to: install Composer; use Composer to create the project; enter the project directory and execute php bin/console serve; visit http://localhost:8000 to view the welcome page.
 The Stable Diffusion 3 paper is finally released, and the architectural details are revealed. Will it help to reproduce Sora?
Mar 06, 2024 pm 05:34 PM
The Stable Diffusion 3 paper is finally released, and the architectural details are revealed. Will it help to reproduce Sora?
Mar 06, 2024 pm 05:34 PM
StableDiffusion3’s paper is finally here! This model was released two weeks ago and uses the same DiT (DiffusionTransformer) architecture as Sora. It caused quite a stir once it was released. Compared with the previous version, the quality of the images generated by StableDiffusion3 has been significantly improved. It now supports multi-theme prompts, and the text writing effect has also been improved, and garbled characters no longer appear. StabilityAI pointed out that StableDiffusion3 is a series of models with parameter sizes ranging from 800M to 8B. This parameter range means that the model can be run directly on many portable devices, significantly reducing the use of AI
 This article is enough for you to read about autonomous driving and trajectory prediction!
Feb 28, 2024 pm 07:20 PM
This article is enough for you to read about autonomous driving and trajectory prediction!
Feb 28, 2024 pm 07:20 PM
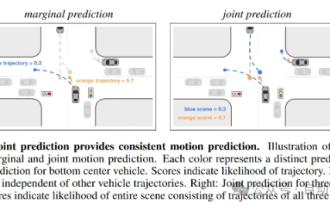
Trajectory prediction plays an important role in autonomous driving. Autonomous driving trajectory prediction refers to predicting the future driving trajectory of the vehicle by analyzing various data during the vehicle's driving process. As the core module of autonomous driving, the quality of trajectory prediction is crucial to downstream planning control. The trajectory prediction task has a rich technology stack and requires familiarity with autonomous driving dynamic/static perception, high-precision maps, lane lines, neural network architecture (CNN&GNN&Transformer) skills, etc. It is very difficult to get started! Many fans hope to get started with trajectory prediction as soon as possible and avoid pitfalls. Today I will take stock of some common problems and introductory learning methods for trajectory prediction! Introductory related knowledge 1. Are the preview papers in order? A: Look at the survey first, p
 There are several versions of thinkphp
Apr 09, 2024 pm 06:09 PM
There are several versions of thinkphp
Apr 09, 2024 pm 06:09 PM
ThinkPHP has multiple versions designed for different PHP versions. Major versions include 3.2, 5.0, 5.1, and 6.0, while minor versions are used to fix bugs and provide new features. The latest stable version is ThinkPHP 6.0.16. When choosing a version, consider the PHP version, feature requirements, and community support. It is recommended to use the latest stable version for best performance and support.
 How to run thinkphp
Apr 09, 2024 pm 05:39 PM
How to run thinkphp
Apr 09, 2024 pm 05:39 PM
Steps to run ThinkPHP Framework locally: Download and unzip ThinkPHP Framework to a local directory. Create a virtual host (optional) pointing to the ThinkPHP root directory. Configure database connection parameters. Start the web server. Initialize the ThinkPHP application. Access the ThinkPHP application URL and run it.
 DualBEV: significantly surpassing BEVFormer and BEVDet4D, open the book!
Mar 21, 2024 pm 05:21 PM
DualBEV: significantly surpassing BEVFormer and BEVDet4D, open the book!
Mar 21, 2024 pm 05:21 PM
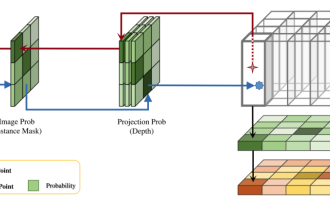
This paper explores the problem of accurately detecting objects from different viewing angles (such as perspective and bird's-eye view) in autonomous driving, especially how to effectively transform features from perspective (PV) to bird's-eye view (BEV) space. Transformation is implemented via the Visual Transformation (VT) module. Existing methods are broadly divided into two strategies: 2D to 3D and 3D to 2D conversion. 2D-to-3D methods improve dense 2D features by predicting depth probabilities, but the inherent uncertainty of depth predictions, especially in distant regions, may introduce inaccuracies. While 3D to 2D methods usually use 3D queries to sample 2D features and learn the attention weights of the correspondence between 3D and 2D features through a Transformer, which increases the computational and deployment time.
 Which one is better, laravel or thinkphp?
Apr 09, 2024 pm 03:18 PM
Which one is better, laravel or thinkphp?
Apr 09, 2024 pm 03:18 PM
Performance comparison of Laravel and ThinkPHP frameworks: ThinkPHP generally performs better than Laravel, focusing on optimization and caching. Laravel performs well, but for complex applications, ThinkPHP may be a better fit.
 How to install thinkphp
Apr 09, 2024 pm 05:42 PM
How to install thinkphp
Apr 09, 2024 pm 05:42 PM
ThinkPHP installation steps: Prepare PHP, Composer, and MySQL environments. Create projects using Composer. Install the ThinkPHP framework and dependencies. Configure database connection. Generate application code. Launch the application and visit http://localhost:8000.
