

Create a portal using the Yii framework

With the development of Internet technology, portals have attracted more and more attention. Portal website is a basic network application. It mainly provides information services and integrates multiple functional modules, such as news, forums, communities, e-commerce, etc. It has good user experience and efficient data management capabilities. It is an important part of today's An essential application form in the information age.
It is very important to choose an efficient, simple and easy-to-use framework when developing a portal website. This article introduces the Yii framework, an efficient PHP framework, which has the following advantages when developing portals:
1. High speed: The Yii framework uses high-performance Caching technology to cache frequently accessed data and As a result, the response speed of the website is improved.
2. Security: The Yii framework has built-in multiple security layers, including input verification, output filtering, authorization and identity verification, etc. to ensure the security of the website.
3. Ease of use: The Yii framework has a clear and simple architecture and adopts the MVC pattern, allowing developers to easily manage website code and databases.
Below we will take the development of a portal website as an example to introduce the application of Yii framework.
Step One: Environment Setup
The Yii framework requires the environment PHP version >=5.4 and supports MySQL database. In this article, the environment we use is Apache2.4 PHP5.6 MySQL5.7.
After installing the corresponding software, you need to download the Yii framework code and extract it to the WEB directory. The platform is available on the Yii official website.
Step 2: Create Yii Application
In this step, we will create a Yii application renamed "demo". Creating a Yii application is very easy, just execute the following command:
$ cd /path/to/webroot
$php/ yii
$ ./yii startapp demo
In this way, an application named demo will be generated in the webroot directory. Among them, the command php/yii is the command to install Yii in the current directory, and can be changed according to the actual situation.
Step 3: Deploy code and database
After creating the Yii application, you need to deploy the core code of the website and related database scripts. In this example, we deploy the code to the webroot/demo directory. In this directory, we will create the following document structure:
.
├── assets
├── commands
├── components
├── config
├── controllers
├── mail
├── models
├── runtime
├── tests
├── vendor
└── views
In the config folder, we need to configure the relevant parameters of the website, including database connection information, user authentication information, URL routing rules, etc. Relevant settings need to be made in the config/main.php file.
Step 4: Write the controller
In the Yii framework, the controller (Controller) is responsible for processing user requests and sending the results to the view (View). We need to create a Home controller to handle the home page request of the website. The code is as follows:
namespace appcontrollers;
use Yii;
use yiiwebController;
class HomeController extends Controller{
4c9b701163759e328375d220e08dd739In this example, we simply A Hello World sentence is output. In actual development, we can write corresponding HTML code according to needs to achieve the functions required by the website.
Step Six: Access the Portal
Now, we have completed the development of the Yii portal. To access the website, you can point the domain name to the WEB directory where the website is located and enter the following address:
http://localhost/demo/
When accessing the website, the Yii framework will automatically call The actionIndex method of the HomeController controller and renders the corresponding view template.
Summary
Through the above steps, we have completed the process of creating a portal using the Yii framework. The Yii framework has a clear architecture and simple code, providing developers with a more efficient portal development solution. If you are looking for an easy-to-use, efficient, and secure PHP framework to develop your own portal, then the Yii framework is a good choice.
The above is the detailed content of Create a portal using the Yii framework. For more information, please follow other related articles on the PHP Chinese website!

Hot AI Tools

Undresser.AI Undress
AI-powered app for creating realistic nude photos

AI Clothes Remover
Online AI tool for removing clothes from photos.

Undress AI Tool
Undress images for free

Clothoff.io
AI clothes remover

AI Hentai Generator
Generate AI Hentai for free.
Hot Article
Hot Tools

Notepad++7.3.1
Easy-to-use and free code editor

SublimeText3 Chinese version
Chinese version, very easy to use

Zend Studio 13.0.1
Powerful PHP integrated development environment

Dreamweaver CS6
Visual web development tools

SublimeText3 Mac version
God-level code editing software (SublimeText3)
Hot Topics
 1377
1377
 52
52

 How to create a constant in Python?
Aug 29, 2023 pm 05:17 PM
How to create a constant in Python?
Aug 29, 2023 pm 05:17 PM
Constants and variables are used to store data values in programming. A variable usually refers to a value that can change over time. A constant is a type of variable whose value cannot be changed during program execution. There are only six built-in constants available in Python, they are False, True, None, NotImplemented, Ellipsis(...) and __debug__. Apart from these constants, Python does not have any built-in data types to store constant values. Example An example of a constant is demonstrated below - False=100 outputs SyntaxError:cannotassigntoFalseFalse is a built-in constant in Python that is used to store boolean values
 How to personalize your iPhone on the latest iOS 17
Sep 21, 2023 am 08:17 AM
How to personalize your iPhone on the latest iOS 17
Sep 21, 2023 am 08:17 AM
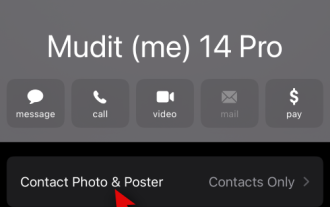
How to Personalize Calls on iPhone Apple’s iOS 17 introduces a new feature called Contact Posters that allows you to personalize the look of your call screen on your iPhone. This feature allows you to design a poster using selected photos, colors, fonts, and Memoji as contact cards. So when you make a call, your custom image will appear on the recipient's iPhone exactly as you envisioned. You can choose to share your unique contact poster with all your saved contacts, or choose who can see it. Likewise, during a call exchange, you will also see other people's contact posters. Additionally, Apple lets you set specific contact photos for individual contacts, making calls from those contacts
 How to create pixel art in GIMP
Feb 19, 2024 pm 03:24 PM
How to create pixel art in GIMP
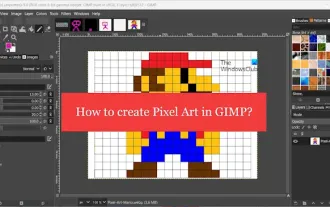
Feb 19, 2024 pm 03:24 PM
This article will interest you if you are interested in using GIMP for pixel art creation on Windows. GIMP is a well-known graphics editing software that is not only free and open source, but also helps users create beautiful images and designs easily. In addition to being suitable for beginners and professional designers alike, GIMP can also be used to create pixel art, a form of digital art that utilizes pixels as the only building blocks for drawing and creating. How to Create Pixel Art in GIMP Here are the main steps to create pixel pictures using GIMP on a Windows PC: Download and install GIMP, then launch the application. Create a new image. Resize width and height. Select the pencil tool. Set the brush type to pixels. set up
 How to create a folder on Realme Phone?
Mar 23, 2024 pm 02:30 PM
How to create a folder on Realme Phone?
Mar 23, 2024 pm 02:30 PM
Title: Realme Phone Beginner’s Guide: How to Create Folders on Realme Phone? In today's society, mobile phones have become an indispensable tool in people's lives. As a popular smartphone brand, Realme Phone is loved by users for its simple and practical operating system. In the process of using Realme phones, many people may encounter situations where they need to organize files and applications on their phones, and creating folders is an effective way. This article will introduce how to create folders on Realme phones to help users better manage their phone content. No.
 How to create a family with Gree+
Mar 01, 2024 pm 12:40 PM
How to create a family with Gree+
Mar 01, 2024 pm 12:40 PM
Many friends expressed that they want to know how to create a family in Gree+ software. Here is the operation method for you. Friends who want to know more, come and take a look with me. First, open the Gree+ software on your mobile phone and log in. Then, in the options bar at the bottom of the page, click the "My" option on the far right to enter the personal account page. 2. After coming to my page, there is a "Create Family" option under "Family". After finding it, click on it to enter. 3. Next jump to the page to create a family, enter the family name to be set in the input box according to the prompts, and click the "Save" button in the upper right corner after entering it. 4. Finally, a "save successfully" prompt will pop up at the bottom of the page, indicating that the family has been successfully created.
 How to create user interface via Python?
Aug 26, 2023 am 09:17 AM
How to create user interface via Python?
Aug 26, 2023 am 09:17 AM
In this article, we will learn how to create user interface using python. What is a graphical user interface? The term "graphical user interface" (or "GUI") refers to a set of visual element items that can be interacted with in computer software to display information and interact. In response to human input, objects may change appearance characteristics such as color, size, and visibility. Graphical components such as icons, cursors, and buttons can be enhanced with audio or visual effects (such as transparency) to create graphical user interfaces (GUIs). If you want more people to use your platform, you need to make sure it has a good user interface. This is because the combination of these factors can greatly affect the quality of service provided by your app or website. Python is widely used by developers because it provides
 How to create a Gantt chart using Highcharts
Dec 17, 2023 pm 07:23 PM
How to create a Gantt chart using Highcharts
Dec 17, 2023 pm 07:23 PM
How to use Highcharts to create a Gantt chart requires specific code examples. Introduction: The Gantt chart is a chart form commonly used to display project progress and time management. It can visually display the start time, end time and progress of the task. Highcharts is a powerful JavaScript chart library that provides rich chart types and flexible configuration options. This article will introduce how to use Highcharts to create a Gantt chart and give specific code examples. 1. Highchart
 A first look at Django: Create your first Django project using the command line
Feb 19, 2024 am 09:56 AM
A first look at Django: Create your first Django project using the command line
Feb 19, 2024 am 09:56 AM
Start the journey of Django project: start from the command line and create your first Django project. Django is a powerful and flexible web application framework. It is based on Python and provides many tools and functions needed to develop web applications. This article will lead you to create your first Django project starting from the command line. Before starting, make sure you have Python and Django installed. Step 1: Create the project directory First, open the command line window and create a new directory
