

Eight mysterious uses of the '!' operator in Linux commands

In different shells, the usage of most Linux commands using the '!' symbol may vary. While the examples I provide are typically used in bash shells, some other Linux shells may have different implementations or may not support certain uses of the '!' symbol at all.
Let’s dive into the surprising and mysterious uses of the ‘!’ symbol in Linux commands.

1. Use the command number to run a command from the history
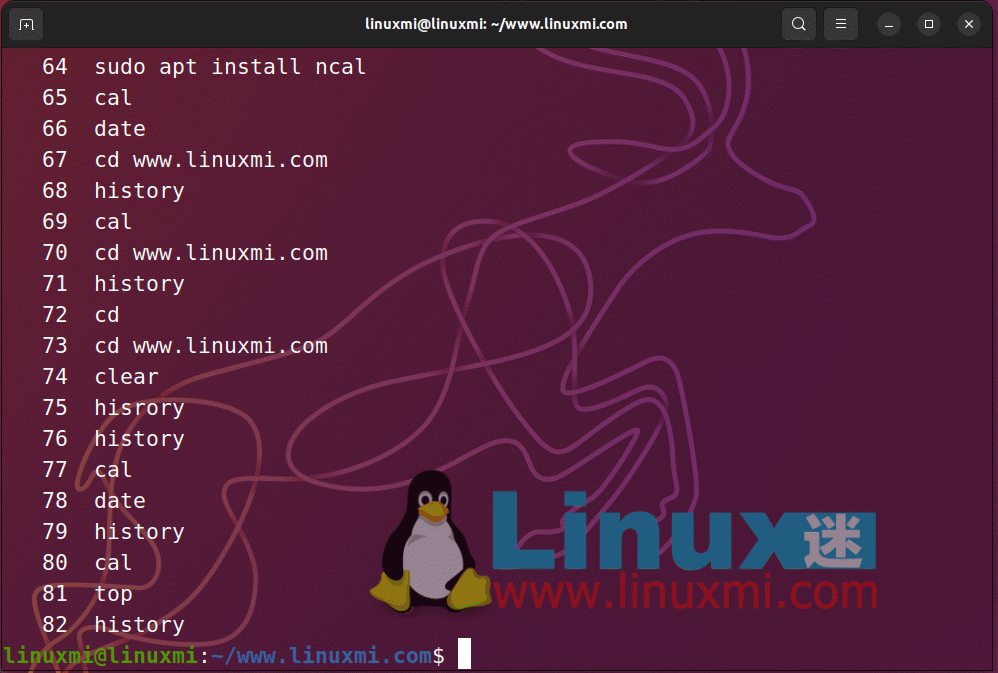
A useful tip is that you can run a command from a previously executed Find the historical command in the command and run it again. First, find the number of the command by running the 'history' command.
1 |
|
Find recently executed commands in Linux
To run a command from history by command number, you can use the '!' symbol followed by the command number ,As follows.
1 |
|
Run command by command number
When you execute the above command, it will run the command at line 58 in the history.
Please note that the actual command number may vary depending on your command history. You can use the history command to view a list of commands and their line numbers.
2. Run previously executed commands in Linux
You can run previously executed commands in the order in which they are run. The last command run will be expressed as -1, the second to last is -2, the seventh to last is -7, and so on. You can use !-n, where n is the reciprocal number of the command you want to quote. As shown below
1 |
|
Rerun the command in Linux
3. Pass the parameters of the previous command to the new command
I needed to list the contents of the directory '/home/linuxmi/snap', so I executed the following command:
1 |
|
Then I realized that I should run the "ls -l" command to see which files Executable. Instead of retyping the entire command, just pass the parameters of the previous command to this new command, like this:
1 |
|
Here, '!$' will be The parameters passed in the previous command are passed to this new command.
4. How to handle two or more parameters in the command
Suppose I create a text file named 1.txt on the desktop.
1 |
|
Then copy it to the '/home/avi/Downloads' directory using the full path, using the cp command.
1 |
|
Now we pass two parameters in the cp command. The first one is '/home/avi/Desktop/1.txt' and the second one is '/home/avi/Downloads'. We can print two parameters in different ways by executing the echo command and using different parameters.
1 |
|
Please note that the first parameter can be displayed as "!^", while other parameters can be printed by executing "![Command Name]:[Parameter Number]".
In the above example, the first command is 'cp' and the second parameter needs to be printed. Hence "!cp:2". For the xyz command with 5 parameters, if you need to get the 4th parameter, you can use "!xyz:4" and use that parameter as needed. All parameters can be accessed via "!*".
Processing two or more parameters
5. Run the latest command based on specific keywords
We can execute recently executed commands based on keywords. The details are as follows:
1 |
|
Here we use the ls command, but with different options and different folders. Also, to keep the console clean, we will send the output of each command to "/dev/null".
Now execute the last executed command based on the keyword:
1 |
|
检查输出,你会惊讶地发现你正在运行已经执行过的命令,只是使用了ls关键词。
6、在Linux中重复上次执行的命令
你可以使用(!!)操作符来运行/修改你上次执行的命令,这是一个简写符号,允许你引用在命令行中执行的上一个命令。
例如,我运行了一个单行脚本来查找Linux机器的IP地址:
1 |
|
然后突然我发现我需要将上述脚本的输出重定向到一个名为ip.txt的文件中,那么我该怎么办呢?我需要重新输入整个命令并将输出重定向到文件吗?好吧,一个简单的解决方案是使用上箭头键来调出上一条命令,并在末尾添加’> ip.txt’来将输出重定向到文件。
1 |
|
感谢上箭头键的救命作用。现在考虑以下情况,下次我运行下面的单行脚本。
1 |
|
当我运行脚本时,bash提示返回了一个错误,信息为“bash: ifconfig: command not found”,我很容易猜到我以一个普通用户的身份运行了这个命令,而它应该以root身份运行。
那么解决办法是什么呢?登录为root然后重新输入整个命令是很困难的!在上一个示例中的(上箭头键)在这里也无法帮助。所以,要调用用户的最后一个命令,需要输入“!!”(不需要引号)
1 |
|
这里的su是切换用户的命令,root是要切换到的用户,-c是以指定的用户身份运行命令的选项,最重要的部分是!!将被替换为上次运行的命令。是的!你需要提供root密码。
7、使用’!’操作符删除除一个文件之外的所有文件
在Linux中,’!’操作符(也称为”bang”操作符)用于历史扩展,它允许你引用先前的命令并对其执行各种操作。要从目录中删除除了特定文件(important_file.txt)之外的所有文件,可以使用带有’!’操作符的rm命令,如下所示。
1 |
|
要从文件夹中删除除了扩展名为’.pdf’之外的所有文件类型。
1 |
|
8、检查Linux中的目录是否存在
在这里,我们将使用’! -d’来验证目录是否存在,如果目录不存在,则紧随其后的是逻辑与操作符(&&),打印出目录不存在,如果目录存在,则紧随其后的是逻辑或操作符(||),打印出目录存在。
逻辑是,当[ ! -d /home/linuxmi/linuxmi.com ]的输出为0时,它将执行逻辑与之后的内容,否则它将转到逻辑或(||)并执行逻辑或之后的内容。
1 |
|
类似于上面的条件,但是如果所需目录不存在,它将退出命令。
1 |
|
在脚本语言中的一般实现,如果所需目录不存在,它将创建一个目录。
1 |
|
The above is the detailed content of Eight mysterious uses of the '!' operator in Linux commands. For more information, please follow other related articles on the PHP Chinese website!

Hot AI Tools

Undresser.AI Undress
AI-powered app for creating realistic nude photos

AI Clothes Remover
Online AI tool for removing clothes from photos.

Undress AI Tool
Undress images for free

Clothoff.io
AI clothes remover

Video Face Swap
Swap faces in any video effortlessly with our completely free AI face swap tool!
Hot Article
Hot Tools

Notepad++7.3.1
Easy-to-use and free code editor

SublimeText3 Chinese version
Chinese version, very easy to use

Zend Studio 13.0.1
Powerful PHP integrated development environment

Dreamweaver CS6
Visual web development tools

SublimeText3 Mac version
God-level code editing software (SublimeText3)
Hot Topics
 1393
1393
 52
1207
24
52
1207
24

 What computer configuration is required for vscode
Apr 15, 2025 pm 09:48 PM
What computer configuration is required for vscode
Apr 15, 2025 pm 09:48 PM
VS Code system requirements: Operating system: Windows 10 and above, macOS 10.12 and above, Linux distribution processor: minimum 1.6 GHz, recommended 2.0 GHz and above memory: minimum 512 MB, recommended 4 GB and above storage space: minimum 250 MB, recommended 1 GB and above other requirements: stable network connection, Xorg/Wayland (Linux)
 vscode cannot install extension
Apr 15, 2025 pm 07:18 PM
vscode cannot install extension
Apr 15, 2025 pm 07:18 PM
The reasons for the installation of VS Code extensions may be: network instability, insufficient permissions, system compatibility issues, VS Code version is too old, antivirus software or firewall interference. By checking network connections, permissions, log files, updating VS Code, disabling security software, and restarting VS Code or computers, you can gradually troubleshoot and resolve issues.
 How to run java code in notepad
Apr 16, 2025 pm 07:39 PM
How to run java code in notepad
Apr 16, 2025 pm 07:39 PM
Although Notepad cannot run Java code directly, it can be achieved by using other tools: using the command line compiler (javac) to generate a bytecode file (filename.class). Use the Java interpreter (java) to interpret bytecode, execute the code, and output the result.
 Can vscode be used for mac
Apr 15, 2025 pm 07:36 PM
Can vscode be used for mac
Apr 15, 2025 pm 07:36 PM
VS Code is available on Mac. It has powerful extensions, Git integration, terminal and debugger, and also offers a wealth of setup options. However, for particularly large projects or highly professional development, VS Code may have performance or functional limitations.
 What is vscode What is vscode for?
Apr 15, 2025 pm 06:45 PM
What is vscode What is vscode for?
Apr 15, 2025 pm 06:45 PM
VS Code is the full name Visual Studio Code, which is a free and open source cross-platform code editor and development environment developed by Microsoft. It supports a wide range of programming languages and provides syntax highlighting, code automatic completion, code snippets and smart prompts to improve development efficiency. Through a rich extension ecosystem, users can add extensions to specific needs and languages, such as debuggers, code formatting tools, and Git integrations. VS Code also includes an intuitive debugger that helps quickly find and resolve bugs in your code.
 How to use VSCode
Apr 15, 2025 pm 11:21 PM
How to use VSCode
Apr 15, 2025 pm 11:21 PM
Visual Studio Code (VSCode) is a cross-platform, open source and free code editor developed by Microsoft. It is known for its lightweight, scalability and support for a wide range of programming languages. To install VSCode, please visit the official website to download and run the installer. When using VSCode, you can create new projects, edit code, debug code, navigate projects, expand VSCode, and manage settings. VSCode is available for Windows, macOS, and Linux, supports multiple programming languages and provides various extensions through Marketplace. Its advantages include lightweight, scalability, extensive language support, rich features and version
 What is the main purpose of Linux?
Apr 16, 2025 am 12:19 AM
What is the main purpose of Linux?
Apr 16, 2025 am 12:19 AM
The main uses of Linux include: 1. Server operating system, 2. Embedded system, 3. Desktop operating system, 4. Development and testing environment. Linux excels in these areas, providing stability, security and efficient development tools.
 How to check the warehouse address of git
Apr 17, 2025 pm 01:54 PM
How to check the warehouse address of git
Apr 17, 2025 pm 01:54 PM
To view the Git repository address, perform the following steps: 1. Open the command line and navigate to the repository directory; 2. Run the "git remote -v" command; 3. View the repository name in the output and its corresponding address.
