How to fill in the default gateway of the router in Win11 system
How to fill in the default gateway of the Win11 system router? The default gateway means that if a host cannot find an available gateway, it will send the data packet to the default designated gateway, and this gateway will process the data packet. So how to fill in the default gateway of the router in Win11 system? Many friends don’t know how to operate in detail. The editor below has compiled the steps to fill in the default gateway of the Win11 system router. If you are interested, follow the editor to take a look below!

Steps to fill in the default gateway of the router in Win11 system
What is the default gateway of the router?
The default gateway of the wireless router is: you can view it after setting the router to dial.
Method 1: The computer enters the router
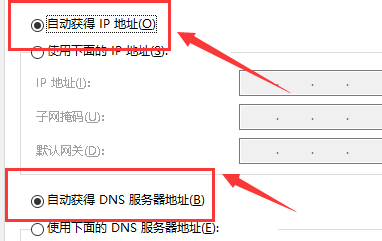
1. The computer IP and dns settings are automatically obtained.
2. Open the browser, enter 192.168.1.1 in the address bar, then enter routing and enter the user name and password.
Method 2: Set up router dial-up
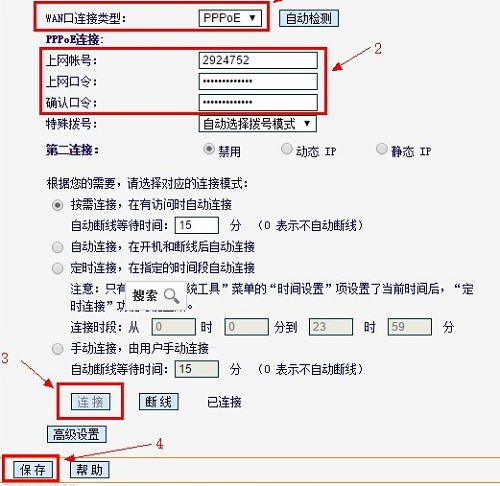
1. In the setup wizard, select PPPoE dial-up, and then follow the prompts to enter your user name and password for Internet access. and save.
2. Then in the network parameters--WAN settings, select normal mode, and among the three connection options,
select PPPoE dial-up.
As shown in the figure, select automatic connection, save and exit.
Method 3:
1. Automatically obtain the computer IP and DNS settings.
2. Open the browser, enter 192.168.1.1 in the address bar, enter routing - enter the user name and password (the default is usually admin).
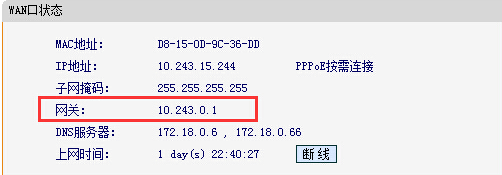
3. Click the running status---LAN port status and wan port status to view.

How to fill in the default gateway of the router
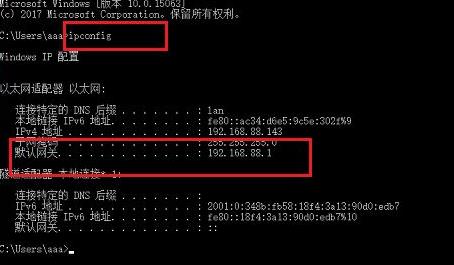
1. First press the shortcut key win r to open the run, and then enter ipconfig ,
Then you can see your default gateway.
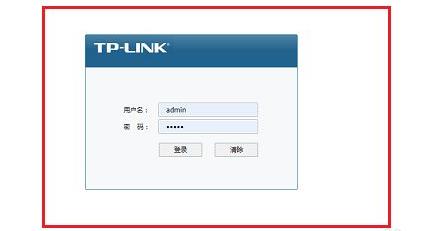
2. Then enter the default gateway in the browser address and log in to the account.
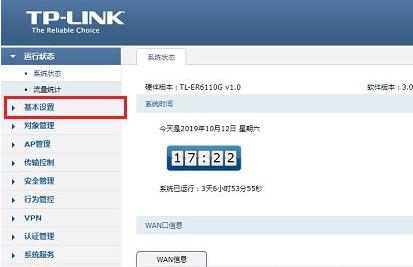
3. Then click on Basic Settings on the left.
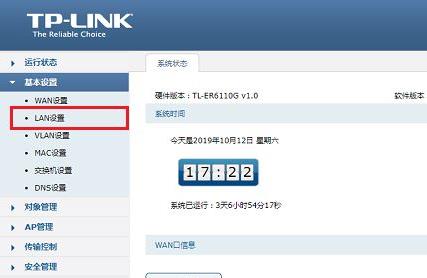
4. Then select the lan settings inside.
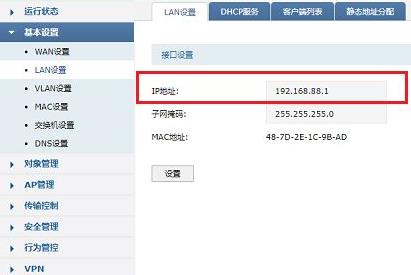
5. Finally, you will see your default gateway, click to set it.
The above is the detailed content of How to fill in the default gateway of the router in Win11 system. For more information, please follow other related articles on the PHP Chinese website!

Hot AI Tools

Undresser.AI Undress
AI-powered app for creating realistic nude photos

AI Clothes Remover
Online AI tool for removing clothes from photos.

Undress AI Tool
Undress images for free

Clothoff.io
AI clothes remover

Video Face Swap
Swap faces in any video effortlessly with our completely free AI face swap tool!

Hot Article

Hot Tools

Notepad++7.3.1
Easy-to-use and free code editor

SublimeText3 Chinese version
Chinese version, very easy to use

Zend Studio 13.0.1
Powerful PHP integrated development environment

Dreamweaver CS6
Visual web development tools

SublimeText3 Mac version
God-level code editing software (SublimeText3)

Hot Topics
 1387
1387
 52
52
 How to check the default gateway on your mobile phone (Easily understand and set the default gateway of your mobile phone)
May 06, 2024 pm 06:28 PM
In order to perform network settings and troubleshooting, when using mobile phones to access the Internet, we often need to know the default gateway of the mobile phone. And to help readers understand relevant knowledge and operations, this article will introduce how to check the default gateway on the mobile phone. 1. What is the default gateway? It is responsible for sending data packets from the local network to the target network or device. The default gateway is the channel that connects the local network to the external network. 2. The importance of the default gateway. It determines how data packets enter and leave the mobile phone. The role of the default gateway on the mobile phone is similar to the doorway of a home. 3. Open the phone settings, find "Settings" on the home screen of the phone and click to enter the settings page and application icon. 4. Enter the network settings sliding screen and find it. Click "Network and Internet" on the settings page to enter the option. 5.
 Detailed explanation of the steps to obtain Win11 system administrator permissions
Mar 08, 2024 pm 09:09 PM
Windows 11, as the latest operating system launched by Microsoft, is deeply loved by users. In the process of using Windows 11, sometimes we need to obtain system administrator rights in order to perform some operations that require permissions. Next, we will introduce in detail the steps to obtain system administrator rights in Windows 11. The first step is to click "Start Menu". You can see the Windows icon in the lower left corner. Click the icon to open the "Start Menu". In the second step, find and click "
 How to solve the problem of default gateway automatically disappearing
Feb 24, 2024 pm 04:18 PM
How to solve the problem that the default gateway disappears automatically. In modern society, the Internet has become an indispensable part of people's lives. Whether for work or entertainment, we all need stable network connections to complete various tasks. The default gateway is one of the key elements connecting the local network to the external Internet. However, sometimes we may encounter the problem that the default gateway disappears automatically, resulting in the inability to access the Internet. So, how should we solve this problem when the default gateway disappears? First, we should clarify the concept of default gateway. The default gateway is a network route
 How to delete installed language pack in win10 system
Jan 06, 2024 pm 10:37 PM
When we use the win10 operating system, in some cases we may need to delete the language pack in the system. At this time, just find the language option first, then choose to add a language pack. During this process, uncheck the language pack to be deleted and then delete it. How to delete the installed language pack in win10 system: 1. Use win+i to open settings and find the time and language options. 2. Select the "Language" option in the time and language options. 3. Select "Add Language" and go to the next step. 4. Uncheck the language pack when adding a language. After the addition is completed, you can download the language pack and voice pack separately;
 How to initialize the computer in win7
Jan 07, 2024 am 11:53 AM
The win7 system is a very excellent high-performance system. During the continuous use of win7, many friends are asking how to initialize the computer in win7! Today, the editor will bring you how to restore the factory settings of a win7 computer. Related information on how to initialize the computer in win7: Detailed instructions with pictures and text. Steps: 1. Open the "Start Menu" and enter. 2. Click to enter the settings at the bottom of the left side. 3. In the Win10 update and recovery settings interface, select. 4. Click below "Remove all content and reinstall Windows". 5. You can see the following "Initialization" settings, and then click. 6. Enter the "Your computer has multiple drives" setting option. There are two options here, you can choose according to the situation.
 How to display file suffix under Win11 system? Detailed interpretation
Mar 09, 2024 am 08:24 AM
How to display file suffix under Win11 system? Detailed explanation: In the Windows 11 operating system, the file suffix refers to the dot after the file name and the characters after it, which is used to indicate the type of file. By default, the Windows 11 system hides the suffix of the file, so that you can only see the name of the file in the file explorer but cannot intuitively understand the file type. However, for some users, displaying file suffixes is necessary because it helps them better identify file types and perform related operations.
 How to implement dual system switching in Win10 system
Jan 03, 2024 pm 05:41 PM
Many friends may not be used to the win system when they first come into contact with it. There are dual systems in the computer. At this time, you can actually switch between the two systems. Let's take a look at the detailed steps for switching between the two systems. How to switch between two systems in win10 system 1. Shortcut key switching 1. Press the "win" + "R" keys to open Run 2. Enter "msconfig" in the run box and click "OK" 3. In the open "System Configuration" In the interface, select the system you need and click "Set as Default". After completion, "Restart" can complete the switch. Method 2. Select switch when booting 1. When you have dual systems, a selection operation interface will appear when booting. You can use the keyboard " Up and down keys to select the system
 How to install Windows 7 system on computer to Android phone
Jan 05, 2024 pm 06:41 PM
When we use the win7 operating system, we will inevitably encounter situations that require us to reinstall the system. So for the question of how to install the win7 system on an Android phone to a computer, the editor thinks that we first need to install a relevant emulator software on our phone, and then download the required operating system to our phone, and connect it to the computer to install it. operate. Let’s take a look at how the editor did it for detailed steps~ How to install win7 system on an Android phone on a computer 1. First download and install DriverDroid, and then set it up according to the setup wizard after running it. 2. Then note that the Android phone has obtained ROOT and needs to be connected to a computer during setup. 3. Move the bios file automatically downloaded by the phone to the image root directory (phone memory/D


