

How to view and refresh DNS cache on Linux

By flushing your local DNS cache, you can resolve HTTP errors and protect yourself from DNS spoofing. Here's how to do it on Linux.
When you visit a website using a domain name, your system sends a request to the DNS server to obtain the IP address for the domain. This domain IP address pair is saved in the DNS cache for later use, so you don't have to send a request to the DNS server every time to establish a connection.
But sometimes, the local DNS cache becomes corrupted and causes HTTP errors. Thankfully, flushing and rebuilding the DNS cache is very easy in Linux operating systems. Here's how it's done.

#Why do you need to flush the DNS cache on Linux?
There are several reasons why you might want to rebuild the DNS cache stored on your system. If your DNS record is out of date, you may want to re-obtain it from the DNS server. Additionally, if you are concerned that your system has been compromised, you may want to ensure that the DNS cache has not been tampered with, also known as DNS spoofing.
When you flush the DNS cache, the system must ping the DNS server again and obtain a new domain IP address record from it, removing any stale or corrupted data in the process.
How to view the local DNS cache on Linux
Before systemd, most Linux distributions did not have a system-wide DNS cache, unless something like dnsmasq or nscd The program is set up manually. systemd comes with systemd-solved, a service that resolves domain names to IP addresses and caches DNS entries.
The following sections will guide you on how to view the contents of the DNS cache generated by systemd resolution, nscd, and dnsmasq so that you can understand the cached data before you decide to flush the cached data.
View system-resolved DNS cache
To view systemd-resolved cache records, you need to temporarily stop the service and then export its logs to a file.
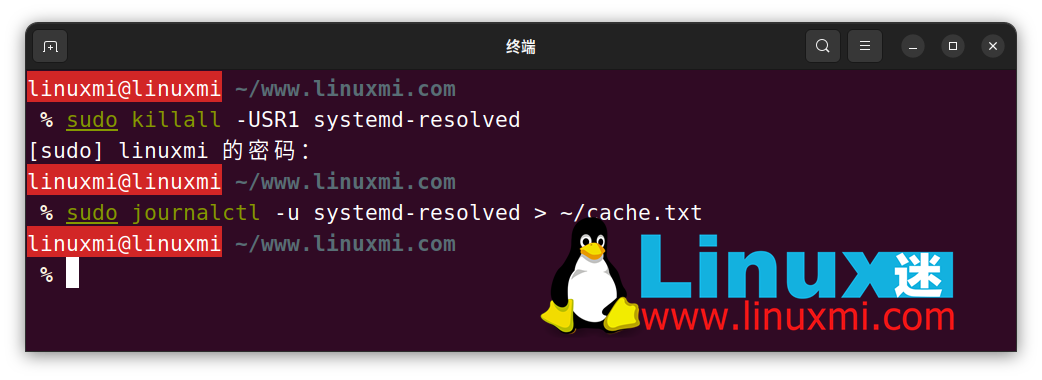
First send the SIGUSR1 signal to terminate the systemd parsed service:
linuxmi@linuxmi ~/www.linuxmi.com % sudo killall -USR1 systemd-resolved[sudo] linuxmi 的密码:
Use the journalctl command and the standard output operator to save the output to a text file:
linuxmi@linuxmi ~/www.linuxmi.com % sudo journalctl -u systemd-resolved > ~/cache.txtlinuxmi@linuxmi ~/www.linuxmi.com
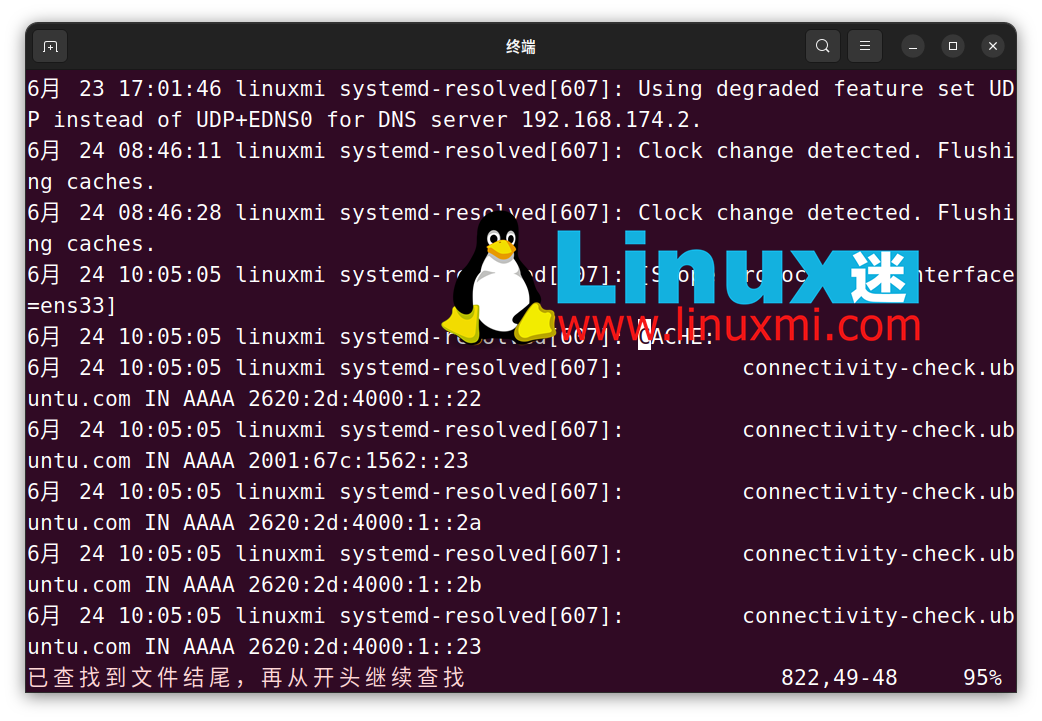
You can then view the contents of the file using a text editor such as Vim:
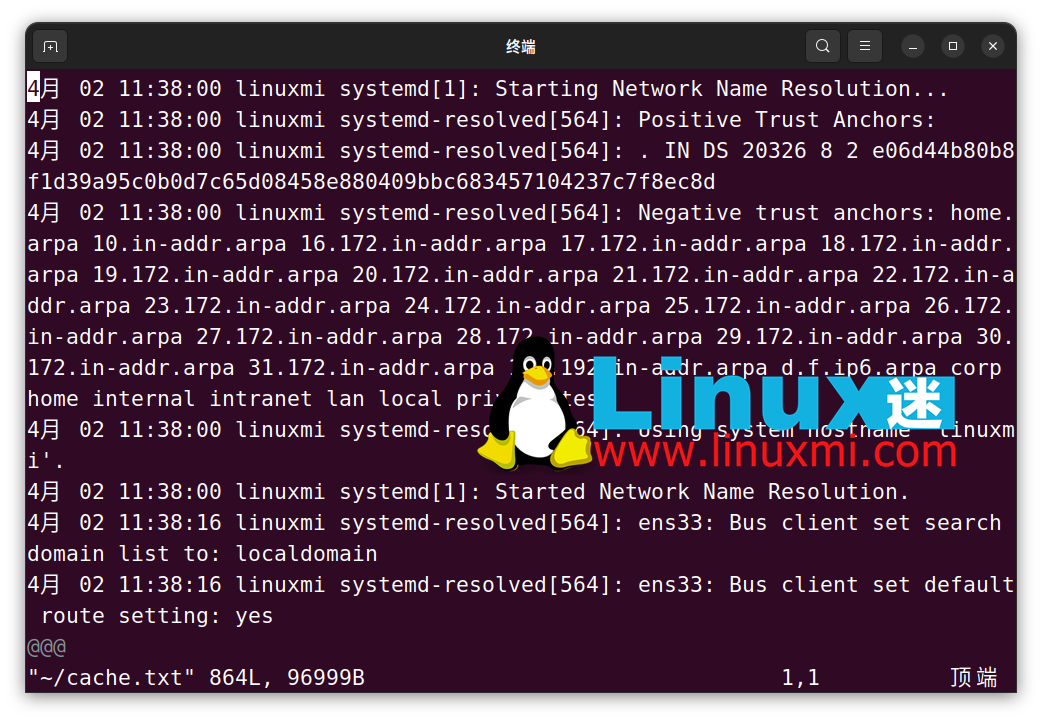
In the file, search for "CACHE:" by pressing Escape, Type "/CACHE:" and press Enter. All DNS records listed under "CACHE:" are included in the local DNS cache. If you are using Vim, press the n key to jump to the next set of DNS entries.
View the local DNS cache of nscd
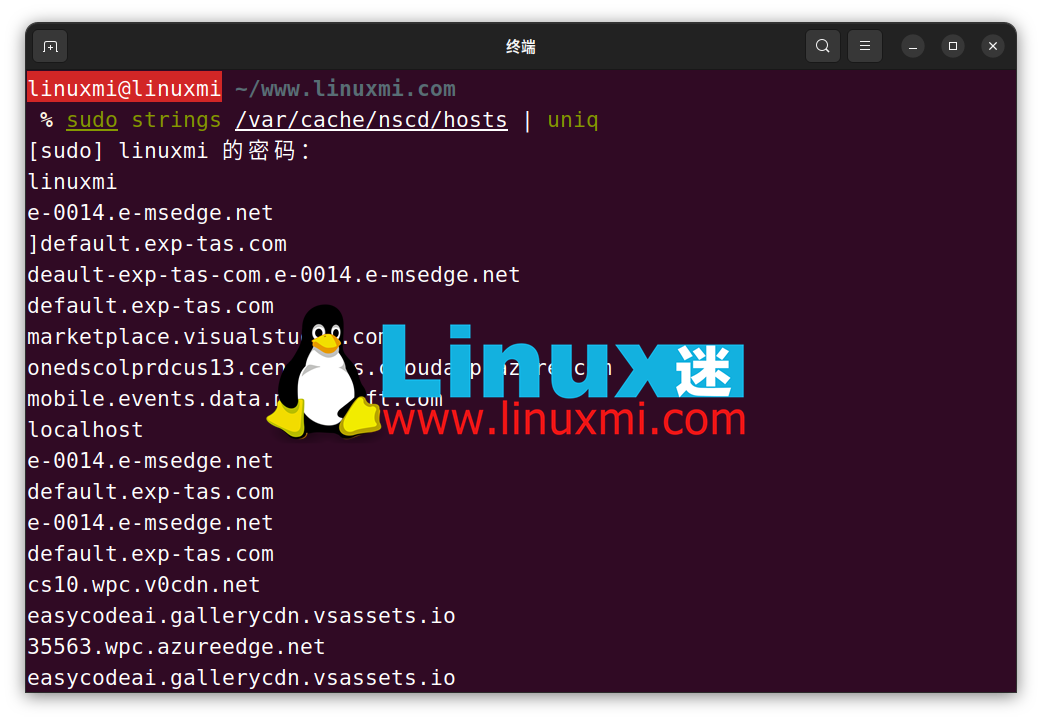
To view the local cache generated by nscd, you need to use the string command to read the nscd host The contents of the database.
On Debian and Ubuntu based distributions, this file is located in /var/cache/nscd/hosts. Run the following command to view the file:
linuxmi@linuxmi ~/www.linuxmi.com % sudo strings /var/cache/nscd/hosts | uniq
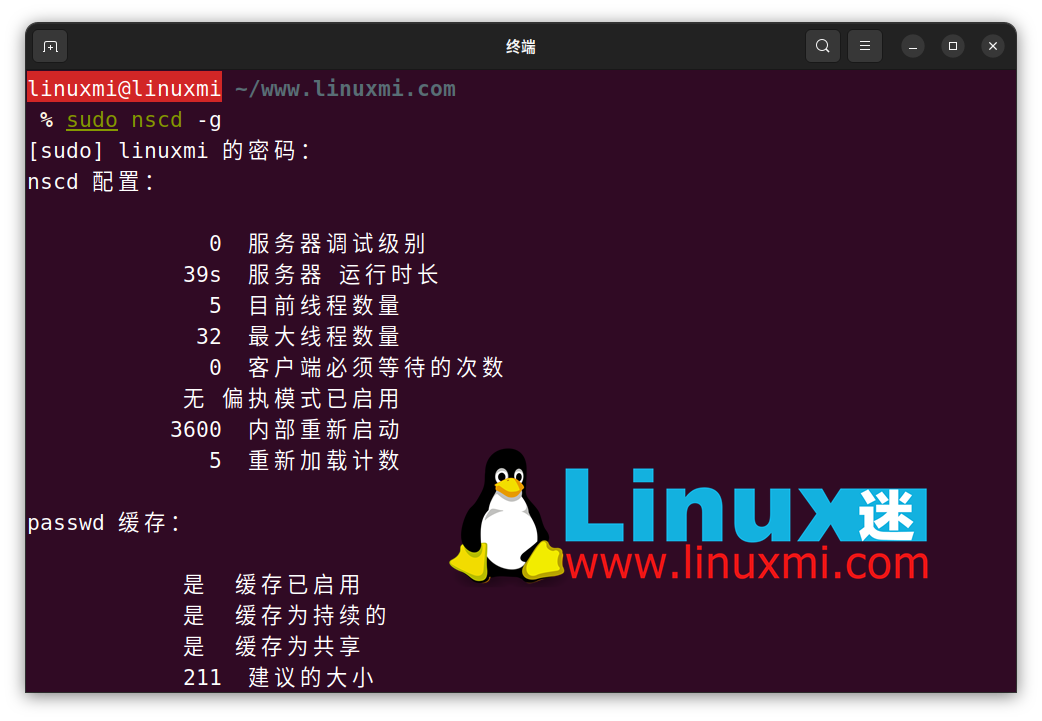
To view general statistics about the nscd DNS cache, use the -g flag:
linuxmi@linuxmi ~/www.linuxmi.com % sudo nscd -g
Show DNS cache generated by dnsmasq
Getting the exact records is not easy because dnsmasq stores the DNS cache in memory. You can send a kill signal to dnsmasq and log its output to get the number of DNS queries processed.
To do this, first, make sure dnsmasq is up and running using the systemctl command:
linuxmi@linuxmi ~/www.linuxmi.com % sudo systemctl status dnsmasq
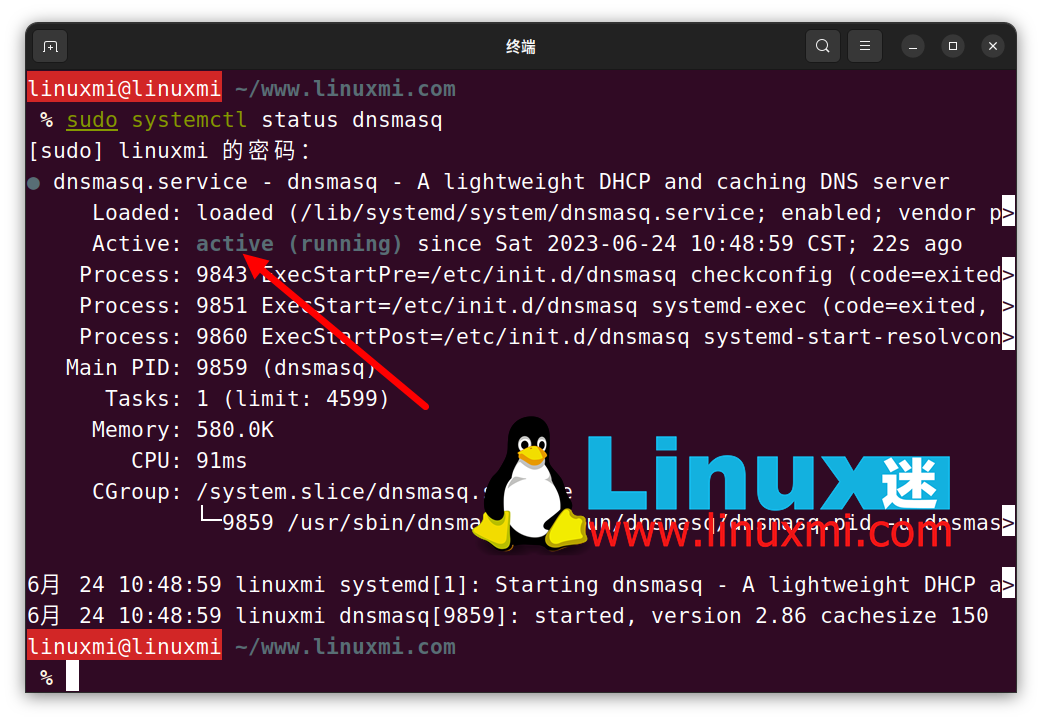
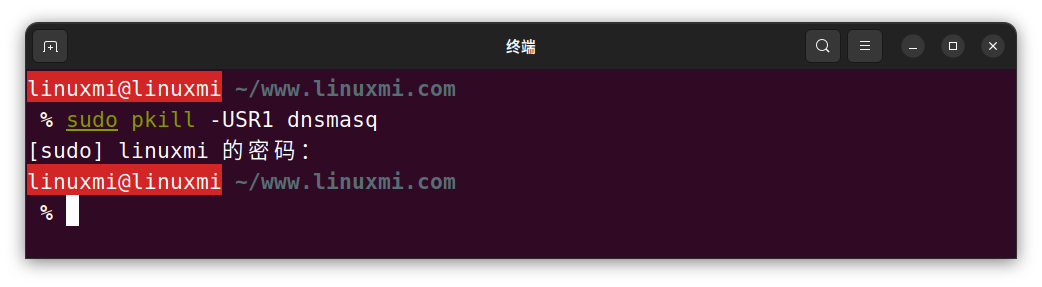
If the status says "Active", run the following command to terminate the service:
linuxmi@linuxmi ~/www.linuxmi.com % sudo pkill -USR1 dnsmasq
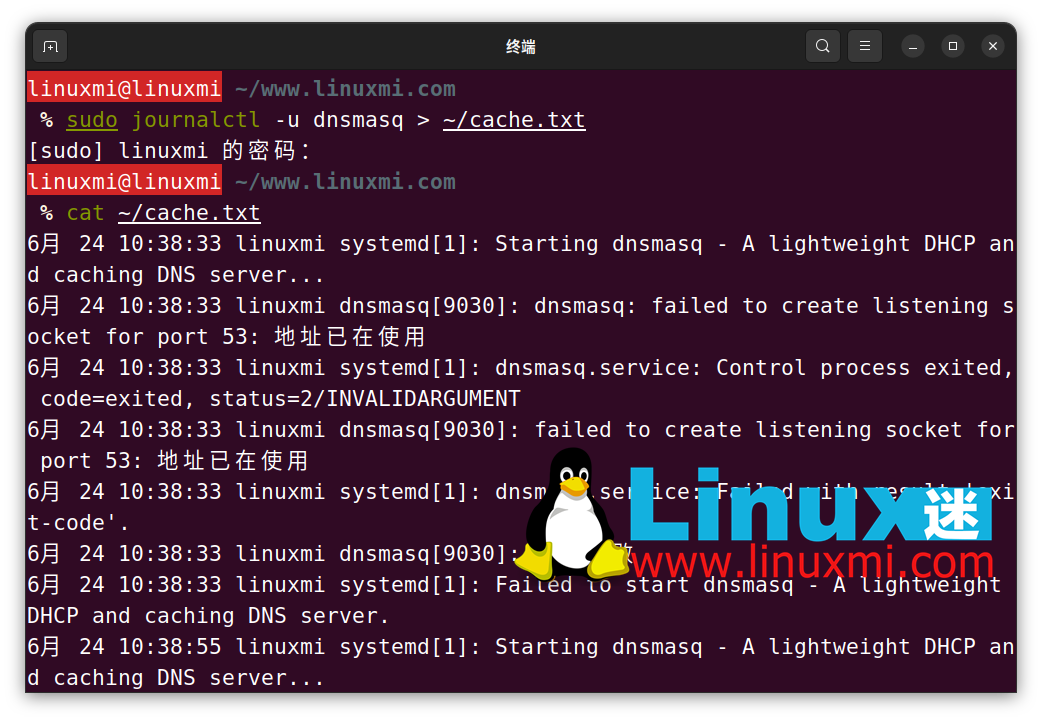
使用 journalctl 命令,提取 dnsmasq 日志并将它们保存到文本文件中:
linuxmi@linuxmi ~/www.linuxmi.com % sudo journalctl -u dnsmasq > ~/cache.txt
最后,使用文件查看实用程序(如 cat 或更少)查看文件的内容:
linuxmi@linuxmi ~/www.linuxmi.com % cat ~/cache.txt
如何在 Linux 上刷新 DNS 缓存
刷新 DNS 缓存意味着从计算机中删除缓存的 DNS 记录。这将迫使它向DNS服务器发送请求,以获取新的DNS条目。
以下是在 Linux 上刷新 DNS 缓存的方法:
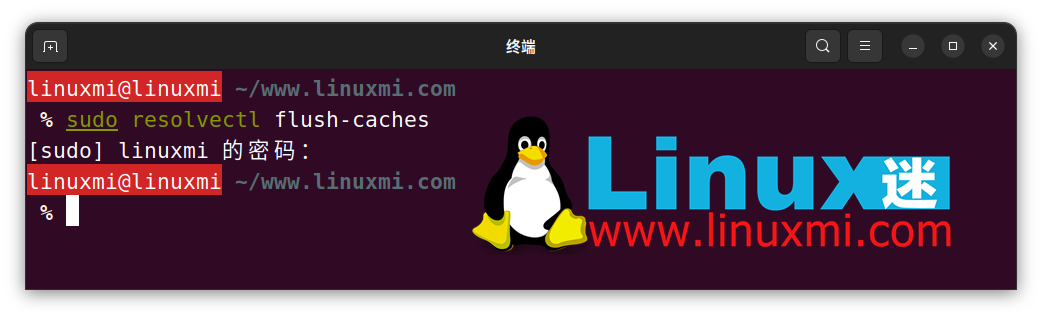
使用 systemd 解析
您可以使用 resolvectl 命令刷新 systemd 解析存储的 DNS 缓存:
linuxmi@linuxmi ~/www.linuxmi.com % sudo resolvectl flush-caches
如果您运行的是 Ubuntu 17.04 或 18.04,请使用 systemd 解析的命令刷新缓存:
sudo systemd-resolved --flush-caches
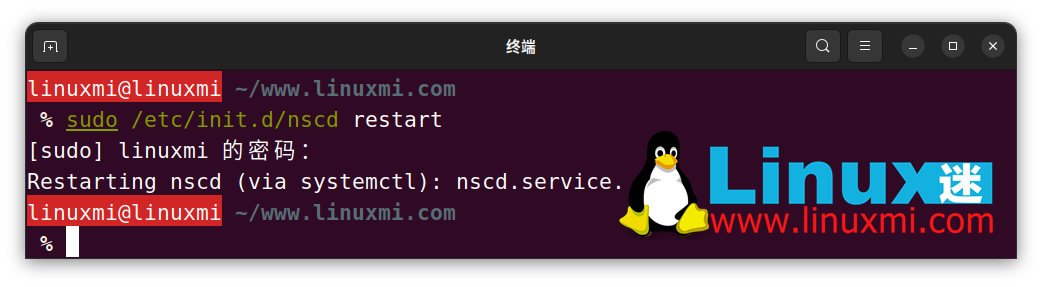
在 Linux 上刷新 nscd DNS 缓存
删除 nscd 的 DNS 缓存的最便捷方法是重新启动服务。您可以通过运行以下命令来执行此操作:
linuxmi@linuxmi ~/www.linuxmi.com % sudo /etc/init.d/nscd restart
如果这不起作用,首先,检查存储在PC上的本地缓存是否持久。您可以使用 -g 标志进行验证:
sudo nscd -g
如果是这种情况,请使用带有 nscd 命令的 –i 标志来清除记录(i 代表 invalidate):
linuxmi@linuxmi ~/www.linuxmi.com % sudo nscd -i hosts
删除 dnsmasq DNS 缓存
刷新 dnsmasq 生成的 DNS 缓存很简单。由于缓存存储在内存中,因此重新启动服务会删除所有存储的条目。
要重新启动 dnsmasq,请运行以下 systemctl 命令:
sudo systemctl restart dnsmasq
或者,发出以下命令:
service dnsmasq restart
如果出现提示,请输入管理员密码。现在要重新启动 dnsmasq,所有缓存中存在的 DNS 条目将被清除。
建议刷新 DNS 缓存后,检查本地缓存条目以确认数据已经成功删除。您可以使用 Linux 命令之一的 dig 来进行网络故障排除,并查看输出中的“查询时间”值。假如超过 0 毫秒,则说明缓存已经成功清除(若为 0 毫秒,则表示域记录仍存在于缓存中)。
dig google.com
清除谷歌浏览器的DNS缓存
您经常使用的 Web 浏览器也会缓存 DNS 记录。输入 URL 时,系统会在本地浏览器缓存中搜索缓存条目。如果未找到,它将检查本地系统缓存中的记录。清除 Web 浏览器的 DNS 缓存非常重要,因为它优先于系统范围的缓存。
为了演示,让我们刷新谷歌浏览器中的DNS缓存。在其他浏览器上也有一些方法可以做到这一点,所以最好 Google 一下如何使用你使用的浏览器做到这一点。
首先,在URL栏中键入“chrome://net-internals/#dns”并按Enter键:
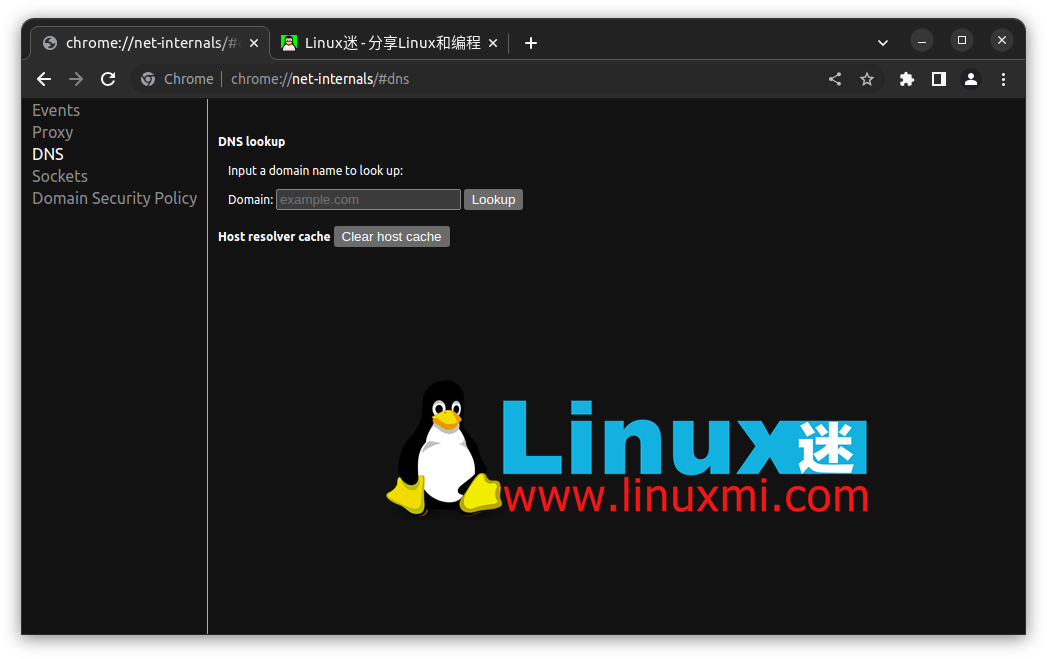
点击“清除主机缓存”按钮来清除谷歌浏览器中存储的DNS条目。
Linux是学习网络的最佳操作系统
Linux 乍一看可能看起来很复杂,但如果你花一些时间来学习它是如何工作的,你很快就会意识到它很棒,甚至可能比 Windows 或 macOS 更好。
大多数在线服务器都运行 Linux,如果您想学习网络或想知道计算机通常如何工作,这也是 Linux 理想选择的原因之一。
The above is the detailed content of How to view and refresh DNS cache on Linux. For more information, please follow other related articles on the PHP Chinese website!

Hot AI Tools

Undresser.AI Undress
AI-powered app for creating realistic nude photos

AI Clothes Remover
Online AI tool for removing clothes from photos.

Undress AI Tool
Undress images for free

Clothoff.io
AI clothes remover

AI Hentai Generator
Generate AI Hentai for free.

Hot Article
Hot Tools

Notepad++7.3.1
Easy-to-use and free code editor

SublimeText3 Chinese version
Chinese version, very easy to use

Zend Studio 13.0.1
Powerful PHP integrated development environment

Dreamweaver CS6
Visual web development tools

SublimeText3 Mac version
God-level code editing software (SublimeText3)
Hot Topics
 1378
1378
 52
52

 Difference between centos and ubuntu
Apr 14, 2025 pm 09:09 PM
Difference between centos and ubuntu
Apr 14, 2025 pm 09:09 PM
The key differences between CentOS and Ubuntu are: origin (CentOS originates from Red Hat, for enterprises; Ubuntu originates from Debian, for individuals), package management (CentOS uses yum, focusing on stability; Ubuntu uses apt, for high update frequency), support cycle (CentOS provides 10 years of support, Ubuntu provides 5 years of LTS support), community support (CentOS focuses on stability, Ubuntu provides a wide range of tutorials and documents), uses (CentOS is biased towards servers, Ubuntu is suitable for servers and desktops), other differences include installation simplicity (CentOS is thin)
 Centos stops maintenance 2024
Apr 14, 2025 pm 08:39 PM
Centos stops maintenance 2024
Apr 14, 2025 pm 08:39 PM
CentOS will be shut down in 2024 because its upstream distribution, RHEL 8, has been shut down. This shutdown will affect the CentOS 8 system, preventing it from continuing to receive updates. Users should plan for migration, and recommended options include CentOS Stream, AlmaLinux, and Rocky Linux to keep the system safe and stable.
 How to install centos
Apr 14, 2025 pm 09:03 PM
How to install centos
Apr 14, 2025 pm 09:03 PM
CentOS installation steps: Download the ISO image and burn bootable media; boot and select the installation source; select the language and keyboard layout; configure the network; partition the hard disk; set the system clock; create the root user; select the software package; start the installation; restart and boot from the hard disk after the installation is completed.
 Detailed explanation of docker principle
Apr 14, 2025 pm 11:57 PM
Detailed explanation of docker principle
Apr 14, 2025 pm 11:57 PM
Docker uses Linux kernel features to provide an efficient and isolated application running environment. Its working principle is as follows: 1. The mirror is used as a read-only template, which contains everything you need to run the application; 2. The Union File System (UnionFS) stacks multiple file systems, only storing the differences, saving space and speeding up; 3. The daemon manages the mirrors and containers, and the client uses them for interaction; 4. Namespaces and cgroups implement container isolation and resource limitations; 5. Multiple network modes support container interconnection. Only by understanding these core concepts can you better utilize Docker.
 What are the backup methods for GitLab on CentOS
Apr 14, 2025 pm 05:33 PM
What are the backup methods for GitLab on CentOS
Apr 14, 2025 pm 05:33 PM
Backup and Recovery Policy of GitLab under CentOS System In order to ensure data security and recoverability, GitLab on CentOS provides a variety of backup methods. This article will introduce several common backup methods, configuration parameters and recovery processes in detail to help you establish a complete GitLab backup and recovery strategy. 1. Manual backup Use the gitlab-rakegitlab:backup:create command to execute manual backup. This command backs up key information such as GitLab repository, database, users, user groups, keys, and permissions. The default backup file is stored in the /var/opt/gitlab/backups directory. You can modify /etc/gitlab
 How to use docker desktop
Apr 15, 2025 am 11:45 AM
How to use docker desktop
Apr 15, 2025 am 11:45 AM
How to use Docker Desktop? Docker Desktop is a tool for running Docker containers on local machines. The steps to use include: 1. Install Docker Desktop; 2. Start Docker Desktop; 3. Create Docker image (using Dockerfile); 4. Build Docker image (using docker build); 5. Run Docker container (using docker run).
 How to mount hard disk in centos
Apr 14, 2025 pm 08:15 PM
How to mount hard disk in centos
Apr 14, 2025 pm 08:15 PM
CentOS hard disk mount is divided into the following steps: determine the hard disk device name (/dev/sdX); create a mount point (it is recommended to use /mnt/newdisk); execute the mount command (mount /dev/sdX1 /mnt/newdisk); edit the /etc/fstab file to add a permanent mount configuration; use the umount command to uninstall the device to ensure that no process uses the device.
 What to do after centos stops maintenance
Apr 14, 2025 pm 08:48 PM
What to do after centos stops maintenance
Apr 14, 2025 pm 08:48 PM
After CentOS is stopped, users can take the following measures to deal with it: Select a compatible distribution: such as AlmaLinux, Rocky Linux, and CentOS Stream. Migrate to commercial distributions: such as Red Hat Enterprise Linux, Oracle Linux. Upgrade to CentOS 9 Stream: Rolling distribution, providing the latest technology. Select other Linux distributions: such as Ubuntu, Debian. Evaluate other options such as containers, virtual machines, or cloud platforms.
