

How to change the vga adapter in win7 system

How to change the vga adapter in win7 system? After a user installed the computer system, when he turned on the computer, he found that there was no graphics card option in the right-click display, but the VGA graphics adapter was displayed. So how to modify this situation? Today I will share with you how to change the settings of the vga adapter in win7 system.
How to change the vga adapter in win7 system
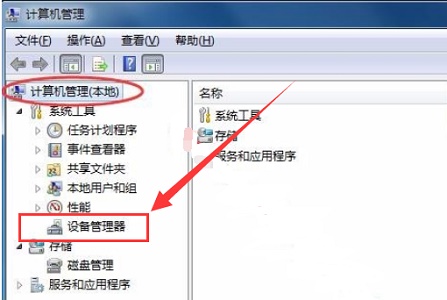
1. First, right-click the computer and select the computer to open management.

2. Click Device Manager.
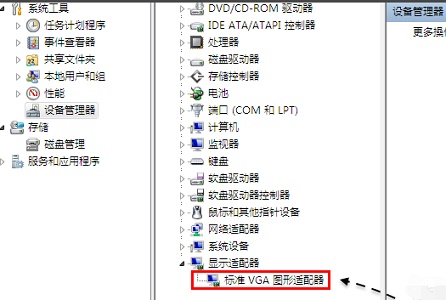
3. Under Display Adapter, you can see the standard VGA graphics adapter.
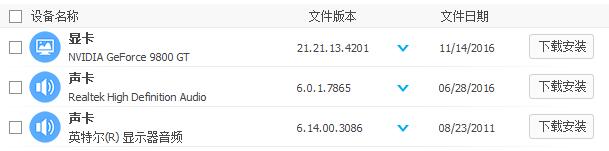
# 4. At this time we can download a driver president from this site.
5. After downloading and installing, open it and click Detect Now.

6. Then find the graphics card and click to download and install it.
The above is the entire content of [How to change the vga adapter in win7 system - How to change the vga adapter in win7 system]. More exciting tutorials are on this site!
The above is the detailed content of How to change the vga adapter in win7 system. For more information, please follow other related articles on the PHP Chinese website!

Hot AI Tools

Undresser.AI Undress
AI-powered app for creating realistic nude photos

AI Clothes Remover
Online AI tool for removing clothes from photos.

Undress AI Tool
Undress images for free

Clothoff.io
AI clothes remover

AI Hentai Generator
Generate AI Hentai for free.

Hot Article
Hot Tools

Notepad++7.3.1
Easy-to-use and free code editor

SublimeText3 Chinese version
Chinese version, very easy to use

Zend Studio 13.0.1
Powerful PHP integrated development environment

Dreamweaver CS6
Visual web development tools

SublimeText3 Mac version
God-level code editing software (SublimeText3)
Hot Topics
 1378
1378
 52
52

 How to change the storage location of wallpaper engine? How to set the save path in wallpaper engine
Mar 13, 2024 pm 12:40 PM
How to change the storage location of wallpaper engine? How to set the save path in wallpaper engine
Mar 13, 2024 pm 12:40 PM
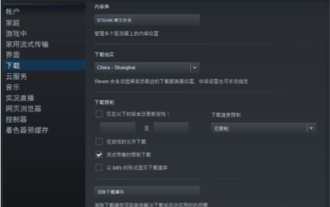
Many users like to download various wallpapers and videos on WallpaperEngine. Over time, they will find that more and more wallpapers are downloaded, resulting in insufficient hard disk space. At this time, the storage location of WallpaperEngine can be changed to reduce the space occupied. So let’s take a look at how to change the save path for wallpaperengine. Step 1: Click Settings under steam in the upper left corner to open the following interface. Step 2: Click Download to find the "Steam Library Folder" under the content library, and click Open above. Step 3: Click Add Library Folder, select the path you want to change to, and after adding it, right-click on the default column.
 How to change the font color of win7 desktop icons
Jan 02, 2024 pm 11:17 PM
How to change the font color of win7 desktop icons
Jan 02, 2024 pm 11:17 PM
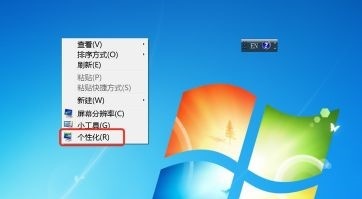
The default desktop icon font of win7 is generally white. If we use a white desktop background, the desktop icon text may not be visible. At this time, we can customize the desktop font color through the advanced appearance settings in the personalization settings. The following is Let’s take a look together. Tutorial on changing the font color of win7 desktop icons 1. Right-click a blank space on the desktop and open the "Personalization" settings. 2. Under Theme, we can directly select the desired theme to change the font color of desktop icons. 3. If you are not satisfied with these themes, you can also turn on the "Window Color" as shown in the picture. 4. Click "Advanced Appearance Settings" below 5. Change the "Project" at the icon location to "Desktop" 6. Then you can change various attributes such as font color and size in the red box
 USB to HDMI adapter not working properly on Windows 11/10
Feb 19, 2024 pm 12:00 PM
USB to HDMI adapter not working properly on Windows 11/10
Feb 19, 2024 pm 12:00 PM
If you're having issues with your USB to HDMI adapter not working properly on Windows, it could be because of an outdated graphics card driver or a problem with the adapter itself. The following content will help you resolve this dilemma. Fix USB to HDMI adapter not working on Windows 11/10 Use the following solutions to fix USB to HDMI adapter not working on Windows 10/11: Update Display Adapter Driver Rollback Graphics Driver Unplug and Plug USB to HDMI Adapter Updated BIOS Let's get started. 1] Update Display Adapter Driver Issues may be caused by outdated or corrupted display adapter drivers. You can try downloading from the official website of the manufacturer
 Detailed explanation of the steps to obtain Win11 system administrator permissions
Mar 08, 2024 pm 09:09 PM
Detailed explanation of the steps to obtain Win11 system administrator permissions
Mar 08, 2024 pm 09:09 PM
Windows 11, as the latest operating system launched by Microsoft, is deeply loved by users. In the process of using Windows 11, sometimes we need to obtain system administrator rights in order to perform some operations that require permissions. Next, we will introduce in detail the steps to obtain system administrator rights in Windows 11. The first step is to click "Start Menu". You can see the Windows icon in the lower left corner. Click the icon to open the "Start Menu". In the second step, find and click "
 How to initialize the computer in win7
Jan 07, 2024 am 11:53 AM
How to initialize the computer in win7
Jan 07, 2024 am 11:53 AM
The win7 system is a very excellent high-performance system. During the continuous use of win7, many friends are asking how to initialize the computer in win7! Today, the editor will bring you how to restore the factory settings of a win7 computer. Related information on how to initialize the computer in win7: Detailed instructions with pictures and text. Steps: 1. Open the "Start Menu" and enter. 2. Click to enter the settings at the bottom of the left side. 3. In the Win10 update and recovery settings interface, select. 4. Click below "Remove all content and reinstall Windows". 5. You can see the following "Initialization" settings, and then click. 6. Enter the "Your computer has multiple drives" setting option. There are two options here, you can choose according to the situation.
 Step-by-step guide to changing background color with Eclipse
Jan 28, 2024 am 08:28 AM
Step-by-step guide to changing background color with Eclipse
Jan 28, 2024 am 08:28 AM
Teach you step by step how to change the background color in Eclipse, specific code examples are required Eclipse is a very popular integrated development environment (IDE) that is often used to write and debug Java projects. By default, the background color of Eclipse is white, but some users may wish to change the background color to suit their preference or to reduce eye strain. This article will teach you step by step how to change the background color in Eclipse and provide specific code examples. Step 1: Open Eclipse First
 How to display file suffix under Win11 system? Detailed interpretation
Mar 09, 2024 am 08:24 AM
How to display file suffix under Win11 system? Detailed interpretation
Mar 09, 2024 am 08:24 AM
How to display file suffix under Win11 system? Detailed explanation: In the Windows 11 operating system, the file suffix refers to the dot after the file name and the characters after it, which is used to indicate the type of file. By default, the Windows 11 system hides the suffix of the file, so that you can only see the name of the file in the file explorer but cannot intuitively understand the file type. However, for some users, displaying file suffixes is necessary because it helps them better identify file types and perform related operations.
 How to delete installed language pack in win10 system
Jan 06, 2024 pm 10:37 PM
How to delete installed language pack in win10 system
Jan 06, 2024 pm 10:37 PM
When we use the win10 operating system, in some cases we may need to delete the language pack in the system. At this time, just find the language option first, then choose to add a language pack. During this process, uncheck the language pack to be deleted and then delete it. How to delete the installed language pack in win10 system: 1. Use win+i to open settings and find the time and language options. 2. Select the "Language" option in the time and language options. 3. Select "Add Language" and go to the next step. 4. Uncheck the language pack when adding a language. After the addition is completed, you can download the language pack and voice pack separately;