
 Common Problem
How to fix the M.2 solid-state drive that cannot be recognized by Windows 7 computer
Common Problem
How to fix the M.2 solid-state drive that cannot be recognized by Windows 7 computer
How to fix the M.2 solid-state drive that cannot be recognized by Windows 7 computer

How to repair the M.2 solid-state drive that cannot be recognized by the win7 system computer? As the usage of computers becomes higher and higher, we may sometimes encounter the problem that the win7 system computer cannot recognize the M.2 solid-state drive. If we encounter the problem that the win7 system computer cannot recognize the M.2 solid-state drive, How to solve the problem that the win7 system computer cannot recognize the M.2 solid state drive? Many friends don’t know how to operate in detail. The editor below has compiled a repair tutorial for the M.2 solid-state drive that cannot be recognized by the win7 system computer. If you are interested, follow the editor and take a look below!
Win7 system computer cannot recognize M.2 solid state drive repair tutorial
1. SSD interface connection error
If it is a mid-to-high-end Motherboards are generally equipped with multiple M.2 slots. When players connect an SSD, they must also consider the location of the slots.
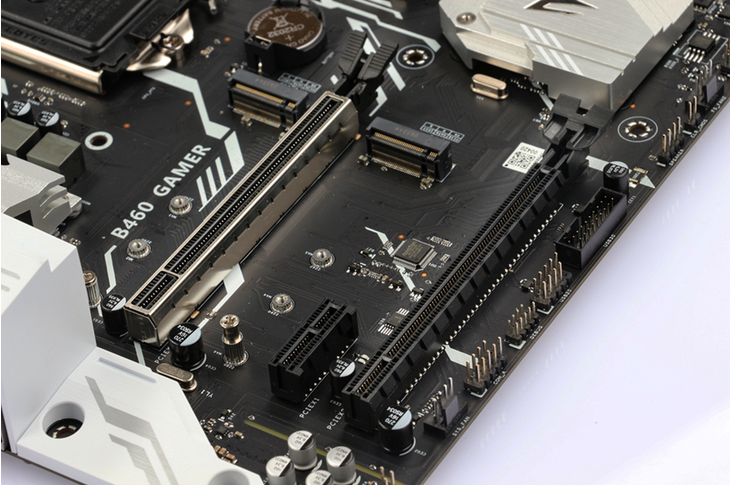
Generally speaking, not all M.2 slots support the same protocol. For example, although the GALAXY B460 GAMER is equipped with two M.2 slots, only The channel of the first slot close to the CPU supports both NVMe protocol and SATA protocol, while the second slot only supports M.2 NVMe SSD. If the user connects an M.2 SATA SSD to the second slot, The motherboard may not recognize the SSD.
Therefore, you must ensure that the M.2 SSD is installed into the correct M.2 slot so that the motherboard can correctly identify the hard drive and perform as it should.
In addition, if your M.2 SSD is not properly connected to the interface, the computer will not be able to recognize the hard drive. You need to ensure that the SSD has been installed correctly.
2. The SSD cannot be recognized in the computer
If you cannot see the M.2 SSD information in your computer, there are three situations.
In the first case, you installed a system disk, but after booting, the computer has been unable to enter the system. It may be that CSM is closed.
Some traditional devices do not support the existing UEFI boot mode of the new motherboard. CSM is here for this purpose. CSM is also called the compatibility support module. It is compatible with both UEFI and non-UEFI boot modes. Turn on CSM, the computer will perform a step to detect hardware functions when it is turned on. If CSM is turned off, the computer will only support UEFI mode. The computer will skip the power-on self-test step and speed up the boot-up speed.
Nowadays, many motherboard manufacturers set CSM in BIOS to off by default to improve computer startup speed. However, after turning off CSM, the BIOS may not be able to recognize the M.2 SSD, so if your computer cannot recognize the M.2 SSD, you can try turning on the CSM.
Different motherboard BIOS have different locations to open CSM. After restarting the computer, keep pressing the DEL key to enter the BIOS, and then follow the instructions in the manual to open CSM.
In the second case, you open CSM, but the computer still cannot enter the system. It may be because the system disk recognized by the computer is not the M.2 SSD you want to identify. According to the instructions of different motherboards, choose priority. Start the system's hard drive, save the settings and then restart the computer.
In the third case, in addition to the system disk, you have connected a second new hard disk to the computer. After booting, you find that the computer does not display the hard disk information. This is because the new hard disk is required. Partitioned.
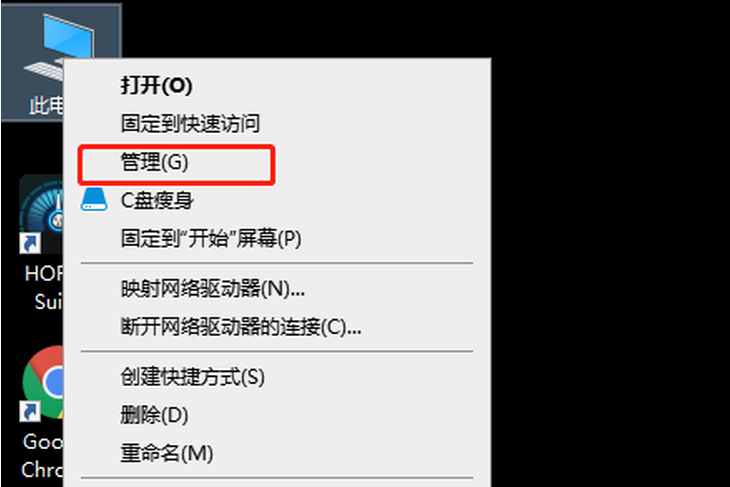
Right-click the “This PC” icon and select “Manage”.
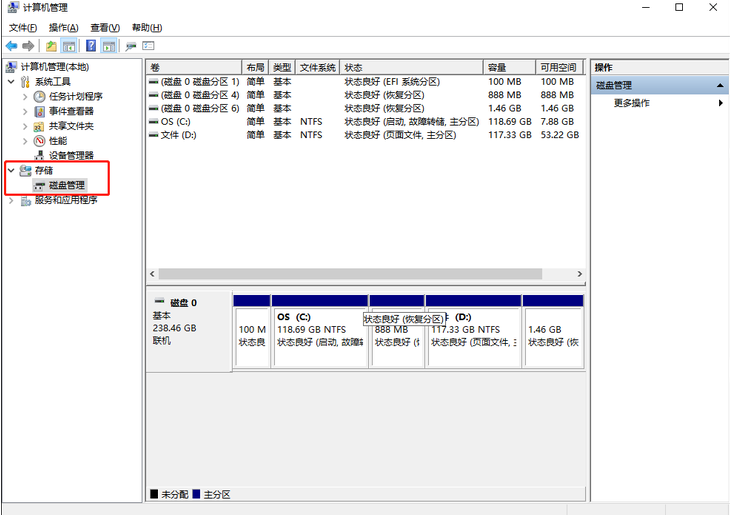
Select "Disk Management" under "Storage" in the left menu bar, and you can see the existing disk information on the computer in the right status bar.
If your new disk shows "Not Initialized", select the disk and right-click, select "Initialize Disk" to initialize the disk, and then perform partitioning operations so that the computer can access your new disk.
Through the above method, you can solve the problem that the win7 system computer cannot recognize the M.2 solid-state drive. I hope it can help everyone
The above is [the win7 system computer cannot recognize the M.2 solid-state drive] How to repair hard disk - Repair tutorial for M.2 solid state drive that cannot be recognized by win7 system computer] All the content is here, more exciting tutorials are on this site!
The above is the detailed content of How to fix the M.2 solid-state drive that cannot be recognized by Windows 7 computer. For more information, please follow other related articles on the PHP Chinese website!

Hot AI Tools

Undresser.AI Undress
AI-powered app for creating realistic nude photos

AI Clothes Remover
Online AI tool for removing clothes from photos.

Undress AI Tool
Undress images for free

Clothoff.io
AI clothes remover

AI Hentai Generator
Generate AI Hentai for free.

Hot Article
Hot Tools

Notepad++7.3.1
Easy-to-use and free code editor

SublimeText3 Chinese version
Chinese version, very easy to use

Zend Studio 13.0.1
Powerful PHP integrated development environment

Dreamweaver CS6
Visual web development tools

SublimeText3 Mac version
God-level code editing software (SublimeText3)
Hot Topics
 1386
1386
 52
52

 This Apple ID is not yet in use in the iTunes Store: Fix
Jun 10, 2024 pm 05:42 PM
This Apple ID is not yet in use in the iTunes Store: Fix
Jun 10, 2024 pm 05:42 PM
When logging into iTunesStore using AppleID, this error saying "This AppleID has not been used in iTunesStore" may be thrown on the screen. There are no error messages to worry about, you can fix them by following these solution sets. Fix 1 – Change Shipping Address The main reason why this prompt appears in iTunes Store is that you don’t have the correct address in your AppleID profile. Step 1 – First, open iPhone Settings on your iPhone. Step 2 – AppleID should be on top of all other settings. So, open it. Step 3 – Once there, open the “Payment & Shipping” option. Step 4 – Verify your access using Face ID. step
 How to fix red-eye on iPhone
Feb 23, 2024 pm 04:31 PM
How to fix red-eye on iPhone
Feb 23, 2024 pm 04:31 PM
So, you took some great photos at your last party, but unfortunately, most of the photos you took were of red eyes. The photo itself is great, but the red eyes in it kind of ruin the image. Not to mention, some of those party photos might be from your friends’ phones. Today we'll look at how to remove red eye from photos. What causes the red eyes in the photo? Red-eye often occurs when taking photos with flash. This is because the light from the flash shines directly into the back of the eye, causing the blood vessels under the eye to reflect the light, giving the effect of red eyes in the photo. Fortunately, with the continuous advancement of technology, some cameras are now equipped with red-eye correction functions that can effectively solve this problem. By using this feature, the camera takes pictures
 How to solve the problem of Win11 failing to verify credentials?
Jan 30, 2024 pm 02:03 PM
How to solve the problem of Win11 failing to verify credentials?
Jan 30, 2024 pm 02:03 PM
When a Win11 user uses credentials to log in, he or she receives an error message stating that your credentials cannot be verified. What is going on? After the editor investigated this problem, I found that there may be several different situations that directly or indirectly cause this problem. Let's take a look with the editor.
 Detailed explanation of the steps to obtain Win11 system administrator permissions
Mar 08, 2024 pm 09:09 PM
Detailed explanation of the steps to obtain Win11 system administrator permissions
Mar 08, 2024 pm 09:09 PM
Windows 11, as the latest operating system launched by Microsoft, is deeply loved by users. In the process of using Windows 11, sometimes we need to obtain system administrator rights in order to perform some operations that require permissions. Next, we will introduce in detail the steps to obtain system administrator rights in Windows 11. The first step is to click "Start Menu". You can see the Windows icon in the lower left corner. Click the icon to open the "Start Menu". In the second step, find and click "
 Comprehensive Guide to PHP 500 Errors: Causes, Diagnosis and Fixes
Mar 22, 2024 pm 12:45 PM
Comprehensive Guide to PHP 500 Errors: Causes, Diagnosis and Fixes
Mar 22, 2024 pm 12:45 PM
A Comprehensive Guide to PHP 500 Errors: Causes, Diagnosis, and Fixes During PHP development, we often encounter errors with HTTP status code 500. This error is usually called "500InternalServerError", which means that some unknown errors occurred while processing the request on the server side. In this article, we will explore the common causes of PHP500 errors, how to diagnose them, and how to fix them, and provide specific code examples for reference. Common causes of 1.500 errors 1.
 How to fix the volume cannot be adjusted in WIN10
Mar 27, 2024 pm 05:16 PM
How to fix the volume cannot be adjusted in WIN10
Mar 27, 2024 pm 05:16 PM
1. Press win+r to open the run window, enter [regedit] and press Enter to open the registry editor. 2. In the opened registry editor, click to expand [HKEY_LOCAL_MACHINESOFTWAREMicrosoftWindowsCurrentVersionRun]. In the blank space on the right, right-click and select [New - String Value], and rename it to [systray.exe]. 3. Double-click to open systray.exe, modify its numerical data to [C:WindowsSystem32systray.exe], and click [OK] to save the settings.
 How to initialize the computer in win7
Jan 07, 2024 am 11:53 AM
How to initialize the computer in win7
Jan 07, 2024 am 11:53 AM
The win7 system is a very excellent high-performance system. During the continuous use of win7, many friends are asking how to initialize the computer in win7! Today, the editor will bring you how to restore the factory settings of a win7 computer. Related information on how to initialize the computer in win7: Detailed instructions with pictures and text. Steps: 1. Open the "Start Menu" and enter. 2. Click to enter the settings at the bottom of the left side. 3. In the Win10 update and recovery settings interface, select. 4. Click below "Remove all content and reinstall Windows". 5. You can see the following "Initialization" settings, and then click. 6. Enter the "Your computer has multiple drives" setting option. There are two options here, you can choose according to the situation.
 How to display file suffix under Win11 system? Detailed interpretation
Mar 09, 2024 am 08:24 AM
How to display file suffix under Win11 system? Detailed interpretation
Mar 09, 2024 am 08:24 AM
How to display file suffix under Win11 system? Detailed explanation: In the Windows 11 operating system, the file suffix refers to the dot after the file name and the characters after it, which is used to indicate the type of file. By default, the Windows 11 system hides the suffix of the file, so that you can only see the name of the file in the file explorer but cannot intuitively understand the file type. However, for some users, displaying file suffixes is necessary because it helps them better identify file types and perform related operations.