How to modify the priority startup items in the win7 system motherboard
How to modify the priority startup items in the win7 system motherboard? Sometimes our systems are placed in different storage locations. At this time, we need to modify the startup items on the system's motherboard. In this way, you can enter the required system when you turn on the computer. Many friends don't know how to operate in detail. The editor below has compiled the method of modifying the priority startup items in the win7 system motherboard. If you are interested, follow the editor to take a look below!

How to modify the priority startup items on the win7 system motherboard
1. First use the hotkey to enter the bios settings, enter the options, and find the boot option.
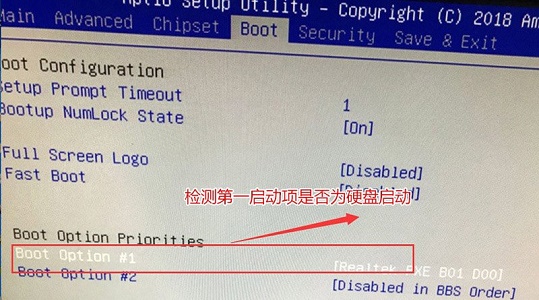
#2. After pressing the Enter key, find the hard disk you want to change. But if we find that no hard disk is available after pressing the Enter key, we need to perform the following steps.
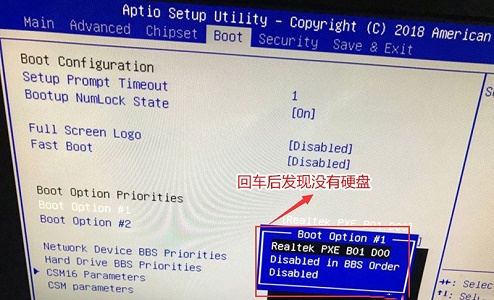
3. Come to the hard drive bbs priorities below.
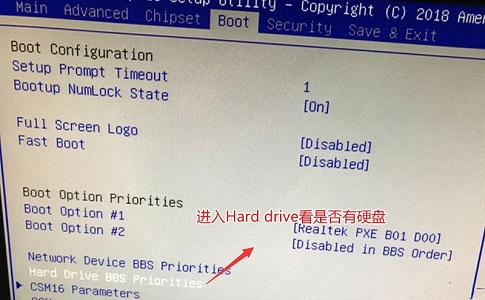
4. After entering, change disabled to the hard disk you want to use.
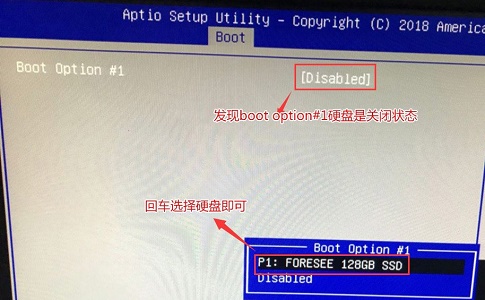
# 5. In this way, we can set the hard disk by returning to the boot option again.
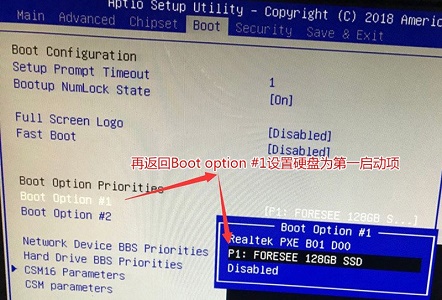
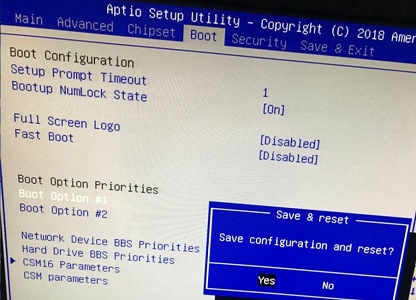
6. Finally, just press F10 to save and select YES in the pop-up window.
The above is the entire content of [How to modify the priority startup items in the win7 system motherboard - How to modify the priority startup items in the win7 system motherboard]. More exciting tutorials are available on this site!
The above is the detailed content of How to modify the priority startup items in the win7 system motherboard. For more information, please follow other related articles on the PHP Chinese website!

Hot AI Tools

Undresser.AI Undress
AI-powered app for creating realistic nude photos

AI Clothes Remover
Online AI tool for removing clothes from photos.

Undress AI Tool
Undress images for free

Clothoff.io
AI clothes remover

AI Hentai Generator
Generate AI Hentai for free.

Hot Article

Hot Tools

Notepad++7.3.1
Easy-to-use and free code editor

SublimeText3 Chinese version
Chinese version, very easy to use

Zend Studio 13.0.1
Powerful PHP integrated development environment

Dreamweaver CS6
Visual web development tools

SublimeText3 Mac version
God-level code editing software (SublimeText3)

Hot Topics
 The DRAM light on the motherboard is orange but there is no display
Feb 19, 2024 am 11:09 AM
This article will explore the role of the DRAM indicator on the motherboard. When the DRAM light on the motherboard shows orange but nothing is displayed, it may mean that there is some hardware issue. In this case, this article will provide some suggestions to solve these problems. The DRAM indicator on the motherboard is orange but does not show that the motherboard is the core hardware of the computer and connects other hardware components such as the CPU, RAM and hard drive. When there is a hardware problem, the motherboard will sound an alarm or display the problem through LED indicators. If the DRAM indicator light is orange but there is no display, you can try the following suggestions. Perform a hard reset to clear CMOS. Reseat your memory modules and check each memory module. Refresh your BIOS. The problem may be with your memory or CPU. Get professional support.
 Close-up of LGA-1851 socket, Guangji showcases new embedded motherboard: supports Intel Core Ultra 200 series processors
Apr 11, 2024 pm 09:22 PM
According to the news from this site on April 11, according to the German technology media ComputeBase, Guangji Technology attended the EmbeddedWorld2024 conference and publicly demonstrated a motherboard using the LGA-1851 slot for the first time. This motherboard is compatible with Intel Meteor Lake processors and is mainly used in embedded systems. The media took an in-depth look and shared multiple photos, confirming that LGA-1851 is the same size as Intel’s existing LGA-1700 socket. The relevant pictures attached to this site are as follows: Not compatible with CPU, but compatible with CPU coolers but not LGA-1851 socket 151 additional pins were added and the CPU locking system was adjusted, so it is not compatible with existing LGA-1700 socket processors. But because LG
 'Valkyrie' joins hands with 'Silver', Biostar displays two Intel Z890 motherboards
Jun 09, 2024 am 11:14 AM
According to news from this website on June 5, according to foreign media TechPowerUp, Biostar exhibited two LGA1851 socket Z890 motherboards supporting Intel's next-generation desktop CPU at the 2024 Taipei International Computer Show. These two motherboards are the flagship Z890VALKYRIE "Valkyrie" and the mainstream Z890A-SILVER. Both are ATX specifications and do not have pre-installed wireless network cards. This website summarizes the detailed parameters of the two motherboards as follows: Z890VALKYRIE continues the gold-powder double-wing elements of the "Valkyrie" family, uses a 23-phase power supply design, and is equipped with 4 DDR5 memory slots. ▲Image source TechPowerUp, the same as below. This motherboard provides 3 alloy-reinforced PCIeG
 Detailed explanation of the steps to obtain Win11 system administrator permissions
Mar 08, 2024 pm 09:09 PM
Windows 11, as the latest operating system launched by Microsoft, is deeply loved by users. In the process of using Windows 11, sometimes we need to obtain system administrator rights in order to perform some operations that require permissions. Next, we will introduce in detail the steps to obtain system administrator rights in Windows 11. The first step is to click "Start Menu". You can see the Windows icon in the lower left corner. Click the icon to open the "Start Menu". In the second step, find and click "
 'The world's first Thin Mini ITX motherboard supporting AM5', ASRock releases X600TM-ITX: up to 96GB memory, 4 external monitors
Jul 27, 2024 am 10:37 AM
According to news from this site on July 27, ASRock recently announced the launch of the X600TM-ITX motherboard, claiming to be "the world's first ThinMiniITX motherboard that supports AM5". The motherboard size is 17*17 cm and supports AMD Ryzen 9000/8000/7000 series processing. device. ASRock said that this motherboard is suitable for products such as mini computers, all-in-one computers, smart mirrors, educational tools, and home theater computers, and can handle various tasks in daily offices, presentations, and work. X600TM-ITX supports the latest AM5 processor, which improves performance by up to 1.33 times compared to the previous generation. This means faster speeds, increased multitasking capabilities, better gaming experiences, faster data processing, and
 ASUS releases BIOS update for Z790 motherboards to alleviate instability issues with Intel's 13th/14th generation Core processors
Aug 09, 2024 am 12:47 AM
According to news from this website on August 8, MSI and ASUS today launched a beta version of BIOS containing the 0x129 microcode update for some Z790 motherboards in response to the instability issues in Intel Core 13th and 14th generation desktop processors. ASUS's first batch of motherboards to provide BIOS updates include: ROGMAXIMUSZ790HEROBetaBios2503ROGMAXIMUSZ790DARKHEROBetaBios1503ROGMAXIMUSZ790HEROBTFBetaBios1503ROGMAXIMUSZ790HEROEVA-02 joint version BetaBios2503ROGMAXIMUSZ790A
 Sapphire launches NITRO+ B650I WIFI ultra-platinum motherboard, 1679 yuan
Apr 22, 2024 pm 01:58 PM
According to news from this site on April 22, Sapphire (Sapphire Technology) recently launched the NITRO+B650IWIFI ultra-platinum motherboard. The e-commerce platform sells it for 1,689 yuan. You can get a 10 yuan coupon, and the price is 1,679 yuan. According to inquiries on this site, Sapphire released a NITRO+B550I motherboard in 2021, and this new product can be regarded as the successor of that product. Sapphire NITRO+B650IWIFI adopts 8-layer PCB+8-phase digital power supply design, uses PowerStage70ADr.MOS, and supports DDR5-6000+ memory overclocking. In terms of storage, it is equipped with 2 Gen4x4 M.2 interfaces and 4 SATA3 interfaces. This motherboard is covered with MOS power supply and front M.2 bay.
 Best CPU and Motherboard Choice Combinations Compatible with 3060 Graphics Cards
Jan 27, 2024 am 09:45 AM
The 3060 graphics card is a graphics card that is more popular among gamers and has a relatively high cost performance. After buying a 3060 graphics card, many players don’t know how to match the CPU and motherboard. I will recommend one for everyone. What CPU and motherboard does the 3060 graphics card go with? Answer: 10400fCPU and b460 mortar motherboard. The combination of this CPU and motherboard is very economical. The 10400f CPU has good performance and power consumption control. The performance of the b460 mortar motherboard is also very good, and the materials are very luxurious and the price/performance ratio is very high. Introduction to 3060 graphics card paired with motherboard and CPU expansion: 1. The overall performance of the i5-10400F CPU is very good, and it is a CP that is comparable to the Ryzen 53600


