

How to set up NVIDIA graphics card in Win10 Professional Edition system

How to set up the NVIDIA graphics card in Win10 Professional Edition system? Win10 Professional Edition system is a simple and easy-to-use operating system. For some computer novices, some computer settings are still confusing, such as Win10 Professional Edition system NVIDIA graphics card How to set it up? Below, the editor of System Home shared this article on this issue. Friends who don’t know should learn it together.

Win10 Professional Edition system NVIDIA graphics card setting steps
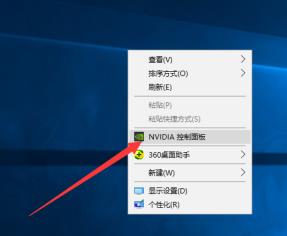
1. Right-click a blank space on the desktop and select NVIDIA Control Panel.
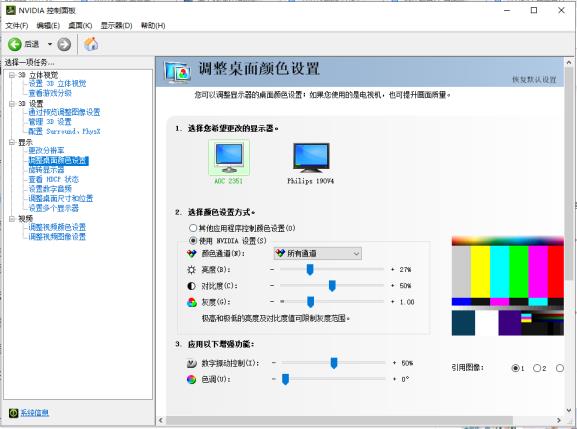
2. After opening the NVIDIA control panel, we can see many settings on the left. The most commonly used ones are display settings and 3D settings. Display settings can adjust the computer resolution. , desktop color settings, etc., to reduce our visual fatigue, everyone can set according to their own needs.
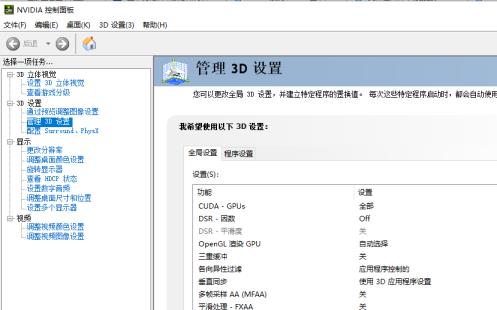
3. 3D settings and game performance are directly linked. Let’s learn more about 3D settings below.
4. Turn off triple buffering. This option has an effect after turning on vertical synchronization. Just turn it off normally.

For anisotropic filtering, you can choose the multiple according to your own graphics card level. It is recommended to choose 4x for low-end graphics cards, 8x for mid-range graphics cards, and 16x for high-end graphics cards. Can improve picture quality.
Vertical synchronization, it is recommended to turn off
More monitor /mix GPU Acceleration, generally keep the default "Display Performance Mode", this option is only effective when using multiple display devices.
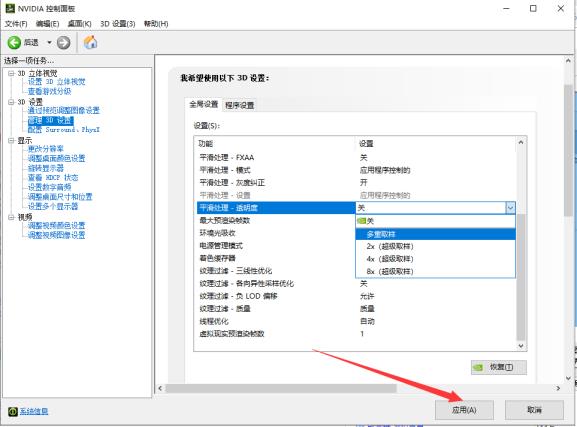
Smoothing processing - transparency, multi-sampling performance is higher, the image quality is slightly weaker, super sampling performance is lower, the image quality is better.
Texture filtering - Anisotropic sampling optimization, select to improve performance, but lose image quality, select to ensure the highest image quality.
Texture filtering-quality, if you pursue performance, choose performance. If you pursue image quality, you can generally choose & quality.
The above is the detailed content of How to set up NVIDIA graphics card in Win10 Professional Edition system. For more information, please follow other related articles on the PHP Chinese website!

Hot AI Tools

Undresser.AI Undress
AI-powered app for creating realistic nude photos

AI Clothes Remover
Online AI tool for removing clothes from photos.

Undress AI Tool
Undress images for free

Clothoff.io
AI clothes remover

Video Face Swap
Swap faces in any video effortlessly with our completely free AI face swap tool!

Hot Article
Hot Tools

Notepad++7.3.1
Easy-to-use and free code editor

SublimeText3 Chinese version
Chinese version, very easy to use

Zend Studio 13.0.1
Powerful PHP integrated development environment

Dreamweaver CS6
Visual web development tools

SublimeText3 Mac version
God-level code editing software (SublimeText3)
Hot Topics
 1392
1392
 52
36
110
52
36
110

 Win11 computer automatic startup setting guide
Jan 15, 2024 pm 06:36 PM
Win11 computer automatic startup setting guide
Jan 15, 2024 pm 06:36 PM
We can save the time we spend every day by setting the system to automatically start up, which is very suitable for use in the office. However, many users do not know how to set up automatic startup on win11. In fact, you only need to create a scheduled task. , let’s take a look with the editor below. How to set the computer to automatically start up win11: 1. First, right-click and select "This PC" and click "Manage" 2. Then find "Task Scheduler" in the system tools 3. Then click "Create Basic Task" on the right 4. In the name Enter "Auto power on" 5, and then select the frequency of automatic power on. 6. Then set the specific time we need to automatically boot. 7. Then check "Start Program" as shown in the figure. 8. In a program or script
 Local users and groups are missing on Windows 11: How to add it
Sep 22, 2023 am 08:41 AM
Local users and groups are missing on Windows 11: How to add it
Sep 22, 2023 am 08:41 AM
The Local Users and Groups utility is built into Computer Management and can be accessed from the console or independently. However, some users find that local users and groups are missing in Windows 11. For some people who have access to it, the message suggests that this snap-in may not work with this version of Windows 10. To manage user accounts for this computer, use the User Accounts tool in Control Panel. The issue has been reported in previous iterations of Windows 10 and is usually caused by issues or oversights on the user's side. Why are local users and groups missing in Windows 11? You are running Windows Home edition, local users and groups are available on Professional edition and above. Activity
 The difference between win11 education version and professional version
Jan 03, 2024 pm 08:01 PM
The difference between win11 education version and professional version
Jan 03, 2024 pm 08:01 PM
There are many different versions under the win11 system. Among them, the professional version and the education version are not commonly used by ordinary users. They are not very clear about the difference between the two. The biggest difference is that the target groups corresponding to the versions are different. The difference between Win11 Education Edition and Professional Edition: Answer: Different target groups. 1. Win11 Professional Edition is suitable for enterprise users and professional developer users. 2. The professional version has a large number of professional functions, such as: remote desktop, enterprise mode ie, group policy management, etc. 3. For school use (school staff, managers, teachers and students), its functions are almost the same as the enterprise version. 4. The education version is only authorized for schools or educational institutions. Introduction to different versions of win11 1. Home version (Windows11H
 The difference between idea community version and professional version
Nov 07, 2023 pm 05:23 PM
The difference between idea community version and professional version
Nov 07, 2023 pm 05:23 PM
The differences between IDEA Community Edition and Professional Edition include authorization methods, functions, support and updates, plug-in support, cloud services and team collaboration, mobile development support, education and learning, integration and scalability, error handling and debugging, security and privacy protection. etc. Detailed introduction: 1. Authorization method. The community version is free and suitable for all developers, no matter what operating system is used. The community version supports open source projects and commercial projects. The professional version is paid and suitable for commercial development. The professional version has 30 There is a trial period of three days, after which you need to purchase a license to continue using it, etc.
 Set up Win11 workgroup control?
Jul 01, 2023 am 09:57 AM
Set up Win11 workgroup control?
Jul 01, 2023 am 09:57 AM
How to set up a Win11 workgroup? Workgroup is the most common, simplest and most common resource management mode, which is to put different computers into different groups according to their functions to facilitate management. Recently, some users have asked how to set up a Win11 workgroup? Many friends don’t know how to operate in detail. The editor has compiled the steps to set up a Win11 workgroup below. If you are interested, follow the editor and take a look below! Win11 workgroup setting steps 1. Right-click this computer on the desktop, and select Properties in the menu item that opens; 2. Windows settings window, click on the domain or workgroup under the relevant link on the right; 3. System properties window, computer name option card, click To use the wizard to join the computer to a domain or job
 Which one has better performance, win10 workstation version or professional version?
Dec 31, 2023 pm 08:38 PM
Which one has better performance, win10 workstation version or professional version?
Dec 31, 2023 pm 08:38 PM
After Microsoft launched the win10 system, in addition to repeated updates, there are also many versions of win10 that make people wonder, which one is better, the workstation version or the professional version, in terms of smoothness, which we are most concerned about when using the system. Which one is smoother, Win10 Workstation Edition or Professional Edition? Answer: Win10 Professional Workstation Edition is smoother 1. The hard drive score soared by 180%. "Excellent Performance Mode" is a newly added mode in Win10 Professional Workstation Edition. In layman's terms, "Excellent Performance Mode" It allows the system to dynamically optimize performance and quickly achieve the highest performance by identifying the workload of the CPU and GPU. The workstation version comes with "Excellent Performance" mode. These are on the same computer, and Win10PRO Professional Edition is installed separately (
 How to upgrade win11 home version to professional version: detailed steps
Jan 30, 2024 pm 07:45 PM
How to upgrade win11 home version to professional version: detailed steps
Jan 30, 2024 pm 07:45 PM
Many users want to upgrade their win11 home version to the professional version. After all, the professional version system supports more functions, so how to upgrade win11 home version to the professional version? Next, let this site carefully introduce to users how to convert win11 home version into professional version. Introduction to how to convert Win11 Home Edition to Professional Edition 1. Open Settings: Click the Start button on the taskbar, and then select the Settings icon (gear shape). 2. Enter WindowsUpdate settings: In the settings window, click WindowsUpdate in the left menu bar. 3. Check for updates: On the Windows Update page, click the Check for updates button on the right to ensure that your system has been updated to the latest
 Detailed explanation of the functional differences between PyCharm Community Edition and Professional Edition
Feb 20, 2024 pm 04:03 PM
Detailed explanation of the functional differences between PyCharm Community Edition and Professional Edition
Feb 20, 2024 pm 04:03 PM
PyCharm is a powerful Python integrated development environment (IDE) developed by JetBrains, aiming to provide developers with convenient and efficient Python programming tools. PyCharm is divided into two versions: community version and professional version. There are certain differences in functions between the two. This article will introduce in detail the functional differences between the PyCharm community version and the professional version to help readers better choose the version that suits them. First of all, it needs to be clear that PyCharm Community Edition