How to skip hard disk self-test in Win7 system
How to skip hard disk self-test in Win7 system? We all know that after the computer shuts down abnormally or a hard disk failure occurs, the system will start a hard disk self-check. In severe cases, it will even perform a self-check every time it is turned on. Of course, if you know the status of the device well, you can You can skip the hard disk self-test through settings, so how to skip the hard disk self-test in Win7 system? The following editor will bring you the steps to skip the hard disk self-test in Win7 system, let’s take a look!
Win7 system skips the hard disk self-test step
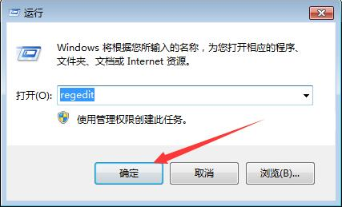
1. Open the device, bring up the run window, enter the command regedit, and press the OK button; as shown in the figure:
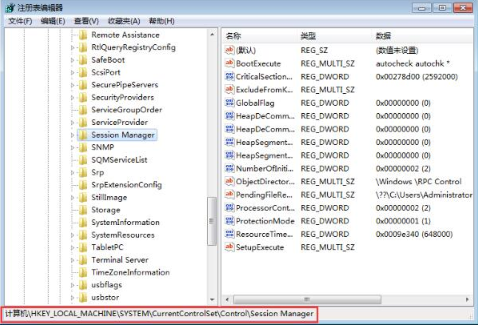
2. After the registry editor pops up, navigate to HKEY_LOCAL_MACHINESYSTEMCurrentControlSetControlSession Manager; as shown in the figure:
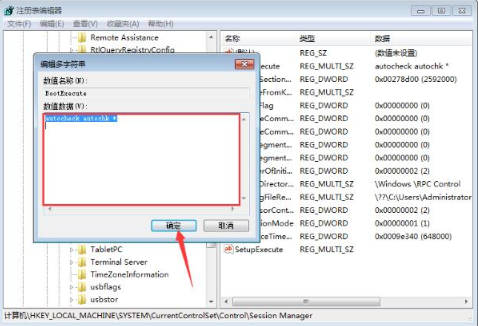
3. In Find the BootExecute project in the right window and double-click to open it; as shown in the figure:
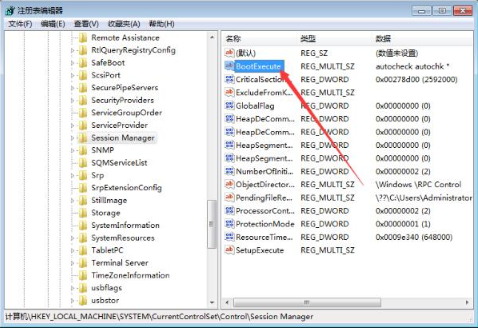
4. Finally, clear the numerical data in this item and press the OK button to save it. That’s it. As shown in the picture:
The above is the entire content of [How to skip the hard disk self-test in Win7 system - Skip the hard disk self-test step in Win7 system], more exciting tutorials All on this site!
The above is the detailed content of How to skip hard disk self-test in Win7 system. For more information, please follow other related articles on the PHP Chinese website!

Hot AI Tools

Undresser.AI Undress
AI-powered app for creating realistic nude photos

AI Clothes Remover
Online AI tool for removing clothes from photos.

Undress AI Tool
Undress images for free

Clothoff.io
AI clothes remover

AI Hentai Generator
Generate AI Hentai for free.

Hot Article

Hot Tools

Notepad++7.3.1
Easy-to-use and free code editor

SublimeText3 Chinese version
Chinese version, very easy to use

Zend Studio 13.0.1
Powerful PHP integrated development environment

Dreamweaver CS6
Visual web development tools

SublimeText3 Mac version
God-level code editing software (SublimeText3)

Hot Topics
 1374
1374
 52
52
 Detailed explanation of the steps to obtain Win11 system administrator permissions
Mar 08, 2024 pm 09:09 PM
Windows 11, as the latest operating system launched by Microsoft, is deeply loved by users. In the process of using Windows 11, sometimes we need to obtain system administrator rights in order to perform some operations that require permissions. Next, we will introduce in detail the steps to obtain system administrator rights in Windows 11. The first step is to click "Start Menu". You can see the Windows icon in the lower left corner. Click the icon to open the "Start Menu". In the second step, find and click "
 How to initialize the computer in win7
Jan 07, 2024 am 11:53 AM
The win7 system is a very excellent high-performance system. During the continuous use of win7, many friends are asking how to initialize the computer in win7! Today, the editor will bring you how to restore the factory settings of a win7 computer. Related information on how to initialize the computer in win7: Detailed instructions with pictures and text. Steps: 1. Open the "Start Menu" and enter. 2. Click to enter the settings at the bottom of the left side. 3. In the Win10 update and recovery settings interface, select. 4. Click below "Remove all content and reinstall Windows". 5. You can see the following "Initialization" settings, and then click. 6. Enter the "Your computer has multiple drives" setting option. There are two options here, you can choose according to the situation.
 Win11 Tips Sharing: Skip Microsoft Account Login with One Trick
Mar 27, 2024 pm 02:57 PM
Win11 Tips Sharing: One trick to skip Microsoft account login Windows 11 is the latest operating system launched by Microsoft, with a new design style and many practical functions. However, for some users, having to log in to their Microsoft account every time they boot up the system can be a bit annoying. If you are one of them, you might as well try the following tips, which will allow you to skip logging in with a Microsoft account and enter the desktop interface directly. First, we need to create a local account in the system to log in instead of a Microsoft account. The advantage of doing this is
 How to display file suffix under Win11 system? Detailed interpretation
Mar 09, 2024 am 08:24 AM
How to display file suffix under Win11 system? Detailed explanation: In the Windows 11 operating system, the file suffix refers to the dot after the file name and the characters after it, which is used to indicate the type of file. By default, the Windows 11 system hides the suffix of the file, so that you can only see the name of the file in the file explorer but cannot intuitively understand the file type. However, for some users, displaying file suffixes is necessary because it helps them better identify file types and perform related operations.
 Win11 bypass network verification process tutorial
Jan 01, 2024 pm 05:45 PM
When win11 is installed, it will be forced to require online computer verification for activation. However, some users do not want to be connected to the Internet, so they want to know that win11 skips online computer verification for activation. In fact, we only need to open the task manager and end the relevant processes. Skip networking in win11: 1. In the networking interface, press the "shift+F10" key combination on the keyboard. 2. After opening the dialog box, enter "taskmgr" and press Enter to open the task manager. 3. If it is in simple mode after opening, click "Details" below to expand. 4. Then find the "Network Connection Streaming" option. 5. After selecting, click "End Task" in the lower right corner to skip the online machine verification and activate it. We can also skip networking by connecting to the wired network and then disconnecting it.
 How to delete installed language pack in win10 system
Jan 06, 2024 pm 10:37 PM
When we use the win10 operating system, in some cases we may need to delete the language pack in the system. At this time, just find the language option first, then choose to add a language pack. During this process, uncheck the language pack to be deleted and then delete it. How to delete the installed language pack in win10 system: 1. Use win+i to open settings and find the time and language options. 2. Select the "Language" option in the time and language options. 3. Select "Add Language" and go to the next step. 4. Uncheck the language pack when adding a language. After the addition is completed, you can download the language pack and voice pack separately;
 How to implement dual system switching in Win10 system
Jan 03, 2024 pm 05:41 PM
Many friends may not be used to the win system when they first come into contact with it. There are dual systems in the computer. At this time, you can actually switch between the two systems. Let's take a look at the detailed steps for switching between the two systems. How to switch between two systems in win10 system 1. Shortcut key switching 1. Press the "win" + "R" keys to open Run 2. Enter "msconfig" in the run box and click "OK" 3. In the open "System Configuration" In the interface, select the system you need and click "Set as Default". After completion, "Restart" can complete the switch. Method 2. Select switch when booting 1. When you have dual systems, a selection operation interface will appear when booting. You can use the keyboard " Up and down keys to select the system
 How to install Windows 7 system on computer to Android phone
Jan 05, 2024 pm 06:41 PM
When we use the win7 operating system, we will inevitably encounter situations that require us to reinstall the system. So for the question of how to install the win7 system on an Android phone to a computer, the editor thinks that we first need to install a relevant emulator software on our phone, and then download the required operating system to our phone, and connect it to the computer to install it. operate. Let’s take a look at how the editor did it for detailed steps~ How to install win7 system on an Android phone on a computer 1. First download and install DriverDroid, and then set it up according to the setup wizard after running it. 2. Then note that the Android phone has obtained ROOT and needs to be connected to a computer during setup. 3. Move the bios file automatically downloaded by the phone to the image root directory (phone memory/D


