How to create a gray version of a new spanned volume on Win10 disk
What should I do if the new spanned volume on Win10 disk is grayed out? sometimes we harddisk If there are multiple unused spaces, we can combine them and put them in a logical volume, so that the space on multiple hard disks can be used more efficiently. This is a spanned volume. However, some netizens said that their win10 system had problems when creating a new spanned volume. They found that the new spanned volume on the disk was not grayed out. What happened? How to create a new spanned volume? The editor below will teach you the correct method of creating a new cross-zone volume.

Win10 disk new spanned volume gray solution steps
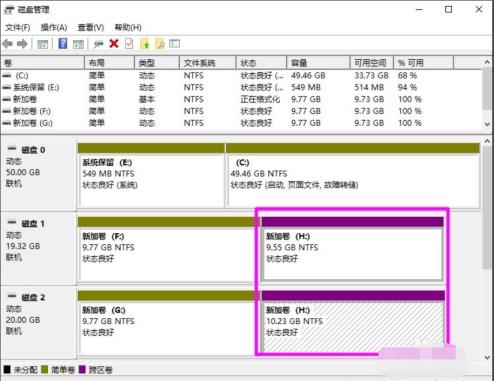
First, as shown in the figure below, the space on the two hard disks can use the same volume to create a spanned volume. Just zone it.
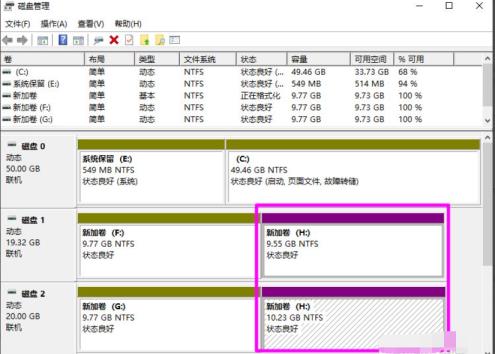
Then the reason why the spanned volume cannot be grayed out may be due to the following factors:
1. If the hard disk containing a spanned volume fails, then The entire volume will not work, and all data on the spanned volume will be lost, which means that the spanned volume is not fault-tolerant. If there is a problem with your volume, it will not be merged into a spanned volume. You must first check whether there is a problem with your newly added volume.
2. Spanned volumes can only use the NTFS file system and cannot be extended to use the FAT file system. format of spanned volumes. Therefore, the fat file system cannot create spanned volumes.
So how to create a new spanned volume correctly? The specific steps are as follows:
1. Right-click on the Start button and select [Disk Management].
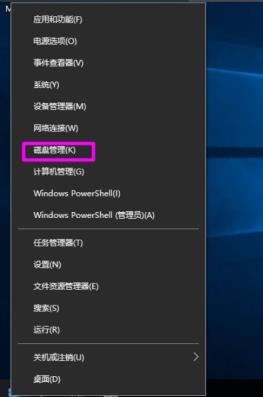
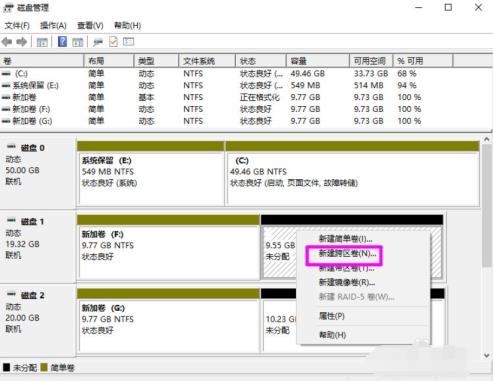
2. Right-click on the [Unallocated] disk space where you want to create a spanned volume and select [New Spanned Volume].
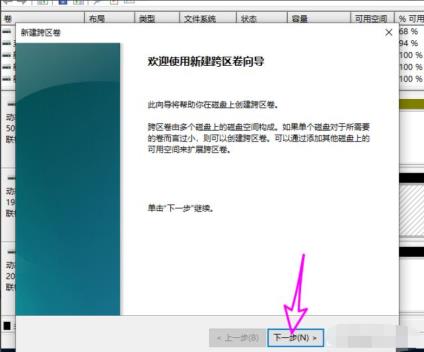
3. You will then enter the [New Spanned Volume] wizard, click [Next] to continue.
4. You will see the available space on other disks that can be used on the left. Click the [Add] button to add it to the [Selected] list. middle.
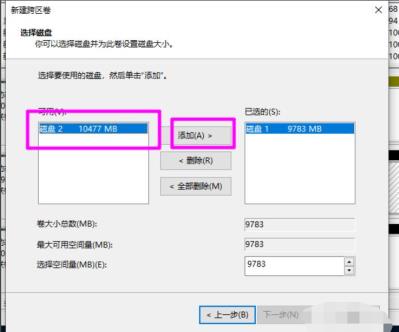
5. For each newly added disk, you can set the disk space size used by the spanned volume below. After setting the size, click [Next].
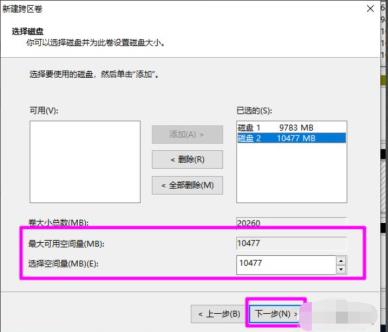
6. Then add a drive symbol to the spanned volume and click [Next].
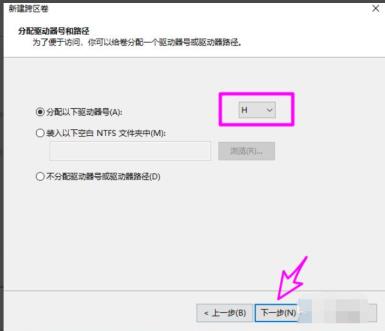
7. Set the file system of the spanned volume. Only the NTFS file system can be used, click [Next].
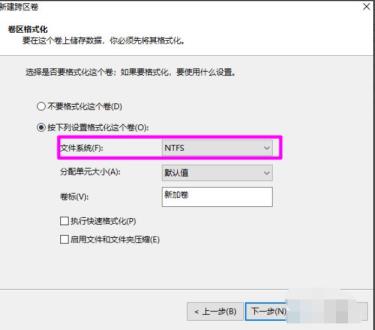
8. After all settings are ready, click [Finish] to start the task of creating a spanned volume.
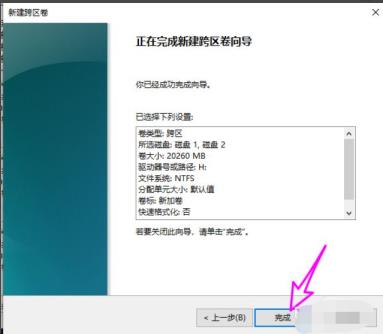
9. Wait for the establishment to be completed as shown in the figure below.
The above is the detailed content of How to create a gray version of a new spanned volume on Win10 disk. For more information, please follow other related articles on the PHP Chinese website!

Hot AI Tools

Undresser.AI Undress
AI-powered app for creating realistic nude photos

AI Clothes Remover
Online AI tool for removing clothes from photos.

Undress AI Tool
Undress images for free

Clothoff.io
AI clothes remover

AI Hentai Generator
Generate AI Hentai for free.

Hot Article

Hot Tools

Notepad++7.3.1
Easy-to-use and free code editor

SublimeText3 Chinese version
Chinese version, very easy to use

Zend Studio 13.0.1
Powerful PHP integrated development environment

Dreamweaver CS6
Visual web development tools

SublimeText3 Mac version
God-level code editing software (SublimeText3)

Hot Topics
 How to create a new simulator in the Lightning Simulator - How to create a new simulator in the Lightning Simulator
Mar 05, 2024 pm 03:04 PM
Recently, some users who have just downloaded and contacted the lightning simulator software asked the editor how to create a new simulator in the lightning simulator? The following content brings the method of creating a new simulator in the lightning simulator. Let us take a look below. Find the lightning simulator software. Double-click to open the Thunderbolt multi-opener. Click New/Copy Simulator. Click New Simulator. You can get a new simulator. Find the lightning simulator software, double-click to open the lightning multi-opener, click New/Copy Simulator, click New Simulator, and you will get a new simulator.
 How to create a new Word document on your computer
Dec 27, 2023 pm 10:05 PM
There are many ways to create a new word document. We can right-click the desktop and click New Doc Document or Docx Document. The specific methods are almost the same. Let’s take a look at them together. How to create a new word document using a computer: win11: 1. First, we right-click "New". 2. Then select the "docx or doc" file. 3. Finally, the creation can be completed. win10: 1. We right-click and select "New". 2. Then select one of the two documents. 3. Finally, the creation is completed. win7: 1. First, right-click and select "New". 2. Then select the word document. 3. Finally, the new creation can be completed.
 How to create a gray version of a new spanned volume on Win10 disk
Jul 02, 2023 am 08:13 AM
What should I do if the newly created spanned volume on Win10 disk is grayed out? Sometimes there are multiple unused spaces in our hard disk. We can merge them and put them in a logical volume, so that the space on multiple hard disks can be used more efficiently. This is a spanned volume. However, some netizens said that their win10 system had problems when creating a new spanned volume. They found that the new spanned volume on the disk was not grayed out. What happened? How to create a new spanned volume? The editor below will teach you the correct method of creating a new cross-zone volume. Gray solution steps for creating a spanned volume on Win10 disk First, as shown in the figure below, the space on the two hard disks can use the same volume, and just create a spanned volume. Then the reason why the spanned volume cannot be grayed out may be due to the following factors: 1. If it contains a span
 Detailed method for creating a new monthly report on Enterprise WeChat
Mar 25, 2024 pm 05:36 PM
1. Open Enterprise WeChat. 2. Click the [App] icon button on the left. 3. Click the [Report], [New], [Monthly Report] options. 4. Then you can see that you need to enter this month’s work, etc. 5. Enter the content of this month’s work. You may or may not fill in the rest, and click the [Submit] button. 6. Finally, you can see the details of your monthly report.
 Solve the problem that there is no 'New' option on the right click of Win10
Jan 05, 2024 am 09:45 AM
When using win10 system, some friends find that there is no new option in the right-click menu when they right-click the mouse on the desktop. In fact, they only need to add an option to it through the registry to right-click and create a new one. What to do if there is no New option when right-clicking on Windows 10: 1. Press the key combination + Open Run, enter and click OK to open the Registry Editor. 2. Then expand the folders:. 3. Then find the folder. If there is no such folder, right-click the folder-- and name it. 4. After opening the file in the new folder, we change this numerical data to. 5. Then restart the computer to solve the problem.
 Step-by-step guide for creating folders on Realme mobile phone
Mar 23, 2024 pm 03:51 PM
Step-by-Step Guide to Creating Folders on Realme Mobile Phones In our daily lives, we use our phones to store a variety of files, including photos, videos, documents, and more. However, as time goes by, the number of files on your phone may increase, causing insufficient memory on your phone or making it difficult to manage files. In order to better organize files and improve the efficiency of mobile phone use, the establishment of mobile phone folders has become particularly important. Realme Mobile is a popular smartphone brand with a powerful system and diverse features. Creating folders on Realme phones can help users better organize files
 Win11 new document tutorial
Dec 30, 2023 pm 07:59 PM
In win11, we can add articles or notes by creating a new document, but some friends don’t know how to create a new document in win11. In fact, just right-click on the blank space. How to create a new document in win11: 1. Right-click on the blank space of the desktop or explorer and select "New" 2. Then select "Text Document" 3. After the new creation is completed, you can see your newly created text document. 4. We can also choose to "create" a "doc/docx document" 5. After the creation is completed, double-click the document to open it.
 How to create a new sub-account on Feige Customer Service Workbench - How to create a new sub-account on Feige Customer Service Workbench
Mar 04, 2024 pm 04:58 PM
Many people use Feige Customer Service Workbench when working, so do you know how to create a new sub-account on Feige Customer Service Workbench? Below, the editor will bring you how to create a new sub-account on Feige Customer Service Workbench. If you are interested Let’s take a look below. 1. First come to the main page, click on the store on the left, and select the store management option. 2. Then click the sub-account management option in the drop-down option. 3. Finally, in the Account Management Office, click Create a new sub-account.


