How to enable ahci mode in win10
How to enable ahci mode in win10? As the usage rate of computers becomes higher and higher, we may sometimes encounter the problem of setting the AHCI mode of the SATA hard disk on the win10 system. If we need to set the AHCI mode of the SATA hard disk on the win10 system, we must How to enable AHCI mode of SATA hard disk in win10 system? Many friends don’t know how to operate in detail. The editor has compiled the steps to format the C drive in win11 below. If you are interested, follow the editor to read below!

Quickly explain the graphic skills of turning on AHCI mode of SATA hard disk in win10 system

To turn on AHCI, please refer to the following Steps, this method does not require modifying the registry:
1. First, add Win10 safe mode to the system startup menu.
2. Restart, check whether the menu has been added normally, and try to enter safe mode to make sure it can be entered normally.
3. Restart the computer and press the keyboard shortcut to enter the BIOS settings. Different brands of computers have different methods of entering BIOS settings, generally using F1, F2, F10, Del and other keys.
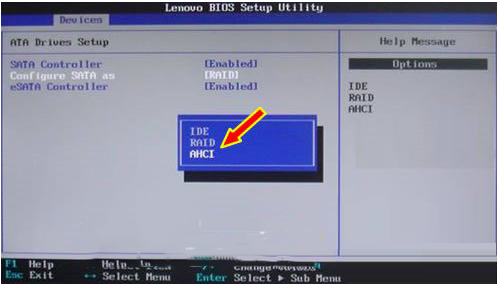
4. Find the hard disk controller mode setting option in the BIOS (look for the setting option containing the words SATA, IDE, AHCI), and change the hard disk mode from IDE to AHCI.
For example, when a certain computer starts, press the F1 key to enter the BIOS, select Devices→ATA Drives Setup→Configure SATA as→AHCI, as shown in the figure below, and finally press the F10 key to save and exit the BIOS.

1. Save the changes and restart the computer. Note here that you must enter safe mode first.
2. After successfully entering the safe mode, restart the computer and select normal startup. Under normal circumstances, it can be started normally. At this point, the switch of the hard disk mode from IDE to AHCI is completed.
The above is the entire content of [How to enable AHCI mode in win10 - Quickly explain the graphic and text techniques for enabling AHCI mode of SATA hard disk in win10 system]. More exciting tutorials are available on this site!
The above is the detailed content of How to enable ahci mode in win10. For more information, please follow other related articles on the PHP Chinese website!

Hot AI Tools

Undresser.AI Undress
AI-powered app for creating realistic nude photos

AI Clothes Remover
Online AI tool for removing clothes from photos.

Undress AI Tool
Undress images for free

Clothoff.io
AI clothes remover

AI Hentai Generator
Generate AI Hentai for free.

Hot Article

Hot Tools

Notepad++7.3.1
Easy-to-use and free code editor

SublimeText3 Chinese version
Chinese version, very easy to use

Zend Studio 13.0.1
Powerful PHP integrated development environment

Dreamweaver CS6
Visual web development tools

SublimeText3 Mac version
God-level code editing software (SublimeText3)

Hot Topics
 deepseek web version official entrance
Mar 12, 2025 pm 01:42 PM
The domestic AI dark horse DeepSeek has risen strongly, shocking the global AI industry! This Chinese artificial intelligence company, which has only been established for a year and a half, has won wide praise from global users for its free and open source mockups, DeepSeek-V3 and DeepSeek-R1. DeepSeek-R1 is now fully launched, with performance comparable to the official version of OpenAIo1! You can experience its powerful functions on the web page, APP and API interface. Download method: Supports iOS and Android systems, users can download it through the app store; the web version has also been officially opened! DeepSeek web version official entrance: ht
 In-depth search deepseek official website entrance
Mar 12, 2025 pm 01:33 PM
At the beginning of 2025, domestic AI "deepseek" made a stunning debut! This free and open source AI model has a performance comparable to the official version of OpenAI's o1, and has been fully launched on the web side, APP and API, supporting multi-terminal use of iOS, Android and web versions. In-depth search of deepseek official website and usage guide: official website address: https://www.deepseek.com/Using steps for web version: Click the link above to enter deepseek official website. Click the "Start Conversation" button on the homepage. For the first use, you need to log in with your mobile phone verification code. After logging in, you can enter the dialogue interface. deepseek is powerful, can write code, read file, and create code
 How to solve the problem of busy servers for deepseek
Mar 12, 2025 pm 01:39 PM
DeepSeek: How to deal with the popular AI that is congested with servers? As a hot AI in 2025, DeepSeek is free and open source and has a performance comparable to the official version of OpenAIo1, which shows its popularity. However, high concurrency also brings the problem of server busyness. This article will analyze the reasons and provide coping strategies. DeepSeek web version entrance: https://www.deepseek.com/DeepSeek server busy reason: High concurrent access: DeepSeek's free and powerful features attract a large number of users to use at the same time, resulting in excessive server load. Cyber Attack: It is reported that DeepSeek has an impact on the US financial industry.


