How to create a virtual desktop in win11
How to create a virtual desktop in win11? The win11 version of the operating system has accounted for half of today's computer usage. As a particularly popular system operating version, there are certainly not a few users. Many friends also need to do this when using the win11 system for computer work. Open multiple tasks on the computer desktop to improve the efficiency of your computer operations, but how to perform this operation specifically? Many friends don’t know how to operate in detail. The editor below has compiled a guide to creating multiple desktops in win11. If you are interested, follow the editor and take a look below!
Introduction to techniques for creating multiple desktops in win11
1. Right-click the blank space of the taskbar and click the pop-up [Taskbar Settings]
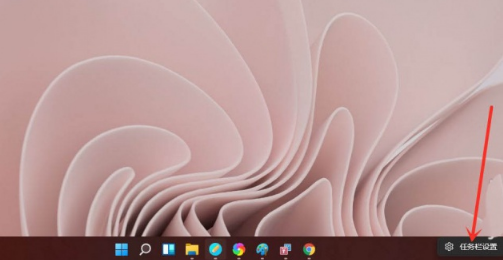
2. Turn on the "Task View" switch.

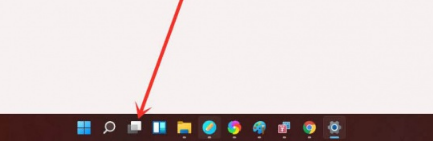
3. Click the [Task View] button on the taskbar.
#4. Enter the task view interface and click [New Desktop] to create a new virtual desktop.
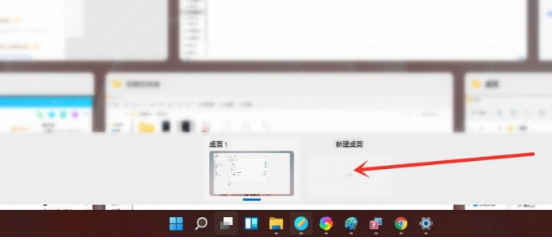
5. Place the cursor on the thumbnail of "Virtual Desktop" and click the [X] in the upper right corner to close the virtual desktop.
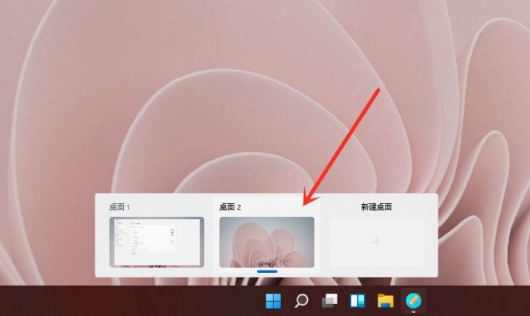
6. Result display.
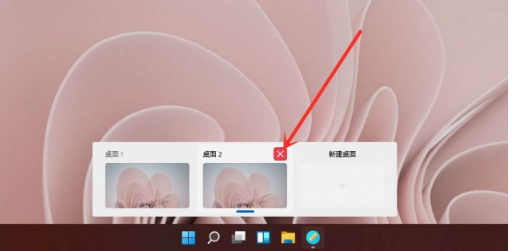
The above is the entire content of [How to create a virtual desktop in win11 - Guide to creating multiple desktops in win11]. More exciting tutorials are on this site!
The above is the detailed content of How to create a virtual desktop in win11. For more information, please follow other related articles on the PHP Chinese website!

Hot AI Tools

Undresser.AI Undress
AI-powered app for creating realistic nude photos

AI Clothes Remover
Online AI tool for removing clothes from photos.

Undress AI Tool
Undress images for free

Clothoff.io
AI clothes remover

Video Face Swap
Swap faces in any video effortlessly with our completely free AI face swap tool!

Hot Article

Hot Tools

Notepad++7.3.1
Easy-to-use and free code editor

SublimeText3 Chinese version
Chinese version, very easy to use

Zend Studio 13.0.1
Powerful PHP integrated development environment

Dreamweaver CS6
Visual web development tools

SublimeText3 Mac version
God-level code editing software (SublimeText3)

Hot Topics
 1387
1387
 52
52
 Solution to the problem that Win11 system cannot install Chinese language pack
Mar 09, 2024 am 09:48 AM
Solution to the problem that Win11 system cannot install Chinese language pack With the launch of Windows 11 system, many users began to upgrade their operating system to experience new functions and interfaces. However, some users found that they were unable to install the Chinese language pack after upgrading, which troubled their experience. In this article, we will discuss the reasons why Win11 system cannot install the Chinese language pack and provide some solutions to help users solve this problem. Cause Analysis First, let us analyze the inability of Win11 system to
 Solution for Win11 unable to install Chinese language pack
Mar 09, 2024 am 09:15 AM
Win11 is the latest operating system launched by Microsoft. Compared with previous versions, Win11 has greatly improved the interface design and user experience. However, some users reported that they encountered the problem of being unable to install the Chinese language pack after installing Win11, which caused trouble for them to use Chinese in the system. This article will provide some solutions to the problem that Win11 cannot install the Chinese language pack to help users use Chinese smoothly. First, we need to understand why the Chinese language pack cannot be installed. Generally speaking, Win11
 How to set CPU performance to full in Win11
Feb 19, 2024 pm 07:42 PM
Many users find that the computer is not running smoothly enough when using the Win11 system. They want to improve CPU performance, but they don't know how to do it. The following will introduce in detail how to set the CPU performance to the highest level in Win11 system to make your computer more efficient. Setting method: 1. Right-click "This PC" on the desktop and select "Properties" in the option list. 2. After entering the new interface, click "Advanced System Settings" in "Related Links". 3. In the window that opens, click the "Advanced" tab at the top, then click the & at the bottom of "Performance"
 Strategies to solve Win11's inability to install the Chinese language pack
Mar 08, 2024 am 11:51 AM
Strategies to deal with Win11’s inability to install the Chinese language pack. With the launch of Windows 11, many users can’t wait to upgrade to this new operating system. However, some users have encountered difficulties when trying to install the Chinese language pack, preventing them from using the Chinese interface properly. In this article, we will discuss the problem that Win11 cannot install the Chinese language pack and propose some countermeasures. First, let’s explore why there are problems installing Chinese language packs on Win11. This may be due to the system's
 How to use shortcut keys to take screenshots in Win8?
Mar 28, 2024 am 08:33 AM
How to use shortcut keys to take screenshots in Win8? In our daily use of computers, we often need to take screenshots of the content on the screen. For users of Windows 8 system, taking screenshots through shortcut keys is a convenient and efficient operation method. In this article, we will introduce several commonly used shortcut keys to take screenshots in Windows 8 system to help you take screenshots more quickly. The first method is to use the "Win key + PrintScreen key" key combination to perform full
 Detailed explanation of obtaining administrator rights in Win11
Mar 08, 2024 pm 03:06 PM
Windows operating system is one of the most popular operating systems in the world, and its new version Win11 has attracted much attention. In the Win11 system, obtaining administrator rights is an important operation. Administrator rights allow users to perform more operations and settings on the system. This article will introduce in detail how to obtain administrator permissions in Win11 system and how to effectively manage permissions. In the Win11 system, administrator rights are divided into two types: local administrator and domain administrator. A local administrator has full administrative rights to the local computer
 How to create a folder on Realme Phone?
Mar 23, 2024 pm 02:30 PM
Title: Realme Phone Beginner’s Guide: How to Create Folders on Realme Phone? In today's society, mobile phones have become an indispensable tool in people's lives. As a popular smartphone brand, Realme Phone is loved by users for its simple and practical operating system. In the process of using Realme phones, many people may encounter situations where they need to organize files and applications on their phones, and creating folders is an effective way. This article will introduce how to create folders on Realme phones to help users better manage their phone content. No.
 Win11 Tips Sharing: Skip Microsoft Account Login with One Trick
Mar 27, 2024 pm 02:57 PM
Win11 Tips Sharing: One trick to skip Microsoft account login Windows 11 is the latest operating system launched by Microsoft, with a new design style and many practical functions. However, for some users, having to log in to their Microsoft account every time they boot up the system can be a bit annoying. If you are one of them, you might as well try the following tips, which will allow you to skip logging in with a Microsoft account and enter the desktop interface directly. First, we need to create a local account in the system to log in instead of a Microsoft account. The advantage of doing this is


