

How UniApp implements image uploading and cropping

UniApp is a cross-platform application development framework based on Vue.js, which can quickly develop applications for both iOS and Android platforms. In UniApp, uploading and cropping images is a common requirement. This article will introduce how to implement image uploading and cropping in UniApp, and provide corresponding code examples.
1. How to implement image upload:
- Use the uni.uploadFile() method to upload images. First, you need to specify the upload URL, temporary path of the file, file name and other parameters in the uni.uploadFile() method. An example is as follows:
uni.chooseImage({
count: 1,
success: function (res) {
uni.uploadFile({
  url: 'https://example.com/upload',
  filePath: res.tempFilePaths[0],
  name: 'file',
  success: function (res) {
    console.log('图片上传成功', res);
  },
  fail: function (res) {
    console.log('图片上传失败', res);
  }
});}
});
- Receive and save uploaded images on the server side. The server side can use various back-end languages (such as Node.js, PHP, Java, etc.) to write corresponding interfaces to receive and save uploaded images. For example, using Node.js and the Express framework, you can write the following interface:
const express = require('express');
const multer = require('multer');
const app = express();
const upload = multer({ dest: 'uploads/' });
app.post('/upload', upload.single('file' ), (req, res) => {
console.log('Picture saved', req.file);
res.send('Picture uploaded successfully');
});
app.listen(3000, () => {
console.log('Server has started');
});
2. How to implement image cropping :
- Use third-party image cropping plug-in such as image-cropper. First, install the image-cropper plugin in the UniApp project. It can be installed through the npm command or in the plug-in market. After the installation is complete, introduce the image-cropper component into the page where you need to use the image cropping function:
<image-cropper :src="imageSrc" @crop="cropImage"></image-cropper>
<button @click="uploadCroppedImage">上传裁剪后的图片</button>
<script><br>import imageCropper from '@/components/image-cropper'</p><p>export default {<br> components: {</p><div class="code" style="position:relative; padding:0px; margin:0px;"><pre class='brush:php;toolbar:false;'>imageCropper</pre><div class="contentsignin">Copy after login</div></div><p>},<br> data() {</p><div class="code" style="position:relative; padding:0px; margin:0px;"><pre class='brush:php;toolbar:false;'>return { imageSrc: '' }</pre><div class="contentsignin">Copy after login</div></div><p>},<br> methods: {</p><div class="code" style="position:relative; padding:0px; margin:0px;"><pre class='brush:php;toolbar:false;'>uploadCroppedImage(imageData) { uni.uploadFile({ url: 'https://example.com/upload', filePath: imageData, name: 'file', success: function (res) { console.log('图片上传成功', res); }, fail: function (res) { console.log('图片上传失败', res); } }); }, cropImage(tempFilePath) { this.imageSrc = tempFilePath; }</pre><div class="contentsignin">Copy after login</div></div><p>}<br>}<br></script>
- Write a backend interface to receive and save the cropped image.
As mentioned above, write the corresponding interface on the server side to receive and save the cropped image.
The above is how to upload and crop images in UniApp. By using the uni.uploadFile() method to upload images, and then using the corresponding back-end interface to receive and save images, the image upload function can be implemented. Using a third-party image cropping plug-in, you can easily implement the image cropping function and upload the image to the server after cropping. I hope this article can be helpful to UniApp developers.
The above is the detailed content of How UniApp implements image uploading and cropping. For more information, please follow other related articles on the PHP Chinese website!

Hot AI Tools

Undresser.AI Undress
AI-powered app for creating realistic nude photos

AI Clothes Remover
Online AI tool for removing clothes from photos.

Undress AI Tool
Undress images for free

Clothoff.io
AI clothes remover

AI Hentai Generator
Generate AI Hentai for free.

Hot Article
Hot Tools

Notepad++7.3.1
Easy-to-use and free code editor

SublimeText3 Chinese version
Chinese version, very easy to use

Zend Studio 13.0.1
Powerful PHP integrated development environment

Dreamweaver CS6
Visual web development tools

SublimeText3 Mac version
God-level code editing software (SublimeText3)
Hot Topics
 1378
1378
 52
52

 How to Fix Explorer.exe High CPU Usage Windows 11
May 02, 2023 am 09:40 AM
How to Fix Explorer.exe High CPU Usage Windows 11
May 02, 2023 am 09:40 AM
Unlike the Explorer.exe high CPU usage issue in Windows 11, a computer may experience high CPU usage. This is completely normal, as long as it happens rarely and doesn't significantly affect your PC's performance. However, this can become a problem when it occurs repeatedly. It can heat up your system, delay loading times, and potentially freeze while you're working on important tasks. Why is my computer experiencing high CPU usage with Explorer.exe? Typically, a computer may experience high CPU usage due to one of the following reasons: Running programs that require higher CPU requirements: Video editing and gaming software can trigger high CPU usage. If published with
 How to restore the deleted hosts file
Feb 22, 2024 pm 10:48 PM
How to restore the deleted hosts file
Feb 22, 2024 pm 10:48 PM
Title: How to restore the hosts file after deletion Summary: The hosts file is a very important file in the operating system and is used to map domain names to IP addresses. If you accidentally delete the hosts file, you may be unable to access certain websites or have other network problems. This article will introduce how to recover accidentally deleted hosts file in Windows and Mac operating systems. Text: 1. Restore hosts file in Windows operating system. Hosts file in Windows operating system
 How to edit documents in Tencent Docs? -Tencent Document Editing Document Tutorial Guide
Mar 19, 2024 am 08:19 AM
How to edit documents in Tencent Docs? -Tencent Document Editing Document Tutorial Guide
Mar 19, 2024 am 08:19 AM
Does anyone know how to edit documents in Tencent Docs? It doesn't matter if you don't know. Today, the editor will introduce detailed graphic explanations on how to edit documents in Tencent Docs. I hope it can help you. Detailed graphic explanation of editing documents in Tencent Documents 1. First, enter Tencent Documents directly (if you don’t have it, download it now!) and log in directly (QQ and TIM two login methods are supported) 2. After logging in, click Add in the upper right corner No., directly create online documents, online forms, new folders, etc.! 3. Then enter the information according to your needs!
 How to edit home screen pages on iPhone
Feb 14, 2024 pm 02:00 PM
How to edit home screen pages on iPhone
Feb 14, 2024 pm 02:00 PM
Apple allows you to quickly change your home screen by rearranging your home screen pages at any time and deleting them freely. This way, you can easily hide multiple apps and widgets without dragging and deleting them one by one. In this article, we will explain how to edit pages on your iPhone home screen. CONTENTS[SHOW] Shows how to edit Home screen pages on iPhone You can edit the Home screen to rearrange pages, hide/unhide certain pages in the Home screen, and delete pages completely. To start editing your iPhone home screen, press and hold an empty area on your home screen. When your home screen enters jitter mode, tap the row of dots at the bottom of the screen. You should now see all your home screens displayed in a grid format. Option 1: On the home screen
 What to do if word document cannot be edited
Mar 19, 2024 pm 09:37 PM
What to do if word document cannot be edited
Mar 19, 2024 pm 09:37 PM
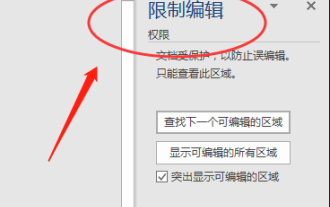
After editing the document, we will save the document to provide convenience for editing and modifying the document next time. Sometimes we can modify it directly after clicking on the edited document, but sometimes for some unknown reason, there is no response no matter how we click on the word document, and the command will not be executed. , what should I do if the word document cannot be edited? Don’t worry, the editor will help you solve this problem. Let’s take a look at the operation process. After opening a Word document, when editing text, you will see a "Restrict Editing" prompt displayed on the right side of the page, as shown in the figure below. 2. You need to cancel editing and you need to know the set password. Click "Stop Protection" below the pop-up prompt, as shown in the figure below. 3. Then enter the password in the "Unprotect Document" dialog box and click OK, as shown in the figure below.
 Windows 11 preview update supports deeper OneDrive integration
May 01, 2023 pm 07:07 PM
Windows 11 preview update supports deeper OneDrive integration
May 01, 2023 pm 07:07 PM
Windows 11 Build 25145 is now available to users in the development channel and includes some minor new features. For example, Build25145 enables tighter integration between OneDrive and Settings. Likewise, it also improves Narrator braille driver support and adds a new local administrator password solution. These improvements are only available to members of the Development Channel. According to the release notes, Windows 11 Build 25145 adds a braille driver solution. The company says braille devices will now work better as they can switch smoothly between Narrator and third-party screen readers because Narrator automatically changes the braille driver. to start
 How to edit messages on iPhone
Dec 18, 2023 pm 02:13 PM
How to edit messages on iPhone
Dec 18, 2023 pm 02:13 PM
The native Messages app on iPhone lets you easily edit sent texts. This way, you can correct your mistakes, punctuation, and even autocorrect wrong phrases/words that may have been applied to your text. In this article, we will learn how to edit messages on iPhone. How to Edit Messages on iPhone Required: iPhone running iOS16 or later. You can only edit iMessage text on the Messages app, and then only within 15 minutes of sending the original text. Non-iMessage text is not supported, so they cannot be retrieved or edited. Launch the Messages app on your iPhone. In Messages, select the conversation from which you want to edit the message
 The specific method of editing vertical subtitles in Edius
Mar 28, 2024 pm 02:52 PM
The specific method of editing vertical subtitles in Edius
Mar 28, 2024 pm 02:52 PM
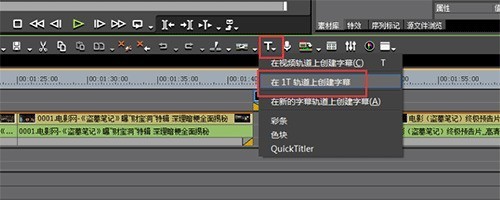
1. Make preparations. Import a piece of material into the material library and drag it to the timeline. 2. Click the [T] button on the timeline track, choose to add subtitles on the 1T track, and you will enter the subtitle editing page. The operation is as shown in the picture: 3. Here you can write the text content we want. It is obvious that the subtitles are written horizontally. Now let’s take a look at how to implement vertical subtitles. Don't write the content yet, select [Insert - Text - Vertical] as shown in the picture: 4. Now write the words and it will be arranged vertically. After adjusting the position, size, font, color and other information of the subtitles, click Save in the upper left corner of the window.
