Files not deleted on Windows 11? 4 ways to force erase them
Many Windows 11 users reported that they were unable to delete certain content from their computers for some reason. This can be annoying because it prevents users from freeing up memory or deleting unwanted files. We will discuss why files cannot be deleted on Windows 11 and how to fix this issue.
Also, you might be interested in our article, What to do if files deleted by File Explorer still show up on your computer.
Why won’t my computer let me delete files?
- This may occur if you are not the file owner or your user account does not have the appropriate access rights.
- The file may be in use by another program or process, preventing it from being deleted.
- The operating system or third-party program may lock the file or folder.
- If your computer's file system is corrupted, it may cause file deletion issues.
- A file or folder can enable the read-only attribute, which restricts modification and deletion.
- Windows protects certain system files and folders from accidental deletion, resulting in restrictions.
- If a filename exceeds the maximum allowed path length, you may encounter problems deleting it.
- Antivirus or security software may interfere with file deletion if it has strict access controls.
What should I do if a file cannot be deleted on Windows 11?
Before proceeding with any advanced troubleshooting steps, we recommend that you adhere to the following preliminary checks:
- Restart your computer to resolve temporary issues affecting file deletion.
- Close the background process using the file and prevent it from being deleted.
1. Close and restart File Explorer
- Right-click the Windows button and click Task Manager in the list menu .
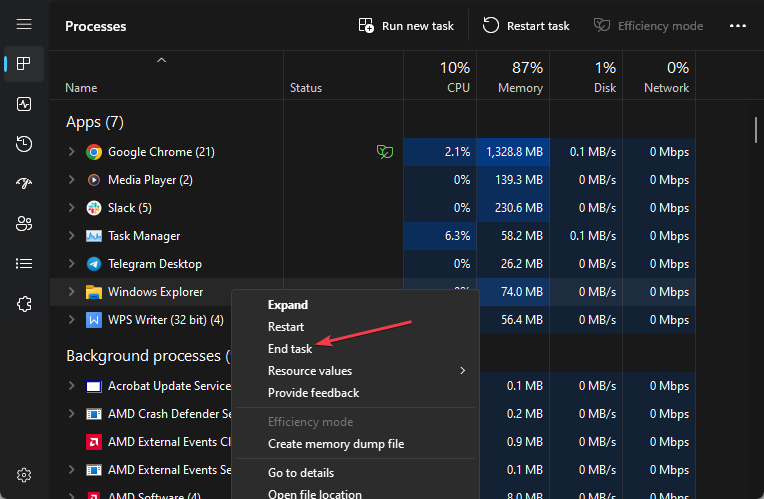
- Navigate to the "Processes" tab. Find Windows Explorer, right-click it and select End Task from the drop-down menu.

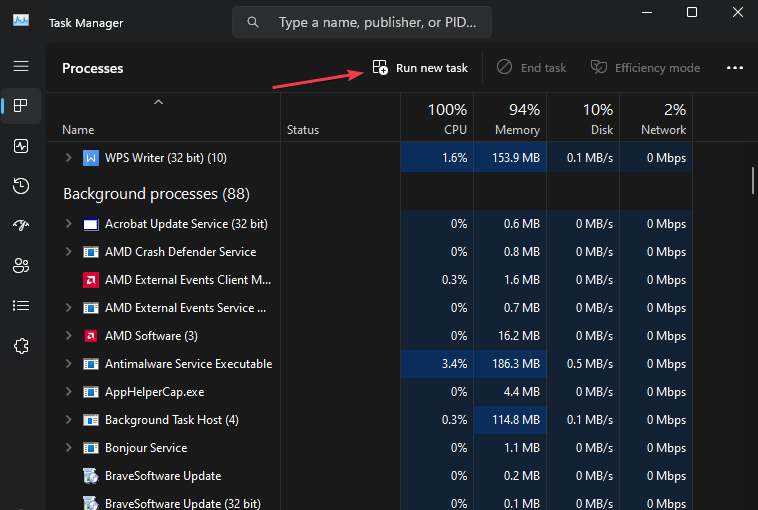
- Click to run a new task.

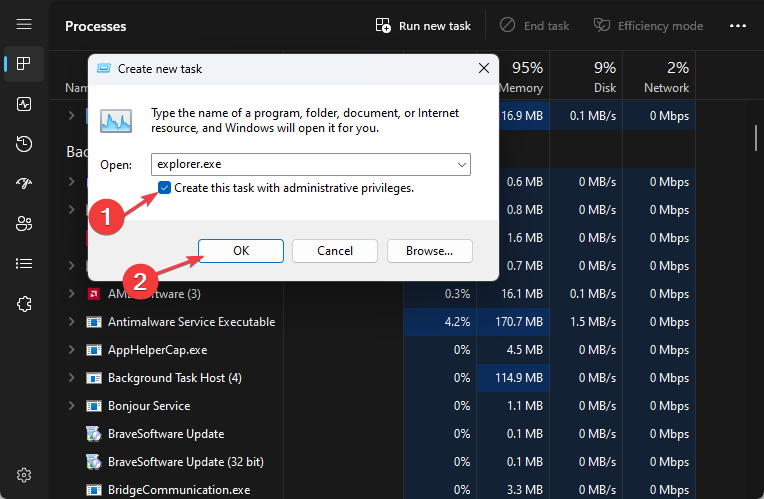
- Type explorer.exe and press to restart File Explorer. Enter

- Try deleting the file again and check if the problem persists.
Restarting File Explorer will resolve any locks or glitches that are preventing it from deleting files.
2. Full Control of Files
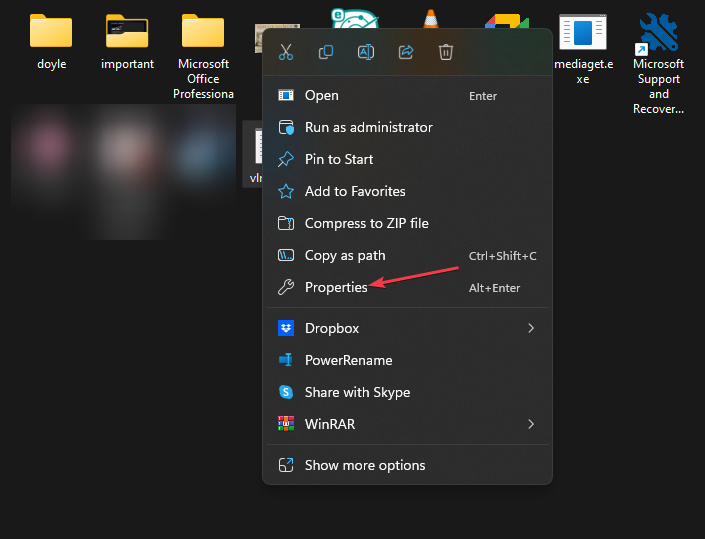
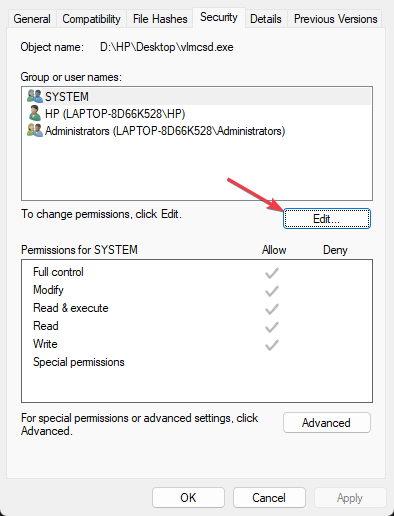
- Right-click the file you want to delete and select Properties from the drop-down menu.

- Go to the Security tab and make sure your user account has the necessary permissions to delete the files.
- If not, click "Edit" to adjust the permissions.

- In the new window, grant full control to your account.
If you do not have the required permissions to delete the file, the above steps will help assign sufficient permissions to change the file.
If you can't bypass the above steps, check out our guide on how to reset permissions on Windows 11.
3. Use command prompt to force delete the file
- Find the file path of the file in File Explorer and copy it.
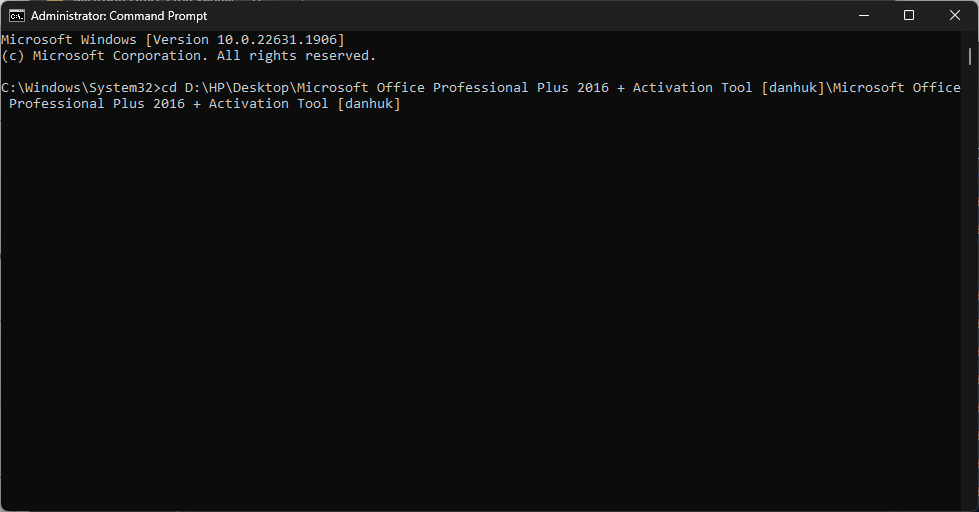
- Left-click the "Start" button, type "Command Prompt", and then click the "Run as administrator" option.
- Click "Yes" on the User Account Control (UAC) prompt.
- Navigate to the file location using the following command and path: For example,
<strong>cd C:\Path\to\file</strong>
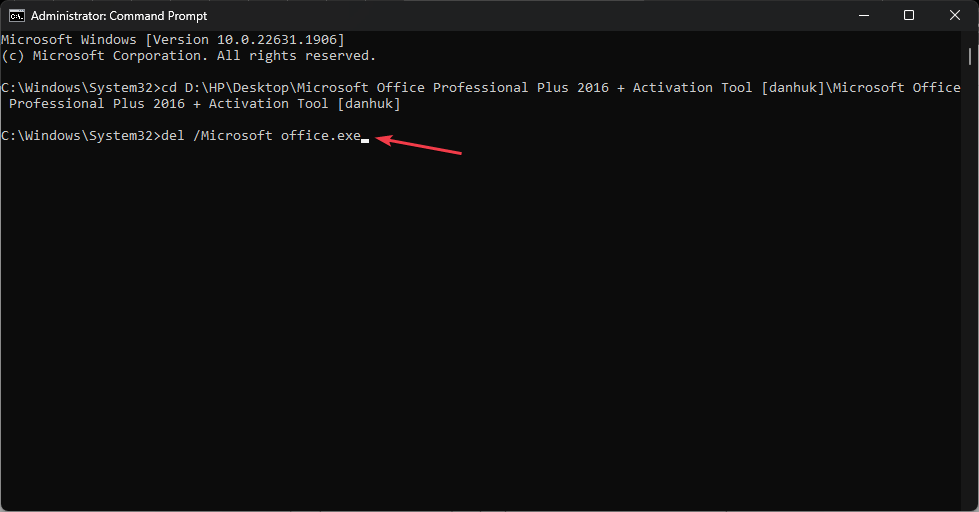
- Enter the correct directory, type the following and press: Enter
<strong>del /f filename.extension</strong> ##Replace filename.extension with The actual name of the file to delete.
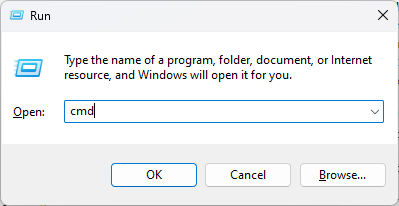
- Press the key to open the
- "Run command" window. Type cmd and press Enter to open Command Prompt. WinR
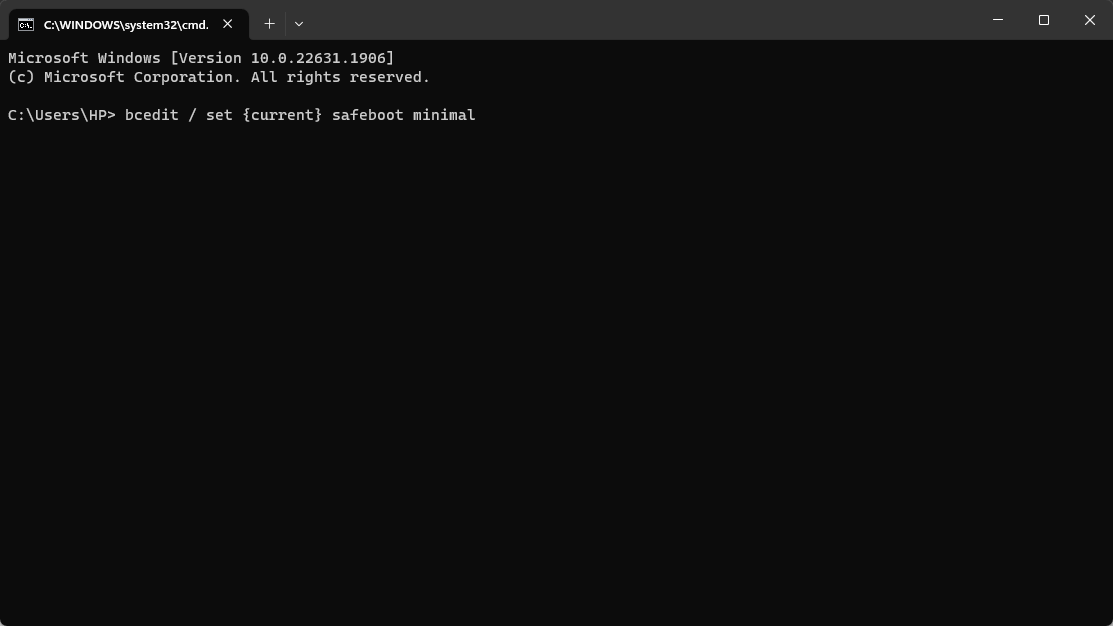
 Type the following at the command prompt and press:
 - Enter
bcedit / set {current} safeboot minimal<strong></strong> Wait for your PC to reboot and display safe mode.
 - After entering safe mode, navigate to the file location and try to delete it.
The above is the detailed content of Files not deleted on Windows 11? 4 ways to force erase them. For more information, please follow other related articles on the PHP Chinese website!

Hot AI Tools

Undresser.AI Undress
AI-powered app for creating realistic nude photos

AI Clothes Remover
Online AI tool for removing clothes from photos.

Undress AI Tool
Undress images for free

Clothoff.io
AI clothes remover

AI Hentai Generator
Generate AI Hentai for free.

Hot Article

Hot Tools

Notepad++7.3.1
Easy-to-use and free code editor

SublimeText3 Chinese version
Chinese version, very easy to use

Zend Studio 13.0.1
Powerful PHP integrated development environment

Dreamweaver CS6
Visual web development tools

SublimeText3 Mac version
God-level code editing software (SublimeText3)

Hot Topics
 How to delete Xiaohongshu notes
Mar 21, 2024 pm 08:12 PM
How to delete Xiaohongshu notes? Notes can be edited in the Xiaohongshu APP. Most users don’t know how to delete Xiaohongshu notes. Next, the editor brings users pictures and texts on how to delete Xiaohongshu notes. Tutorial, interested users come and take a look! Xiaohongshu usage tutorial How to delete Xiaohongshu notes 1. First open the Xiaohongshu APP and enter the main page, select [Me] in the lower right corner to enter the special area; 2. Then in the My area, click on the note page shown in the picture below , select the note you want to delete; 3. Enter the note page, click [three dots] in the upper right corner; 4. Finally, the function bar will expand at the bottom, click [Delete] to complete.
 Is it true that you can be blocked and deleted on WeChat and permanently unable to be added?
Apr 08, 2024 am 11:41 AM
1. First of all, it is false to block and delete someone permanently and not add them permanently. If you want to add the other party after you have blocked them and deleted them, you only need the other party's consent. 2. If a user blocks someone, the other party will not be able to send messages to the user, view the user's circle of friends, or make calls with the user. 3. Blocking does not mean deleting the other party from the user's WeChat contact list. 4. If the user deletes the other party from the user's WeChat contact list after blocking them, there is no way to recover after deletion. 5. If the user wants to add the other party as a friend again, the other party needs to agree and add the user again.
 How to delete Xiaohongshu releases? How to recover after deletion?
Mar 21, 2024 pm 05:10 PM
As a popular social e-commerce platform, Xiaohongshu has attracted a large number of users to share their daily life and shopping experiences. Sometimes we may inadvertently publish some inappropriate content, which needs to be deleted in time to better maintain our personal image or comply with platform regulations. 1. How to delete Xiaohongshu releases? 1. Log in to your Xiaohongshu account and enter your personal homepage. 2. At the bottom of the personal homepage, find the "My Creations" option and click to enter. 3. On the "My Creations" page, you can see all published content, including notes, videos, etc. 4. Find the content that needs to be deleted and click the "..." button on the right. 5. In the pop-up menu, select the "Delete" option. 6. After confirming the deletion, the content will disappear from your personal homepage and public page.
 What to do if the 0x80004005 error code appears. The editor will teach you how to solve the 0x80004005 error code.
Mar 21, 2024 pm 09:17 PM
When deleting or decompressing a folder on your computer, sometimes a prompt dialog box "Error 0x80004005: Unspecified Error" will pop up. How should you solve this situation? There are actually many reasons why the error code 0x80004005 is prompted, but most of them are caused by viruses. We can re-register the dll to solve the problem. Below, the editor will explain to you the experience of handling the 0x80004005 error code. Some users are prompted with error code 0X80004005 when using their computers. The 0x80004005 error is mainly caused by the computer not correctly registering certain dynamic link library files, or by a firewall that does not allow HTTPS connections between the computer and the Internet. So how about
 Find out if your PC has a Neural Processing Unit (NPU) in Windows 11
Mar 16, 2024 pm 06:34 PM
NPU is the abbreviation of neural processing unit, which is a processor specially used to perform calculations such as machine learning algorithms. Simply put, it is a processor specifically designed to accelerate tasks related to artificial intelligence. This article will explain how to check whether a Windows 11 PC is equipped with a Neural Processing Unit (NPU). Find out if your PC has a Neural Processing Unit (NPU) in Windows 11 The following methods will help you determine if your PC has a Neural Processing Unit (NPU) installed in Windows 11. Via Task Manager Via Device Manager By visiting the official website Below, we have explained all these methods in detail. 1] Use Task Manager to check if your PC has NPU on Windows 11 PC
 How to completely delete WeChat File Transfer Assistant_Introduction to how to close WeChat File Transfer Assistant
Mar 20, 2024 pm 08:31 PM
WeChat's file transfer assistant is available to every user. Some users use it as a memo to record some things. So how to completely delete WeChat File Transfer Assistant? Let me introduce it to you in detail below. How to completely delete WeChat File Transfer Assistant? Answer: [WeChat]-[Long press File Transfer Assistant]-[Delete this chat]. Specific steps: 1. First open the WeChat software. After entering the home page, we find [File Transfer Assistant] and press and hold; 2. Then a pop-up will be marked as unread, pin the chat to the top, do not display the chat, and delete the chat. Here We can click [Delete this chat];
 How to completely delete TikTok chat history
May 07, 2024 am 11:14 AM
1. Open the Douyin app, click [Message] at the bottom of the interface, and click the chat conversation entry that needs to be deleted. 2. Long press any chat record, click [Multiple Select], and check the chat records you want to delete. 3. Click the [Delete] button in the lower right corner and select [Confirm deletion] in the pop-up window to permanently delete these records.
 How to send files to others on TikTok? How to delete files sent to others?
Mar 22, 2024 am 08:30 AM
On Douyin, users can not only share their life details and talents, but also interact with other users. In this process, sometimes we need to send files to other users, such as pictures, videos, etc. So, how to send files to others on Douyin? 1. How to send files to others on Douyin? 1. Open Douyin and enter the chat interface where you want to send files. 2. Click the "+" sign in the chat interface and select "File". 3. In the file options, you can choose to send pictures, videos, audio and other files. After selecting the file you want to send, click "Send". 4. Wait for the other party to accept your file. Once the other party accepts it, the file will be transferred successfully. 2. How to delete files sent to others on Douyin? 1. Open Douyin and enter the text you sent.


