

Local Security Authority (LSA) option missing in Windows 11/10 fix

The possible reason behind the missing Local Security Authority (LSA) option in the Windows Security Center app could be a corrupted major component of Windows Security Center. If you don't update your system for a long time, Windows Security Center definitions may become extremely outdated. These are the solutions that should help you get your missing pieces back.
Fix 1 – Manually create the RunAsPPL key
Create the RunAsPPL key and subsequent values to fix LSA issues in Windows Security Center.
Note – Registry editing is not easy. Sometimes, these edits can go wrong and can be dangerous. Therefore, please backup the registry file so that you can use it later.
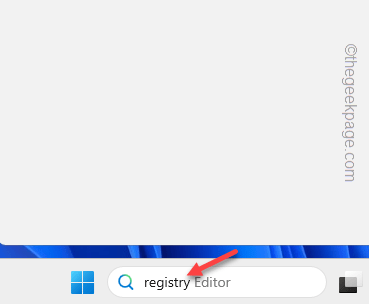
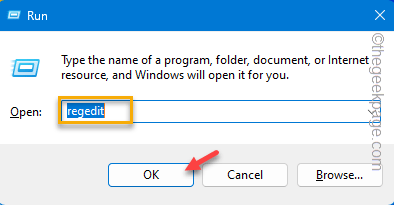
Step 1 –You just need to enter “Registry” in the box and press the Enter key.
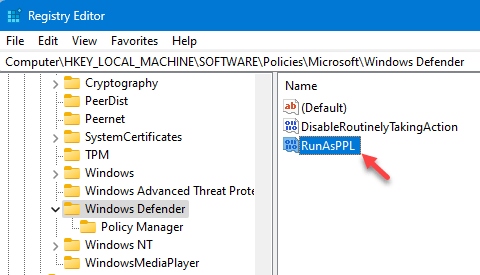
Step 2 –After entering the Registry Editor window, go to this LSA key –
Computer\HKEY_LOCAL_MACHINE\SOFTWARE\Policies\Microsoft\Windows Defender
Step 3 Step – Try to find the “RunAsPPL” value.
Step 4 – Double click on the value so that you can place the value on it.
Cannot find the "RunAsPPL" value? Create values manually.
1. Right-click the right pane of the Registry Editor page, then click "New>", and then click "DWORD (32-bit)" to create a new value.
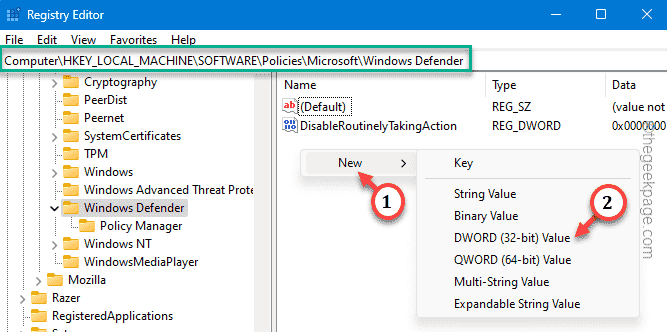
2. Rename this value to "RunAsPPL".
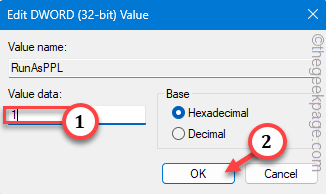
Step 5 –Fix the value at the correct position “1”.
Step 6 –Click “OK” to save this change.
To perform this change, you must restart your computer. After that, restart the system.
Fix 2 – Make LSA Group Policy
LSA can be blocked using Group Policy patch.
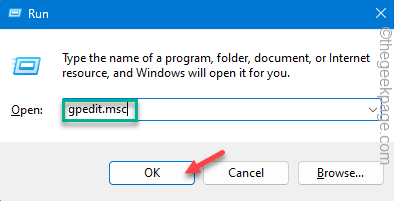
Step 1 –You can open Group Policy directly. To do this, immediately hold down the Win R key.
Step 2 –Put the term in there. Click "OK" to open it.
gpedit.msc
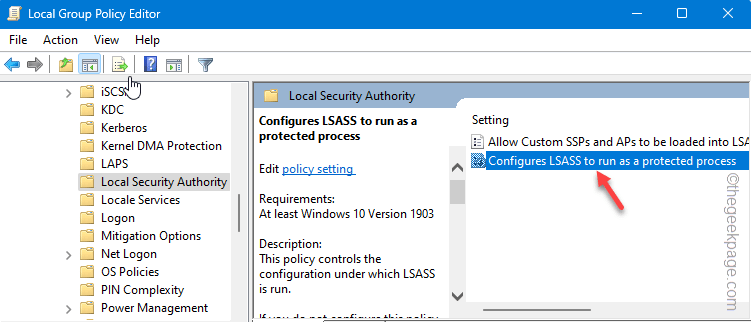
Step 3 –Expand the left pane to access the LSA Security Policy –
Computer Configuration > Administrative Templates > System > Local Security Authority
Step 4 – Turn on the " Configure LSASS to run as a protected process " policy so you can change it.
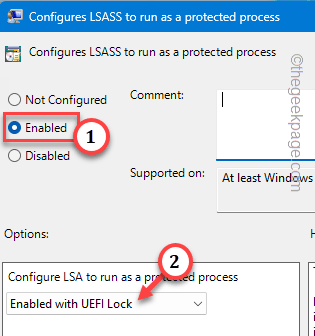
Step 5 –First, switch the policy to “Enabled” mode.
Step 6 –Then, set "Configure LSA to run as a protected process" to "Use UEFI Lockdown Enabled" mode.
Step 7 –You can Apply## only by clicking Apply and OK #thisstrategy.
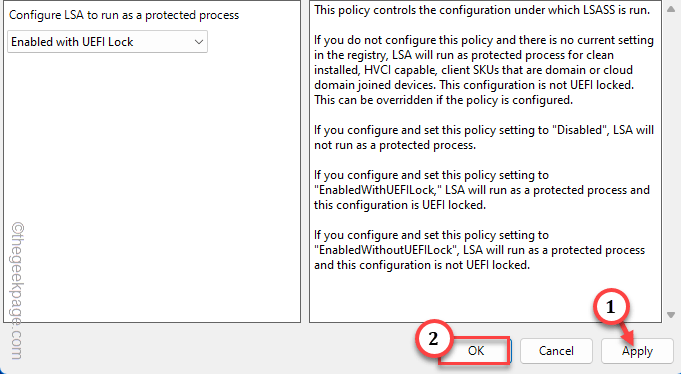
Local Group Policy Editor screen. This LSA policy modification can only be done after a system restart.
Therefore,restart the computer.
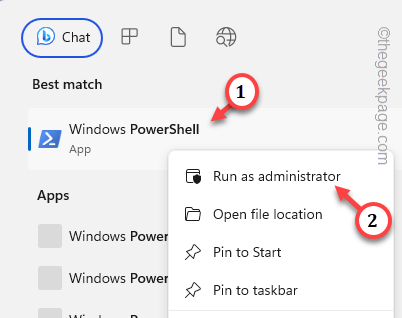
Fix 3 – Repair Windows Security Your third solution is to repair Windows security. Phase 1 – Repair ApplicationStep 1 –Press the Windows button once to open the Start menu.
Step 2 –Then, write “powershell” there.
Step 3 –Once you see it, right-click on it and click “Run as administrator”.
Step 4 –Place this code directly in the open PowerShell terminal. Then, click Enter to execute it.
Get-AppXPackage | Foreach {Add-AppxPackage -DisableDevelopmentMode -Register "$($_.InstallLocation)\AppXManifest.xml"}
现在,这个命令将一次修复所有系统应用程序。但是你的工作还没有完成。
第 2 阶段 – 删除 Windows 安全注册表项
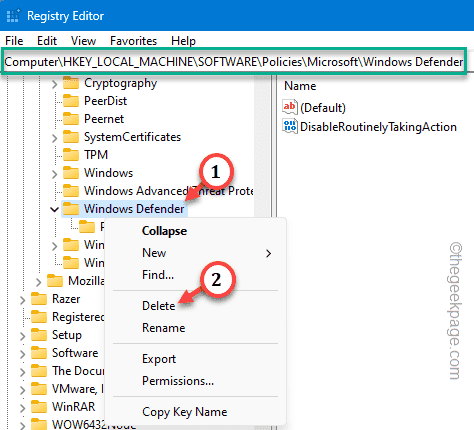
您必须从系统中删除与 Windows 安全相关的注册表项。
步骤 1 –点击键盘上的 Win+R 键。
步骤 2 –直接在其中键入“regedit”,然后使用 Enter 键打开注册表编辑器。
第 3 步 –直截了当地,展开一个又一个键——
Computer\HKEY_LOCAL_MACHINE\SOFTWARE\Policies\Microsoft\Windows Defender
第 4 步 –然后,右键单击“Windows Defender”键并使用上下文菜单中的“删除”选项将其删除。
将出现一条警告消息。继续并点击“是”以确认此删除。
重新启动计算机以使此注册表更改生效。
修复4 –更新Windows安全应用程序
您应该更新 Windows 安全中心应用程序并进行测试。
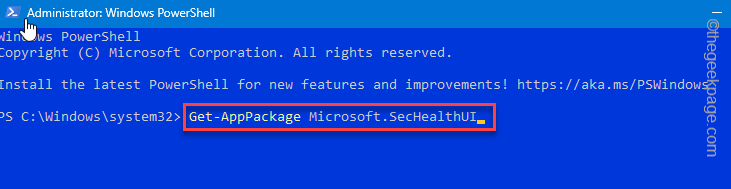
步骤 1 –立即使用 Win+S 后开始输入“powershell”。
步骤 2 – 当你看到它时,你可以右键单击“Windows PowerShell”。接下来,点击“以管理员身份运行”。
步骤 3 – 将此命令复制粘贴到管理 PowerShell 中。按回车键更新 Windows 安全应用。
Get-AppPackage Microsoft.SecHealthUI
Windows 安全应用程序更新将很快安装在你的设备上。
检查这是否对您的情况有帮助。
修复5 –更新计算机
Windows 安全中心通过各种 Windows Update 流获取定期更新。
步骤 1 –打开设置。进入“Windows Update”。
步骤 2 –要查询最新更新,请点击对面的“检查更新”。
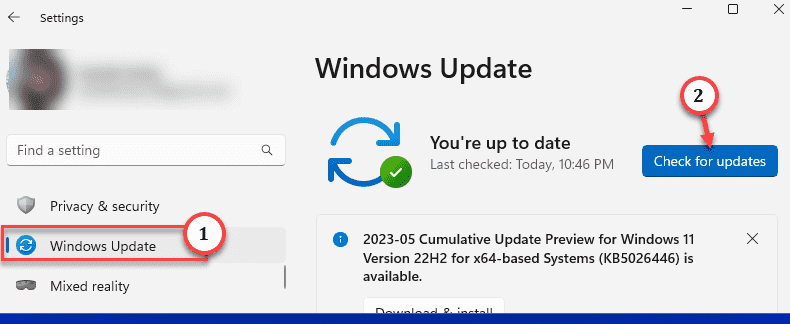
Windows将开始下载最新的Windows安全更新并安装它们。重新启动系统以完成更改。
请在 Windows 安全中心中检查 LSA 的状态。
修复6 –在BIOS中启用虚拟化
本地安全授权 (LSA) 仅在您在 BIOS 模式下启用虚拟化时激活。
步骤 1 –首先,重新启动计算机。
在重新启动过程中,直接按住打开 BIOS 的键。这将直接带您进入 BIOS 页面。
别担心,如果你是第一次错过那个键。让系统启动并重试该过程。
注 – 在某些系统中,您可能需要同时使用 Fn 和相关键才能打开 BIOS 屏幕。

第 3 步 – 转到“高级”选项卡。
第 4 步 –现在,进入BIOS设置后,找到“虚拟化”或“硬件虚拟化支持”功能。打开它。
步骤 5 – 最后,保存并退出 BIOS 页面。
您的系统将自动重新启动。登录到您的帐户,并在 Windows 安全中心中再次检查 LSA 的状态。
The above is the detailed content of Local Security Authority (LSA) option missing in Windows 11/10 fix. For more information, please follow other related articles on the PHP Chinese website!

Hot AI Tools

Undresser.AI Undress
AI-powered app for creating realistic nude photos

AI Clothes Remover
Online AI tool for removing clothes from photos.

Undress AI Tool
Undress images for free

Clothoff.io
AI clothes remover

Video Face Swap
Swap faces in any video effortlessly with our completely free AI face swap tool!

Hot Article
Hot Tools

Notepad++7.3.1
Easy-to-use and free code editor

SublimeText3 Chinese version
Chinese version, very easy to use

Zend Studio 13.0.1
Powerful PHP integrated development environment

Dreamweaver CS6
Visual web development tools

SublimeText3 Mac version
God-level code editing software (SublimeText3)
Hot Topics
 1387
1387
 52
52

 How to make Google Maps the default map in iPhone
Apr 17, 2024 pm 07:34 PM
How to make Google Maps the default map in iPhone
Apr 17, 2024 pm 07:34 PM
The default map on the iPhone is Maps, Apple's proprietary geolocation provider. Although the map is getting better, it doesn't work well outside the United States. It has nothing to offer compared to Google Maps. In this article, we discuss the feasible steps to use Google Maps to become the default map on your iPhone. How to Make Google Maps the Default Map in iPhone Setting Google Maps as the default map app on your phone is easier than you think. Follow the steps below – Prerequisite steps – You must have Gmail installed on your phone. Step 1 – Open the AppStore. Step 2 – Search for “Gmail”. Step 3 – Click next to Gmail app
 Steps to upgrade to the latest version of WeChat (Easily master the upgrade method to the latest version of WeChat)
Jun 01, 2024 pm 10:24 PM
Steps to upgrade to the latest version of WeChat (Easily master the upgrade method to the latest version of WeChat)
Jun 01, 2024 pm 10:24 PM
WeChat is one of the social media platforms in China that continuously launches new versions to provide a better user experience. Upgrading WeChat to the latest version is very important to keep in touch with family and colleagues, to stay in touch with friends, and to keep abreast of the latest developments. 1. Understand the features and improvements of the latest version. It is very important to understand the features and improvements of the latest version before upgrading WeChat. For performance improvements and bug fixes, you can learn about the various new features brought by the new version by checking the update notes on the WeChat official website or app store. 2. Check the current WeChat version We need to check the WeChat version currently installed on the mobile phone before upgrading WeChat. Click to open the WeChat application "Me" and then select the menu "About" where you can see the current WeChat version number. 3. Open the app
 This Apple ID is not yet in use in the iTunes Store: Fix
Jun 10, 2024 pm 05:42 PM
This Apple ID is not yet in use in the iTunes Store: Fix
Jun 10, 2024 pm 05:42 PM
When logging into iTunesStore using AppleID, this error saying "This AppleID has not been used in iTunesStore" may be thrown on the screen. There are no error messages to worry about, you can fix them by following these solution sets. Fix 1 – Change Shipping Address The main reason why this prompt appears in iTunes Store is that you don’t have the correct address in your AppleID profile. Step 1 – First, open iPhone Settings on your iPhone. Step 2 – AppleID should be on top of all other settings. So, open it. Step 3 – Once there, open the “Payment & Shipping” option. Step 4 – Verify your access using Face ID. step
 How to fix red-eye on iPhone
Feb 23, 2024 pm 04:31 PM
How to fix red-eye on iPhone
Feb 23, 2024 pm 04:31 PM
So, you took some great photos at your last party, but unfortunately, most of the photos you took were of red eyes. The photo itself is great, but the red eyes in it kind of ruin the image. Not to mention, some of those party photos might be from your friends’ phones. Today we'll look at how to remove red eye from photos. What causes the red eyes in the photo? Red-eye often occurs when taking photos with flash. This is because the light from the flash shines directly into the back of the eye, causing the blood vessels under the eye to reflect the light, giving the effect of red eyes in the photo. Fortunately, with the continuous advancement of technology, some cameras are now equipped with red-eye correction functions that can effectively solve this problem. By using this feature, the camera takes pictures
 Shazam app not working in iPhone: Fix
Jun 08, 2024 pm 12:36 PM
Shazam app not working in iPhone: Fix
Jun 08, 2024 pm 12:36 PM
Having issues with the Shazam app on iPhone? Shazam helps you find songs by listening to them. However, if Shazam isn't working properly or doesn't recognize the song, you'll have to troubleshoot it manually. Repairing the Shazam app won't take long. So, without wasting any more time, follow the steps below to resolve issues with Shazam app. Fix 1 – Disable Bold Text Feature Bold text on iPhone may be the reason why Shazam is not working properly. Step 1 – You can only do this from your iPhone settings. So, open it. Step 2 – Next, open the “Display & Brightness” settings there. Step 3 – If you find that “Bold Text” is enabled
 Detailed explanation of the steps to obtain Win11 system administrator permissions
Mar 08, 2024 pm 09:09 PM
Detailed explanation of the steps to obtain Win11 system administrator permissions
Mar 08, 2024 pm 09:09 PM
Windows 11, as the latest operating system launched by Microsoft, is deeply loved by users. In the process of using Windows 11, sometimes we need to obtain system administrator rights in order to perform some operations that require permissions. Next, we will introduce in detail the steps to obtain system administrator rights in Windows 11. The first step is to click "Start Menu". You can see the Windows icon in the lower left corner. Click the icon to open the "Start Menu". In the second step, find and click "
 iPhone screenshots not working: How to fix it
May 03, 2024 pm 09:16 PM
iPhone screenshots not working: How to fix it
May 03, 2024 pm 09:16 PM
Screenshot feature not working on your iPhone? Taking a screenshot is very easy as you just need to hold down the Volume Up button and the Power button at the same time to grab your phone screen. However, there are other ways to capture frames on the device. Fix 1 – Using Assistive Touch Take a screenshot using the Assistive Touch feature. Step 1 – Go to your phone settings. Step 2 – Next, tap to open Accessibility settings. Step 3 – Open Touch settings. Step 4 – Next, open the Assistive Touch settings. Step 5 – Turn on Assistive Touch on your phone. Step 6 – Open “Customize Top Menu” to access it. Step 7 – Now you just need to link any of these functions to your screen capture. So click on the first
 Comprehensive Guide to PHP 500 Errors: Causes, Diagnosis and Fixes
Mar 22, 2024 pm 12:45 PM
Comprehensive Guide to PHP 500 Errors: Causes, Diagnosis and Fixes
Mar 22, 2024 pm 12:45 PM
A Comprehensive Guide to PHP 500 Errors: Causes, Diagnosis, and Fixes During PHP development, we often encounter errors with HTTP status code 500. This error is usually called "500InternalServerError", which means that some unknown errors occurred while processing the request on the server side. In this article, we will explore the common causes of PHP500 errors, how to diagnose them, and how to fix them, and provide specific code examples for reference. Common causes of 1.500 errors 1.