4 steps to change user folder names on Windows 11
User folder names and account names are set during user account setup. However, for some reason, you may need to modify your user folder name on Windows 11.
Unlike renaming a standard folder, this process is not that simple. In this guide, we've provided the right information to make the process incredibly easy.
Is it safe to rename my user folder name?
As mentioned before, changing user folder names on Windows 11 is not as simple as renaming a normal folder. Even if you change the user account name, the user folder name will remain the same.
According to Microsoft's recommendations, do not modify the name of the user folder as this may cause some applications to not work properly. This is because the registration pathnames for these will be changed from the default values.
Although this can be solved by changing the path of the faulty application and process, so no lasting damage is caused.
However, it is recommended that you do not change your user folder name unless you have a good reason.
How do I change my user folder name on Windows 11?
1. Create a new administrator account
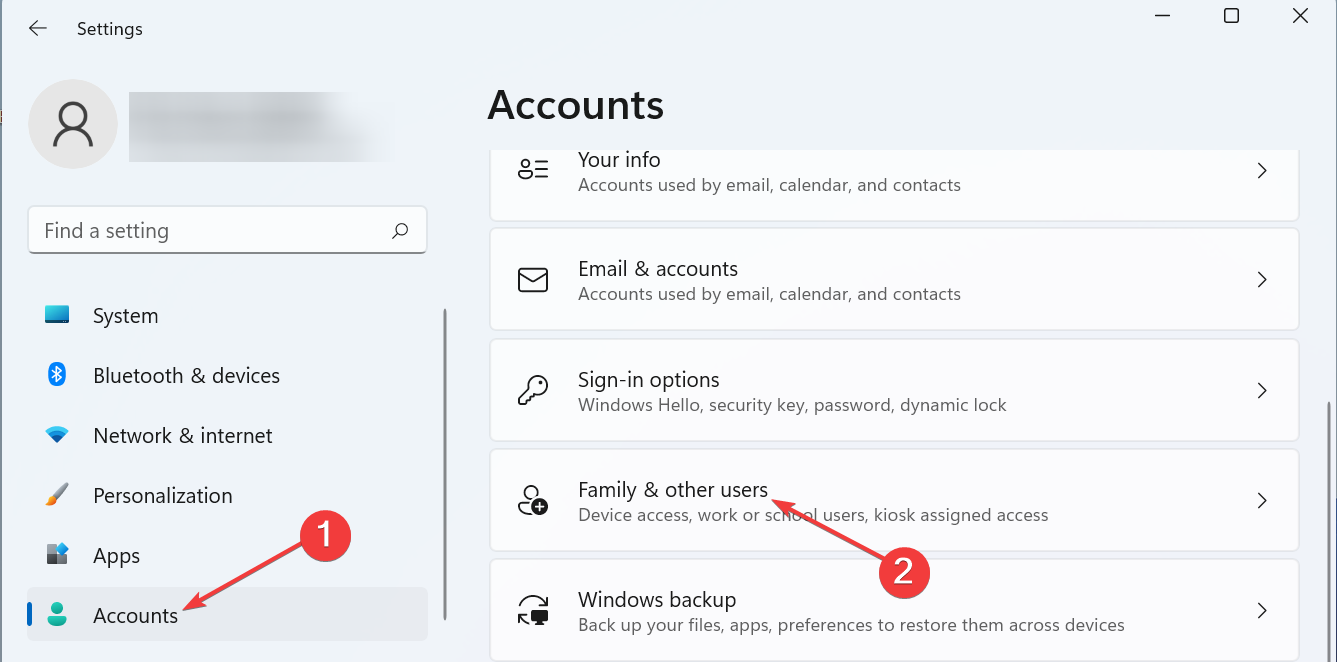
- Press the Windows keyI to open the Settings app and select Accounts ” option in the left pane.
- Select "Family and other users" in the right pane.

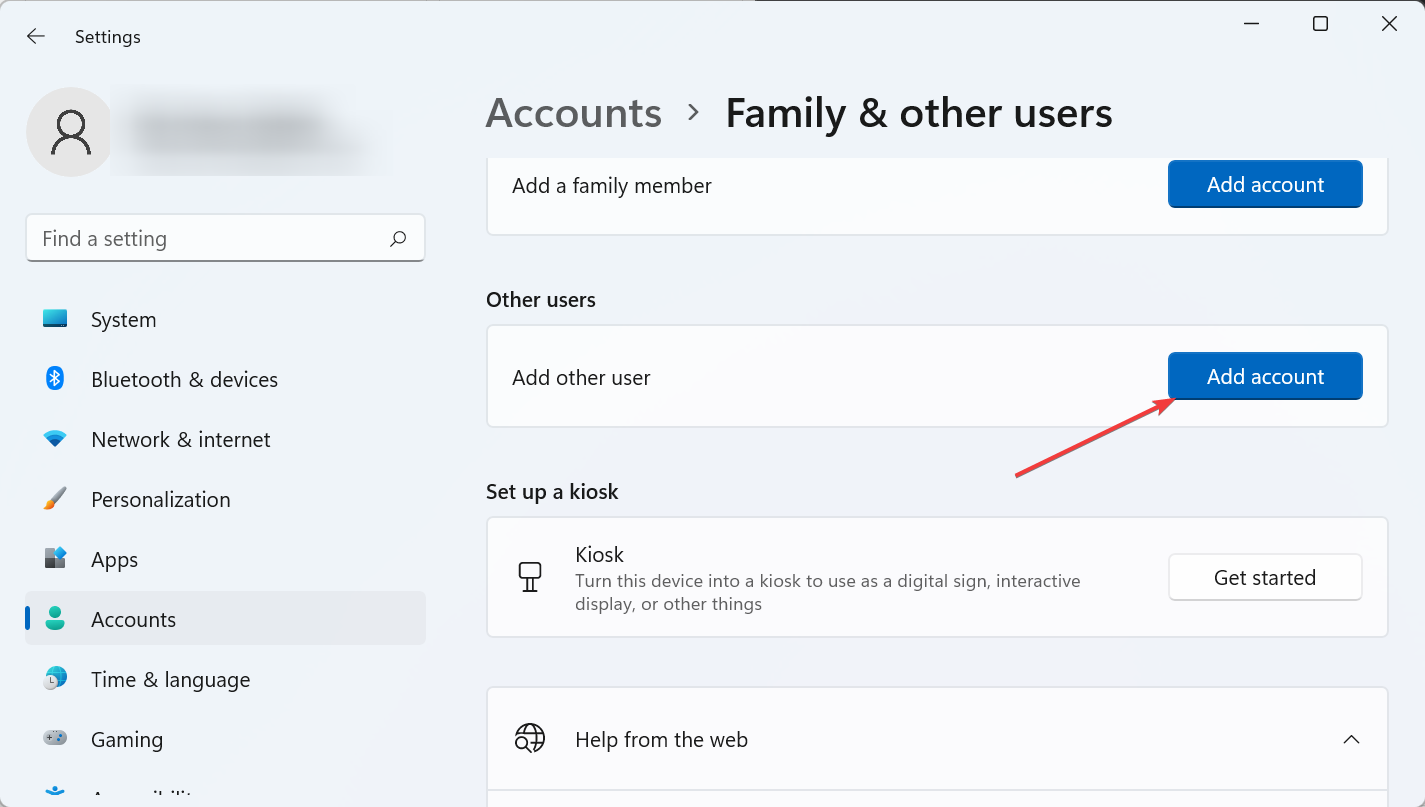
- Now, click on the Add Account button under Other Users.

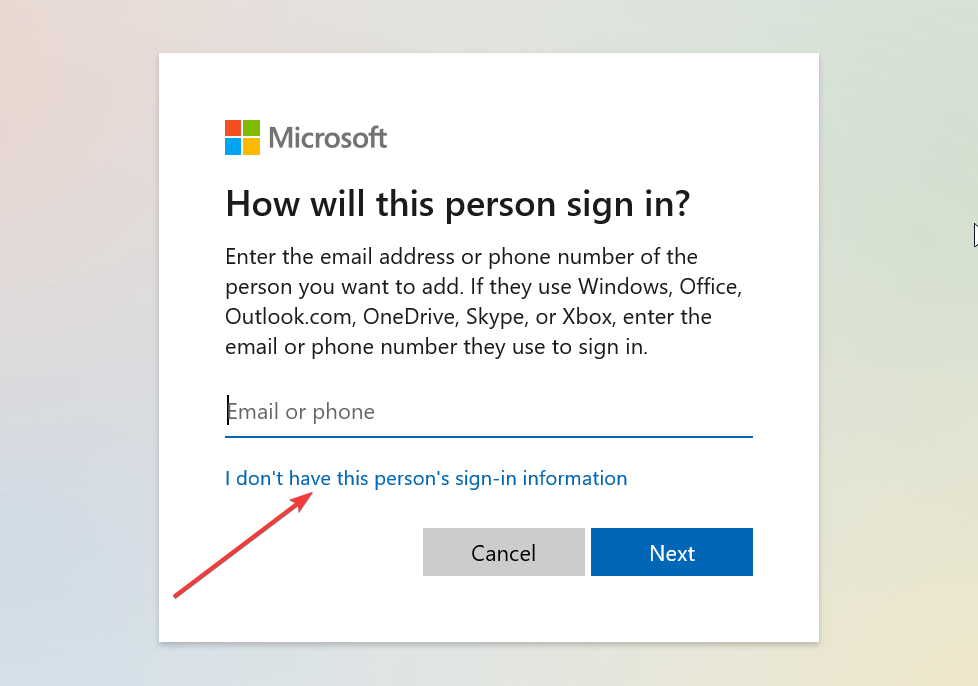
- Next, select "I don't have login information for this person."

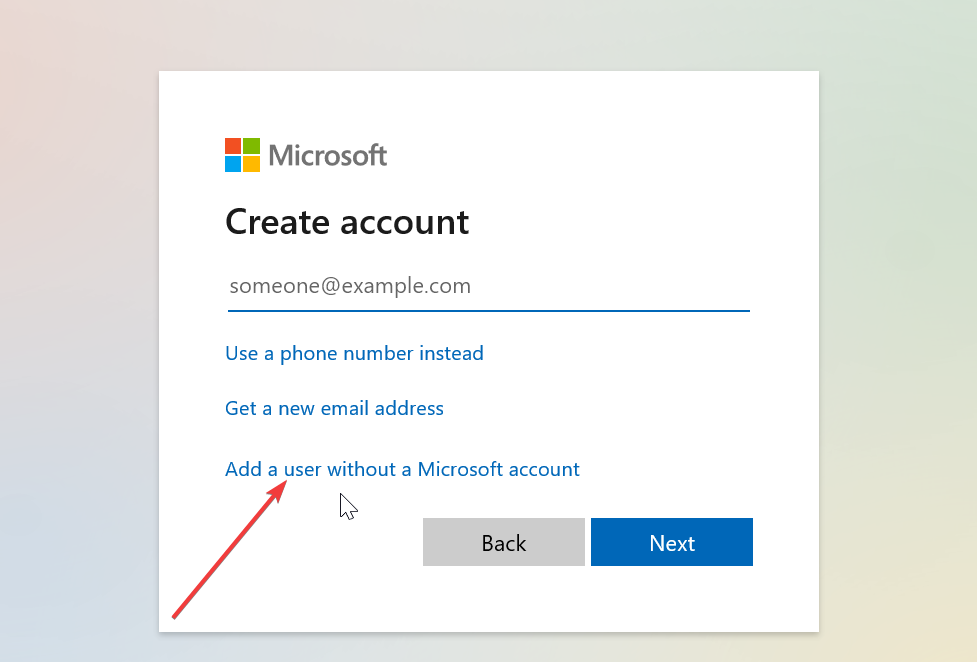
- Click to add a user without a Microsoft account.

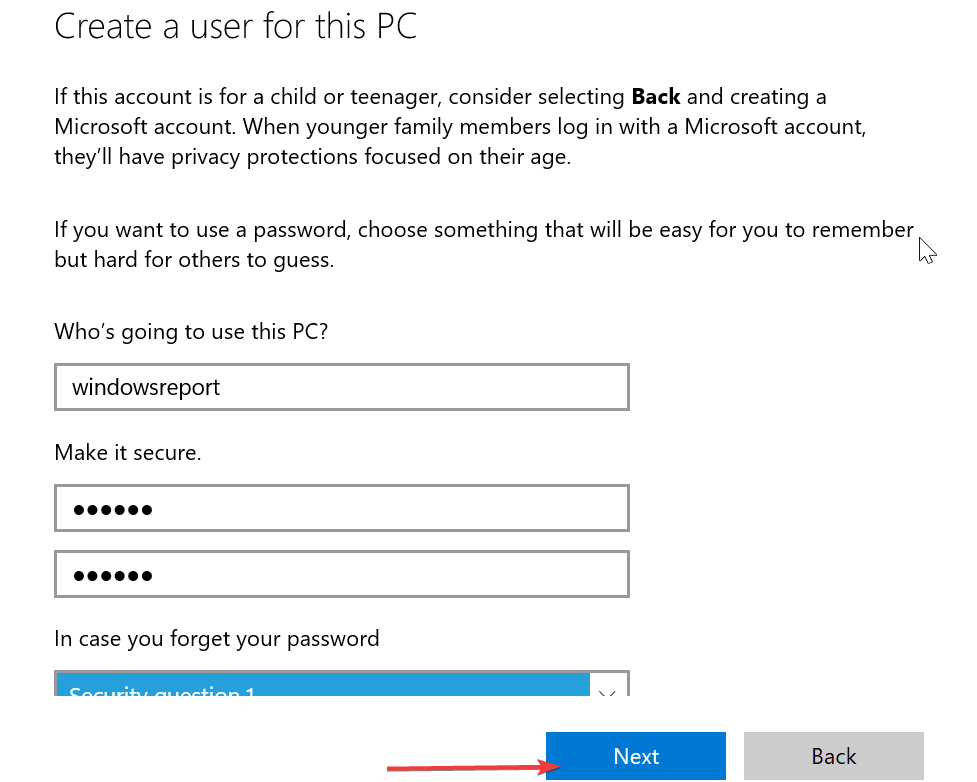
- From here, enter your username, password, and other details and click Next to complete the process.

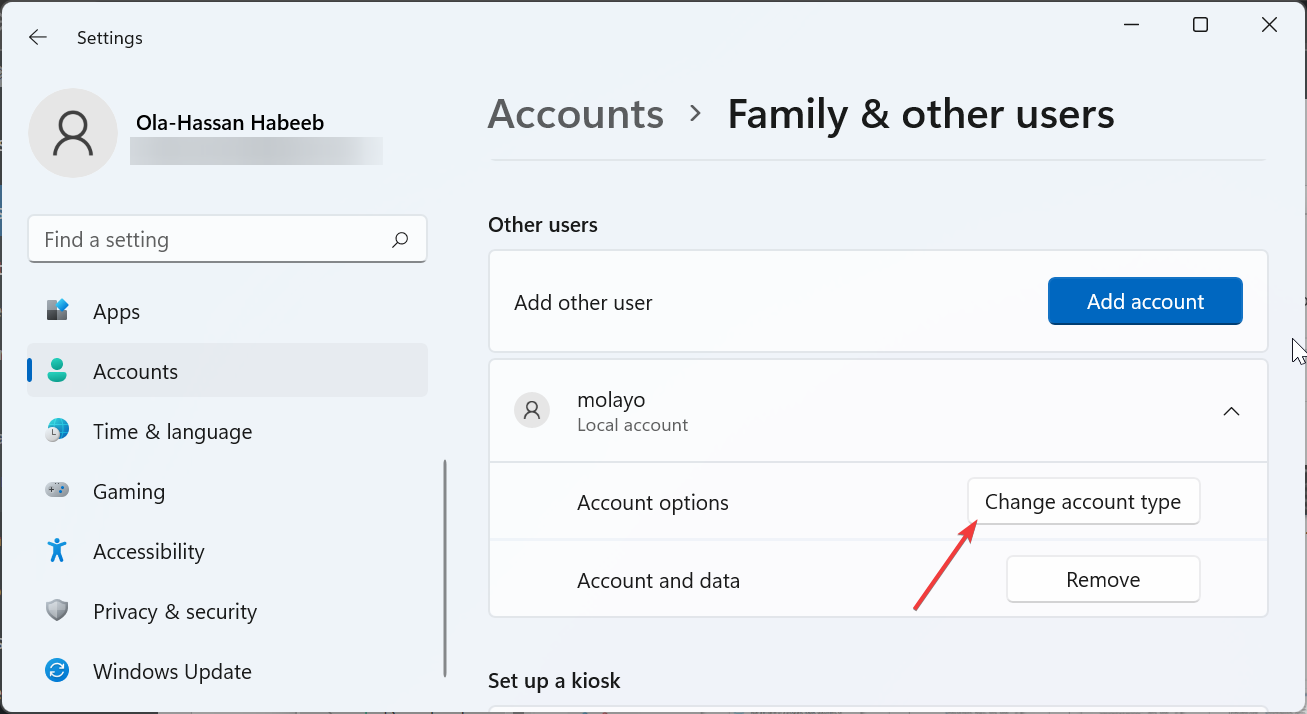
- Now, select the new account you created and select Change Account Type.

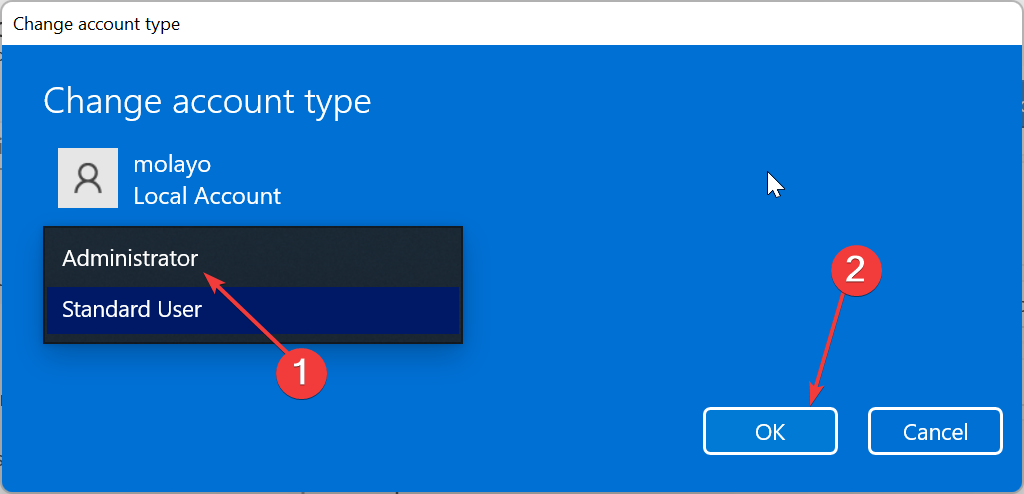
- Click the Account type drop-down list and select the Administrator option.
- Click the OK button to save changes.

- Finally, log out of your account and log in to the new administrator account you created.
To change user folder names on Windows 11, you need to first create a new administrator account. This is because you cannot change the account you are currently logged into.
If you don't want to go through the stress of creating a new admin account, as shown above, you can enable a hidden admin account instead.
After creating the new administrator account, you must continue to the next section to determine the account SID.
2. After confirming the SID
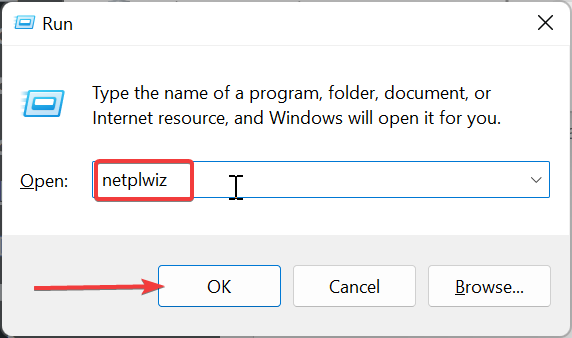
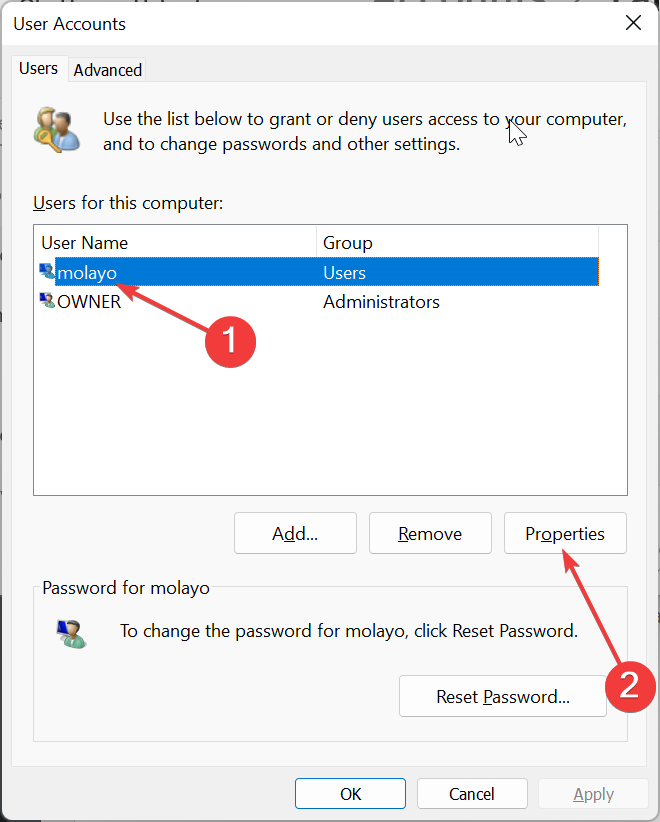
- , log out of the current user account and log in to the new administrator account, press the Windows keyR, type netplwiz and press Enter.

- Now, select the account you are logged into , and then click the Properties button.

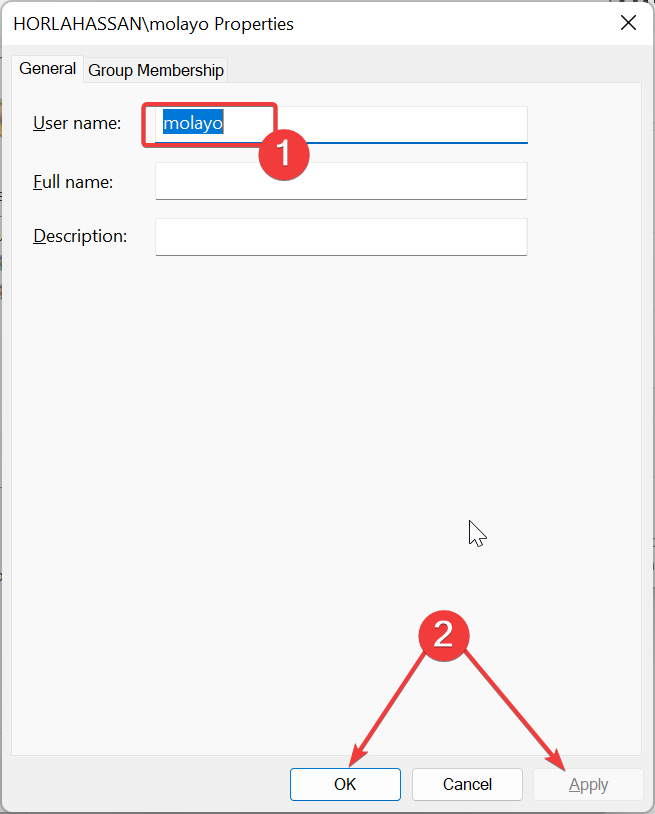
- Check "Username" and "Full Name" under the "User Properties" section.
- Next, set your preferred username and full name.
- Click the "Apply" button and then click "OK".

- Exit the "User Account" page and restart the computer.
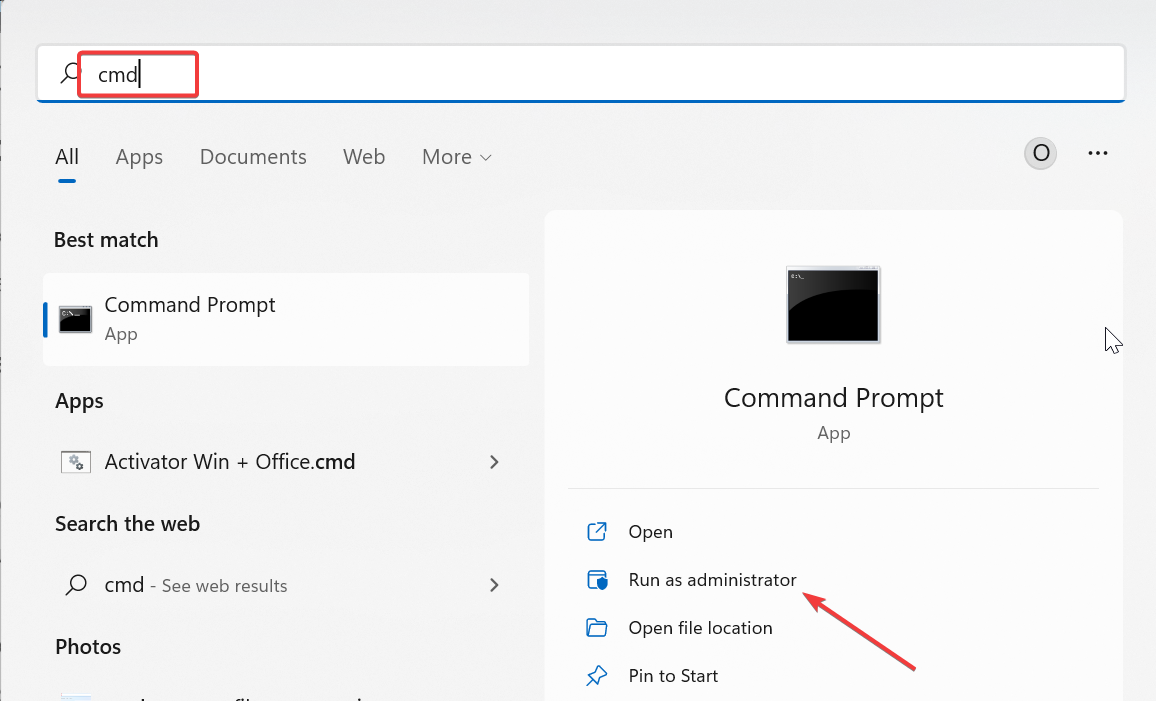
- Now, press the Windows key, type cmd, and then select Run as administrator in the command prompt.

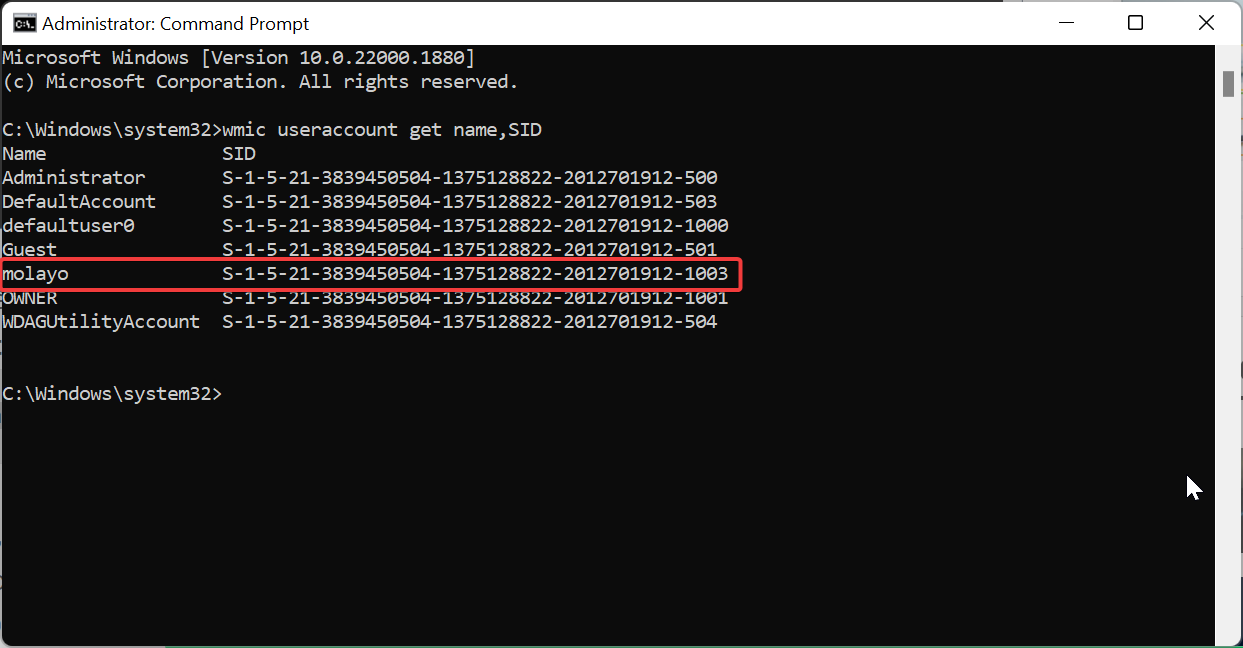
- Enter the following command and click EnterTo view the SID (Security Identifier) of all users on the computer,Please do the following:
<strong>wmic useraccount get name,SID</strong> - Finally, note the of the account whose user profile folder name you want to change SID.

Some PC problems are difficult to solve, especially when Windows' system files and repositories are missing or corrupted.
Be sure to use a specialized tool, such as Fortect, which will scan for corrupted files and replace them with new versions from their repository.
Before changing the user folder name on Windows 11, you must make sure you know the account's SID. First, set a username for the new administrator account to distinguish it from the old account.
You then need to run a command to determine the SID of the account you want to change. Once this is done, you must continue to the next section to change the user folder name from the registry.
Please note that you need to proceed with caution during this step as mistakes can be costly. It's best to create a restore point before continuing.
3. Modify the registry to change the user folder name
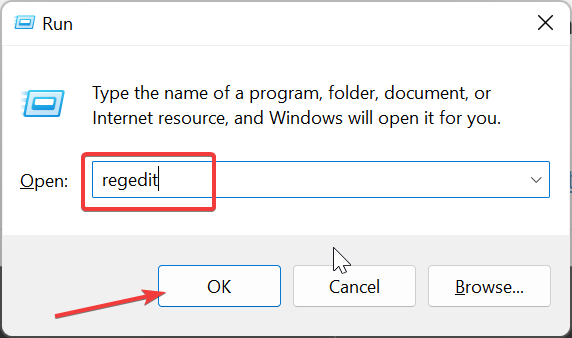
- Press the Windows keyR, type in Registry Editor and click the OK button.

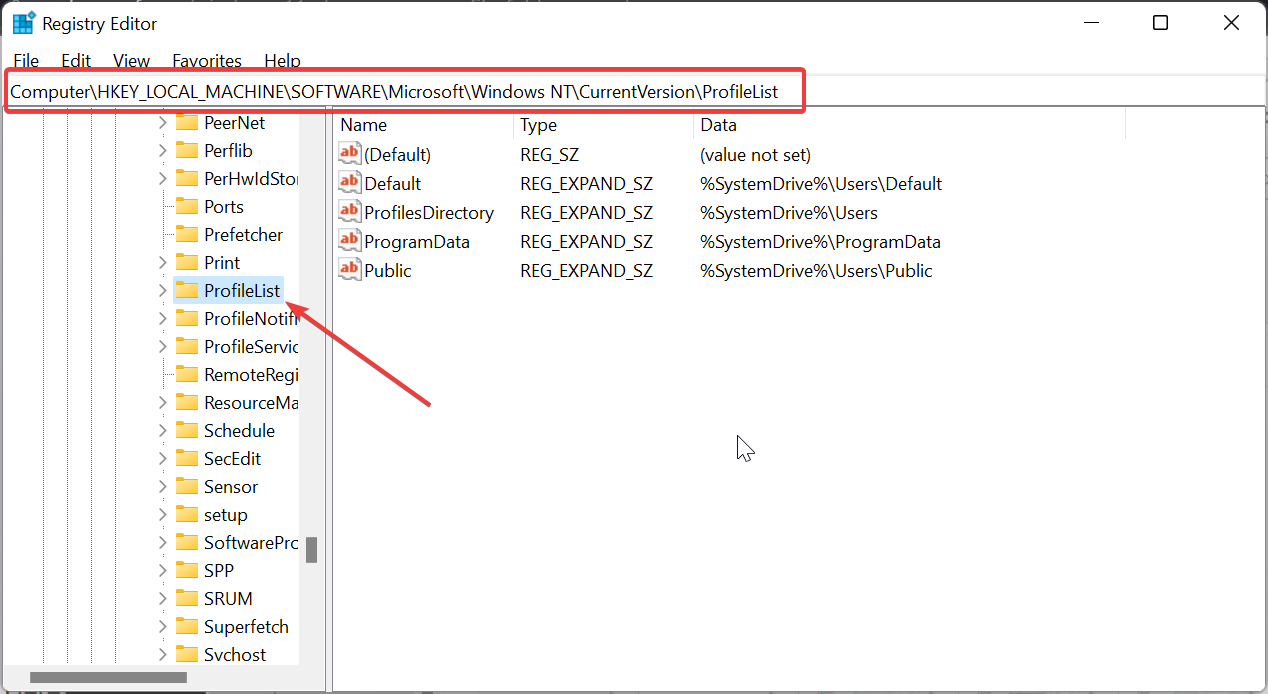
- Navigate to the following path in the left pane:
<strong>HKEY_LOCAL_MACHINE\SOFTWARE\Microsoft\Windows NT\CurrentVersion\ProfileList</strong> - Now, select the Profile List key.

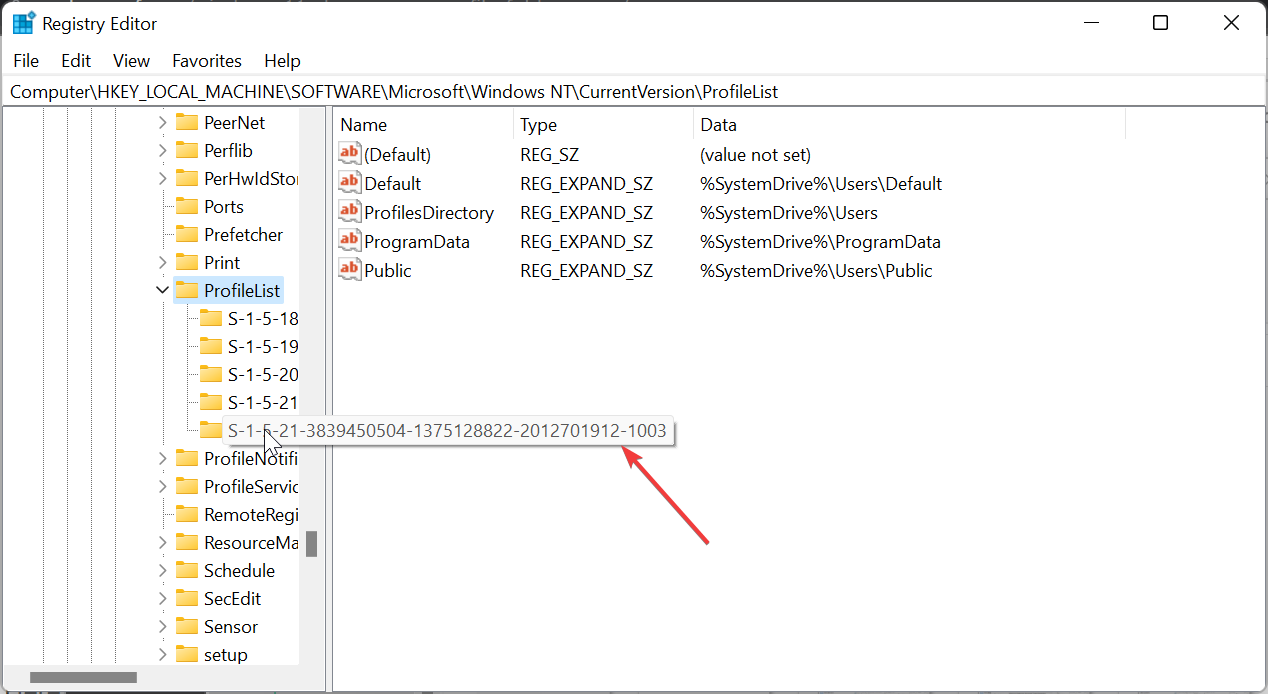
- Next, check the SID you noted in Solution 2 above and click on it.

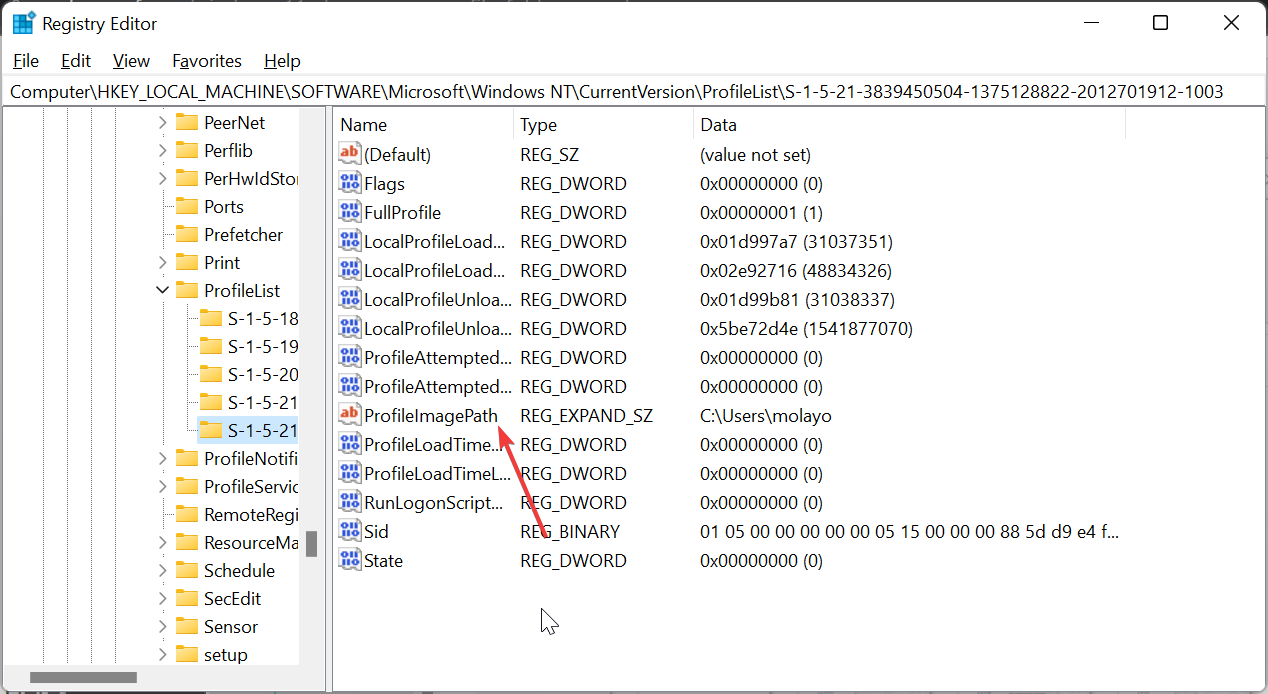
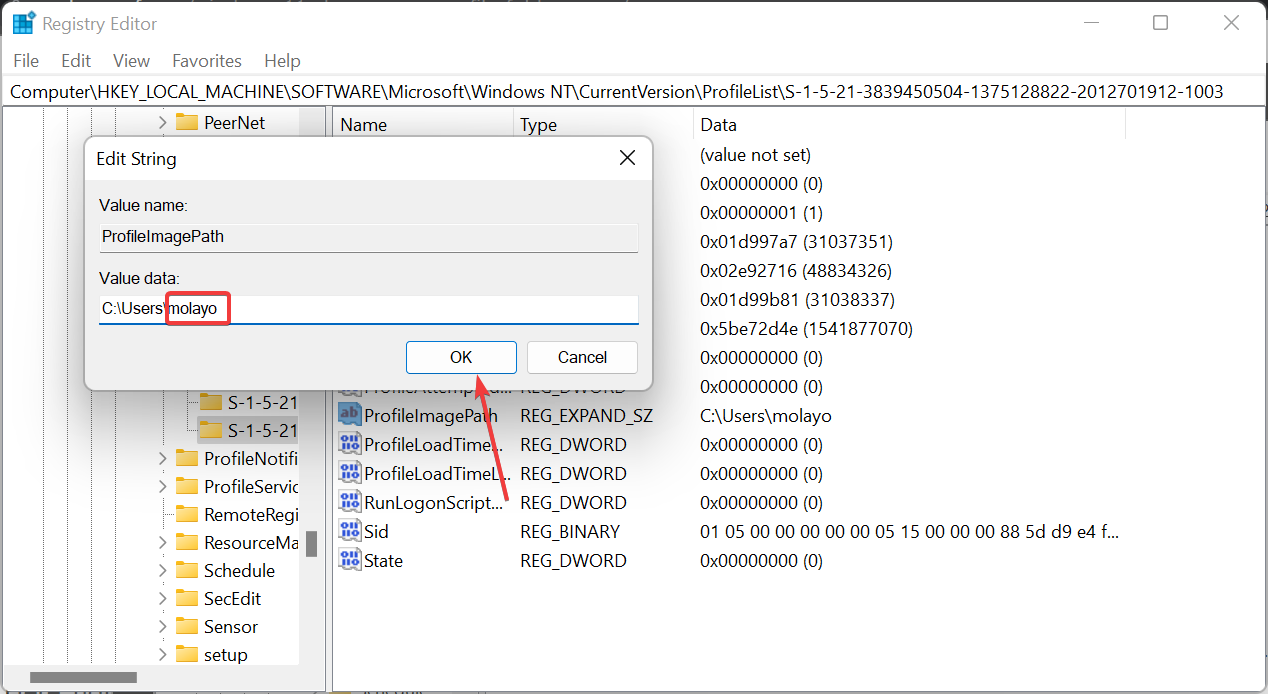
- Double-click Profile Image Path in the right pane.

- #Delete the old name at the end of the path in the Value Data box and add a new name of your choice.
- Finally, click the "OK" button and exit the Registry Editor.

This is the most integral part of the process and it requires you to be careful. After changing the user folder name in Registry Editor on Windows 11, you can now proceed with the following sections to complete the process.
4. Confirm the changes in File Explorer
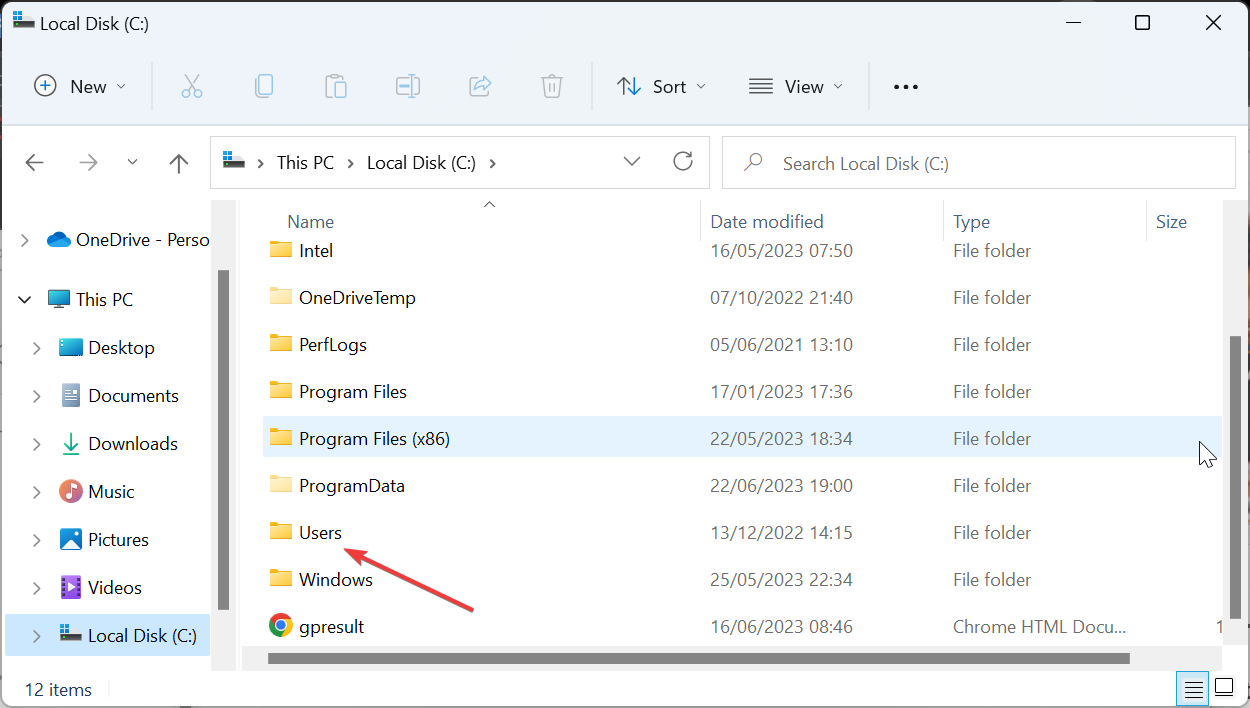
- Press the Windows keyE to launch File Explorer and navigate to the following path:
<strong>C:\Users\</strong>
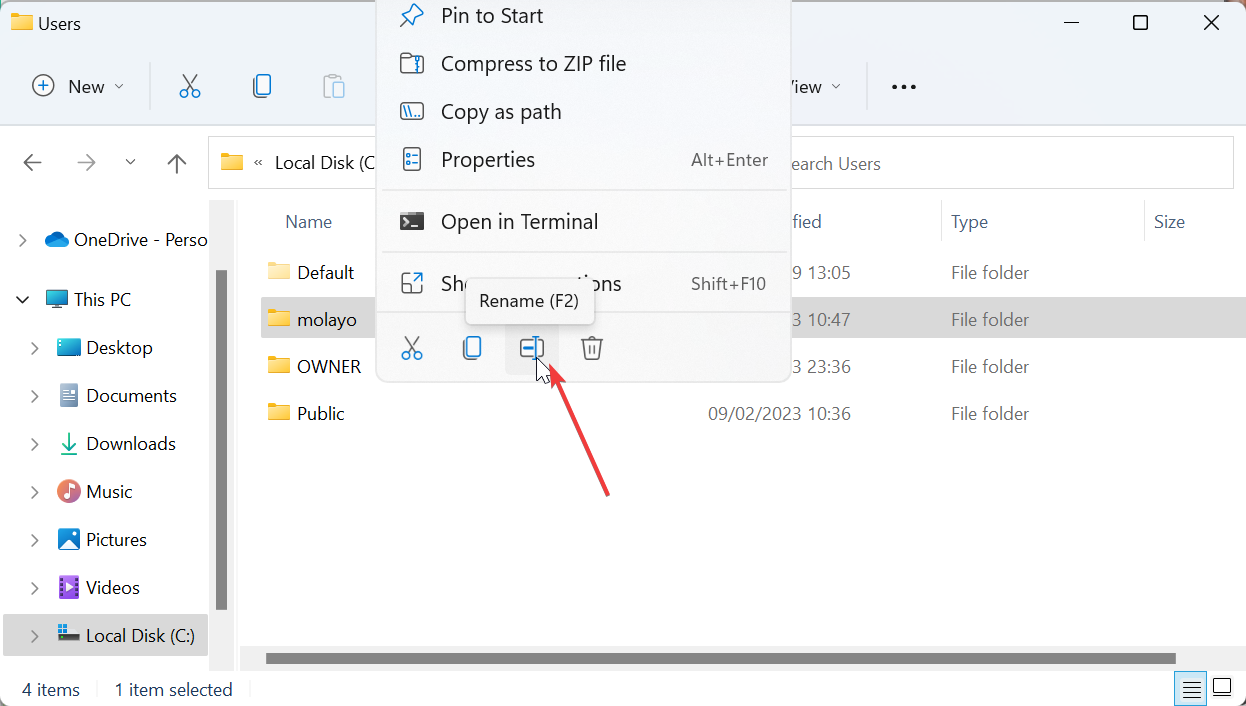
- Right click on the user you want to change folder and select Rename.

- Now, type the new name and press Enter. Please note that it must be the same as the one you set in the Registry Editor corresponding to the name.
- Finally, click Continue when prompted.
In this way, you have successfully changed the user folder name on Windows 11. If you encounter an error like "This operation cannot be performed while renaming a folder," it means that you did not log out of your user account properly.
You need to properly log out of the account, or better yet, restart your PC. Once this process is completed, you can log into the profile using the name of the new folder and start using it normally.
With that, we can wrap up our guide on how to change your user folder name on Windows 11. Although the process is simple by following the steps above, we would like to stress again that you may have issues with some of your applications.
But you can solve this problem by changing the path of these applications. If you're having trouble renaming standard folders on Windows 11, here's our detailed guide to fix it.
The above is the detailed content of 4 steps to change user folder names on Windows 11. For more information, please follow other related articles on the PHP Chinese website!

Hot AI Tools

Undresser.AI Undress
AI-powered app for creating realistic nude photos

AI Clothes Remover
Online AI tool for removing clothes from photos.

Undress AI Tool
Undress images for free

Clothoff.io
AI clothes remover

AI Hentai Generator
Generate AI Hentai for free.

Hot Article

Hot Tools

Notepad++7.3.1
Easy-to-use and free code editor

SublimeText3 Chinese version
Chinese version, very easy to use

Zend Studio 13.0.1
Powerful PHP integrated development environment

Dreamweaver CS6
Visual web development tools

SublimeText3 Mac version
God-level code editing software (SublimeText3)

Hot Topics
 1378
1378
 52
52
 Solution: Your organization requires you to change your PIN
Oct 04, 2023 pm 05:45 PM
The message "Your organization has asked you to change your PIN" will appear on the login screen. This happens when the PIN expiration limit is reached on a computer using organization-based account settings, where they have control over personal devices. However, if you set up Windows using a personal account, the error message should ideally not appear. Although this is not always the case. Most users who encounter errors report using their personal accounts. Why does my organization ask me to change my PIN on Windows 11? It's possible that your account is associated with an organization, and your primary approach should be to verify this. Contacting your domain administrator can help! Additionally, misconfigured local policy settings or incorrect registry keys can cause errors. Right now
 Local users and groups are missing on Windows 11: How to add it
Sep 22, 2023 am 08:41 AM
The Local Users and Groups utility is built into Computer Management and can be accessed from the console or independently. However, some users find that local users and groups are missing in Windows 11. For some people who have access to it, the message suggests that this snap-in may not work with this version of Windows 10. To manage user accounts for this computer, use the User Accounts tool in Control Panel. The issue has been reported in previous iterations of Windows 10 and is usually caused by issues or oversights on the user's side. Why are local users and groups missing in Windows 11? You are running Windows Home edition, local users and groups are available on Professional edition and above. Activity
 How to change the storage location of wallpaper engine? How to set the save path in wallpaper engine
Mar 13, 2024 pm 12:40 PM
Many users like to download various wallpapers and videos on WallpaperEngine. Over time, they will find that more and more wallpapers are downloaded, resulting in insufficient hard disk space. At this time, the storage location of WallpaperEngine can be changed to reduce the space occupied. So let’s take a look at how to change the save path for wallpaperengine. Step 1: Click Settings under steam in the upper left corner to open the following interface. Step 2: Click Download to find the "Steam Library Folder" under the content library, and click Open above. Step 3: Click Add Library Folder, select the path you want to change to, and after adding it, right-click on the default column.
 4 steps to change user folder names on Windows 11
Jul 07, 2023 pm 02:33 PM
User folder names and account names are set during user account setup. However, sometimes for some reason, you need to change your user folder name on Windows 11. Unlike renaming a standard folder, this process is not that simple. But with the right information, the process can be effortless, and that's what we've got you covered in this guide. Is it safe to rename my user folder name? As mentioned before, changing user folder names on Windows 11 is not as simple as renaming a normal folder. Even if you change the user account name, the user folder name will remain the same. Microsoft recommends not changing your user folder name as this may cause some applications to
 How to change the font color of win7 desktop icons
Jan 02, 2024 pm 11:17 PM
The default desktop icon font of win7 is generally white. If we use a white desktop background, the desktop icon text may not be visible. At this time, we can customize the desktop font color through the advanced appearance settings in the personalization settings. The following is Let’s take a look together. Tutorial on changing the font color of win7 desktop icons 1. Right-click a blank space on the desktop and open the "Personalization" settings. 2. Under Theme, we can directly select the desired theme to change the font color of desktop icons. 3. If you are not satisfied with these themes, you can also turn on the "Window Color" as shown in the picture. 4. Click "Advanced Appearance Settings" below 5. Change the "Project" at the icon location to "Desktop" 6. Then you can change various attributes such as font color and size in the red box
 How to adjust the font, style, and size of Notepad in Windows 11
Sep 23, 2023 pm 11:25 PM
Many users want to change the font in Notepad on Windows 11 because the default font is too small or difficult to read for them. Changing fonts is quick and easy, and in this guide, we'll show you how to customize Notepad and change the font to suit your needs. What font does Windows 11 Notepad use by default? As for the default font options, Notepad uses the Consolas font and the default font size is set to 11 pixels. How to change Notepad font size and style in Windows 11? Use the Edit menu in Notepad to click the search button and type notepad. Select Notepad from the list of results. In Notepad, click the Edit menu and select Fonts. You should now see the settings in the left pane
 Fix: Dock in taskbar option is grayed out on Windows 11
Sep 15, 2023 pm 05:35 PM
The language bar is an important feature in Windows that allows users to quickly switch inputs instead of using the + keyboard shortcut. But in some cases, the dock option in the taskbar appears gray in Windows 11. This problem with WindowsSpacebar seems to be very common and there is no solution. We tried changing the language settings and reconfiguring the content, but to no avail. Although we finally managed to find the root cause and solution. Why can't I dock the language bar in the taskbar in Windows 11? You only have one language installed, and the language bar only works with multiple languages. The language is not installed correctly. A bug in Windows 11. Corrupted system files or user profiles. If in W
 Step-by-step guide to changing background color with Eclipse
Jan 28, 2024 am 08:28 AM
Teach you step by step how to change the background color in Eclipse, specific code examples are required Eclipse is a very popular integrated development environment (IDE) that is often used to write and debug Java projects. By default, the background color of Eclipse is white, but some users may wish to change the background color to suit their preference or to reduce eye strain. This article will teach you step by step how to change the background color in Eclipse and provide specific code examples. Step 1: Open Eclipse First


