How to change the default installation path location in win10
How to change the default installation path location in win10? C drive is the system disk of our computer, so the default installation address of most software is on the C drive. However, this will cause our system to run slowly. So how do we change the default installation path of the software? Many friends don’t know how to operate in detail. The editor below has compiled the steps to change the default software installation path in Win10. If you are interested, follow the editor and take a look below!

Steps to change the default software installation path in Win10
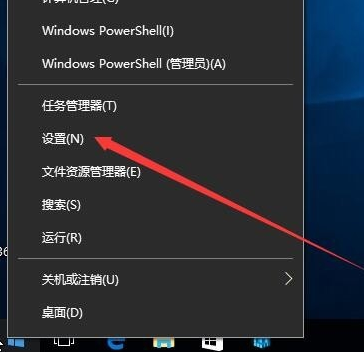
1. Right-click the Start menu button on the Windows 10 desktop and select Set this menu option in the pop-up menu. As shown by the red arrow in the figure.

2. In the opened Windows settings window, we click on the system icon, as shown in the figure where the red arrow is clicked.

3. The system settings window will pop up. Click the storage option in the left sidebar, as shown in the figure.

4. In the opened interface, find the blue font option to change the save location of new content and click it.

5. In the page that opens, in the New application will be saved to the drop-down menu, select the default installation path of win10 software as a storage disk other than the C drive.

6. Select drive D as shown in the figure, and then click the Apply button. Future applications will be saved in the modified D drive, and you can also choose other storage drives to save according to personal preferences.

The above is the entire content of [How to change the default installation path location in Win10 - Steps to change the default installation path of software in Win10]. More exciting tutorials are on this site!
The above is the detailed content of How to change the default installation path location in win10. For more information, please follow other related articles on the PHP Chinese website!

Hot AI Tools

Undresser.AI Undress
AI-powered app for creating realistic nude photos

AI Clothes Remover
Online AI tool for removing clothes from photos.

Undress AI Tool
Undress images for free

Clothoff.io
AI clothes remover

Video Face Swap
Swap faces in any video effortlessly with our completely free AI face swap tool!

Hot Article

Hot Tools

Notepad++7.3.1
Easy-to-use and free code editor

SublimeText3 Chinese version
Chinese version, very easy to use

Zend Studio 13.0.1
Powerful PHP integrated development environment

Dreamweaver CS6
Visual web development tools

SublimeText3 Mac version
God-level code editing software (SublimeText3)


