

Teach you how to use the one-click LAN sharing tool in win10

How to share files on LAN with one click in Wi10 system? We can use the win10 one-click LAN sharing tool to achieve this. There are many similar tools on the market that are more convenient to operate. However, some netizens still don’t know how to use the one-click LAN sharing tool in Win10. The editor below will take one of them as an example to teach you how to use the one-click LAN sharing tool in Win10.
The specific steps are as follows:
1. First search and download the win10 LAN sharing tool.

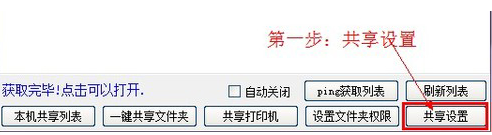
#2. Open the downloaded one-click LAN sharing tool, select the sharing method as needed, and click Sharing Settings in the lower right corner of the interface.
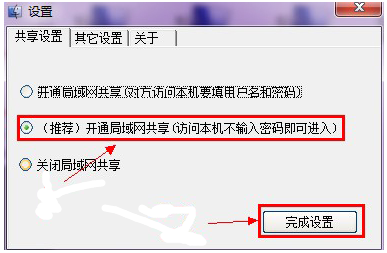
#3. In the setting interface, select the activation of LAN sharing for the counterfeit case. After selecting, click to complete the setting.
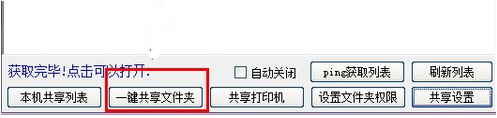
#4. Click the one-click shared folder button in the menu below.
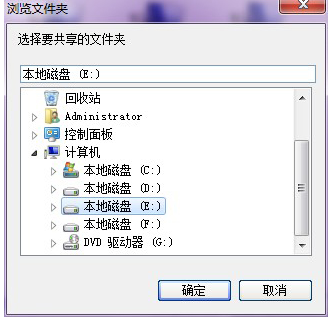
#5. The browse folder window pops up, select the file to be shared and click OK.
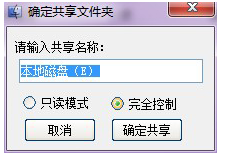
#6. Enter the share name, select the sharing mode, and click OK to share. Then others can see the files you shared through other computers.
The above is how to use the one-click LAN sharing tool in win10. I hope it can help everyone.
The above is the detailed content of Teach you how to use the one-click LAN sharing tool in win10. For more information, please follow other related articles on the PHP Chinese website!

Hot AI Tools

Undresser.AI Undress
AI-powered app for creating realistic nude photos

AI Clothes Remover
Online AI tool for removing clothes from photos.

Undress AI Tool
Undress images for free

Clothoff.io
AI clothes remover

AI Hentai Generator
Generate AI Hentai for free.

Hot Article
Hot Tools

Notepad++7.3.1
Easy-to-use and free code editor

SublimeText3 Chinese version
Chinese version, very easy to use

Zend Studio 13.0.1
Powerful PHP integrated development environment

Dreamweaver CS6
Visual web development tools

SublimeText3 Mac version
God-level code editing software (SublimeText3)
Hot Topics
 1378
1378
 52
52

 Win11 cannot connect to LAN printer, how to solve it?
Jul 01, 2023 am 08:57 AM
Win11 cannot connect to LAN printer, how to solve it?
Jul 01, 2023 am 08:57 AM
What should I do if win11 cannot connect to the LAN printer? Many users' win11 systems cannot connect to the shared printer normally when using the LAN printer function. This problem may occur because the connection steps or a certain functional service are not turned on. Today, the editor has brought you a variety of solutions. Many friends do not know how to operate in detail. The editor below has compiled tips for solving the problem of Win11 computers not being able to connect to shared printers. If you are interested, follow the editor to read below. Look! Tips for solving the problem that win11 computer cannot connect to a shared printer 1. First, press the Win+X key combination on the keyboard, or right-click the Windows start icon on the taskbar, and select Run from the hidden menu item that opens; 2. Run window
 How to view all IP addresses in LAN using cmd
Feb 20, 2023 pm 02:22 PM
How to view all IP addresses in LAN using cmd
Feb 20, 2023 pm 02:22 PM
How to view all IP addresses on the LAN using cmd: 1. Press the "Win+R" shortcut key to open the "Run" window; 2. After entering "CMD" in the "Run" window, press the Enter key; 3. In the open "Command" In the "Prompt" interface, enter the command "arp -a" and press the Enter key; 4. From the returned results, you can see the IP addresses of all computers in the local LAN that communicate with the machine.
 Why do LAN IPs usually start with 192.168 instead of 1.2 or 193.169?
Aug 02, 2023 pm 03:42 PM
Why do LAN IPs usually start with 192.168 instead of 1.2 or 193.169?
Aug 02, 2023 pm 03:42 PM
People who configure routers often use the default IP address of the router as the gateway. Changing it to another IP address is both confusing and troublesome. Don’t believe it yet, people who often do network maintenance set IP addresses, and input “192.168” very smoothly. But this is not the root cause.
 How to use EasyTier remote networking
Jun 19, 2024 am 10:14 AM
How to use EasyTier remote networking
Jun 19, 2024 am 10:14 AM
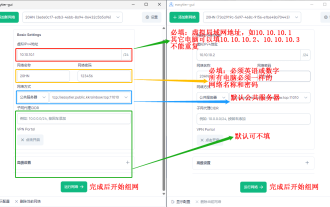
EasyTier is an open source, free, decentralized intranet penetration remote networking tool. It is an easy-to-use and feature-rich remote networking solution, suitable for remote office collaboration, game connection and other scenarios. The following is a brief introduction to how to use EasyTier remote networking. Download the easytier-gui program and install it. Download address: https://github.com/EasyTier/EasyTier Just set it up as shown above on the computer that needs to be networked. Virtual IPv4 address: required. For example, computer A is 10.10.10.1, B is 10.10.10.2, and C is 10.10.10.3. It cannot be repeated. (Such IP segments are available: 10.
 How to solve the network problem that Win11 cannot recognize other computers on the LAN?
Jan 30, 2024 am 10:51 AM
How to solve the network problem that Win11 cannot recognize other computers on the LAN?
Jan 30, 2024 am 10:51 AM
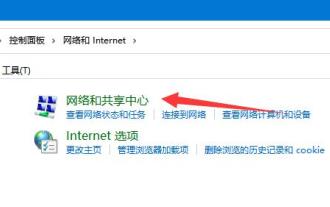
How to solve the problem that other computers in the LAN cannot be found in the Win11 network? The method is very simple. Users can go to Change Advanced Sharing Settings under Network and Internet Settings under the Control Panel, and then select Start Network Discovery to perform the operation. Let this site carefully introduce to users the solution to the problem that other computers on the LAN cannot be found in the Win11 network. Solution to the problem that other computers on the LAN cannot be found in the Win11 network 1. First, we open the control panel. 2. Then enter the network and internet settings. 3. Then open the Network and Sharing Center. 6. There is also a check mark in the guest options below to enable network discovery. It should be noted that both sides of the LAN must be turned on. If one side
 What should I do if I can't see other computers in Windows 10 LAN?
Jul 18, 2023 am 08:02 AM
What should I do if I can't see other computers in Windows 10 LAN?
Jul 18, 2023 am 08:02 AM
Many users share files with other computers through the LAN, but some Windows 10 users report that they cannot see other computers in the LAN. What should they do? You first open the advanced sharing settings and select "Enable network discovery" and "Turn on file and printer sharing." Later, open the service panel, find the Server service item, and right-click to start it. Then open the Programs and Functions panel, choose to turn on or off Windows features, and check "SMB1.0/CIFS shared file support". What to do if you can't see other computers in Windows 10 LAN: 1. First, right-click the "This PC" logo and select the "Properties" menu item in the pop-up menu; 2. Then, in the opened Network and Sharing Center window,
 win11 shared folder requires username and password
Jan 07, 2024 pm 09:01 PM
win11 shared folder requires username and password
Jan 07, 2024 pm 09:01 PM
When we share folders with network users, we will encounter a problem that requires a username and password. At this time, we can solve this problem by providing permissions to the guest account. The win11 shared folder requires a username and password: 1. First, we right-click the start menu and open "Run" 2. Then enter "compmgmt.msc" and press Enter to run. 3. Then enter "Users" and double-click to open the "guest" account. 4. Then check the three options above, and then click "OK" below. 5. After creating the account, find the folder you want to share, right-click to open "Properties" 6. Then enter the "Sharing" option and click "Share" 7. Then enter "guest" and click "Add" 8. Adding completed
 How to handle the problem that WIN10 LAN cannot be accessed
Mar 27, 2024 pm 07:00 PM
How to handle the problem that WIN10 LAN cannot be accessed
Mar 27, 2024 pm 07:00 PM
1. Right-click the [Windows] button in the lower left corner of the desktop, select the [Run] item from its right-click menu to open the [Run] window, or directly press [Windows+R] to quickly open the [Run] window. 2. From the opened [Run] window, enter the command [regedit] and press Enter to open the registry editing interface. 3. Expand the [[HKEY_LOCAL_MACHINESYSTEMCurrentControlSetServicesLanmanWorkstationParameters]] item in turn, right-click the mouse in the blank space on the right, and select the [New]-[DWORD Value (32-bit)] item from the right-click menu. 4. Then create a new