Introduction to downgrading Windows 10 to Windows 7
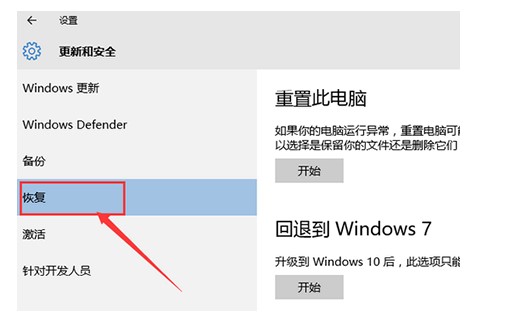
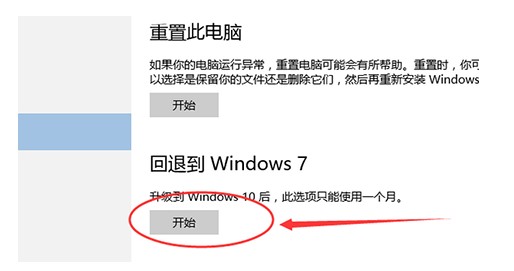
Some users are not used to it after upgrading to Windows 10 system. They want to downgrade the system to Windows 7 system. So how to do it specifically? First, open the computer’s settings options, then click Upgrade and Security to find the repair option. Then click to exit the Windows 7 system, select the reason and complete the account verification, and finally wait for the system to be downgraded to the Windows 7 system.
Introduction to how to downgrade Windows 10 to Windows 7
1. Click the icon on the taskbar at the bottom right, and in the pop-up page, click All Settings Options

2. Select Upgrade and Security in the settings and select the repair option
3. Find the option that will return to wwindows7 and click Start


The above is the detailed content of Introduction to downgrading Windows 10 to Windows 7. For more information, please follow other related articles on the PHP Chinese website!

Hot AI Tools

Undresser.AI Undress
AI-powered app for creating realistic nude photos

AI Clothes Remover
Online AI tool for removing clothes from photos.

Undress AI Tool
Undress images for free

Clothoff.io
AI clothes remover

Video Face Swap
Swap faces in any video effortlessly with our completely free AI face swap tool!

Hot Article

Hot Tools

Notepad++7.3.1
Easy-to-use and free code editor

SublimeText3 Chinese version
Chinese version, very easy to use

Zend Studio 13.0.1
Powerful PHP integrated development environment

Dreamweaver CS6
Visual web development tools

SublimeText3 Mac version
God-level code editing software (SublimeText3)

Hot Topics
 1387
1387
 52
52
 How to upgrade Windows XP to Windows 11
Dec 27, 2023 pm 01:11 PM
Windowsxp is a very old system, its performance is very lagging behind, and it has few functions, but it can support the use of computers with very low configurations. However, the win11 system has recently been launched, and many friends want to know how to directly upgrade to win11. Let’s take a look with the editor. How to upgrade windowsxp to win111? Because the computer hardware configuration of Windowsxp users is generally relatively low, we need to first check whether our system configuration meets the requirements. 2. You can download a Microsoft official software healthcheck to check whether it can be installed. 3. When everyone meets the win11 upgrade requirements, you cannot directly upgrade because Windo
 How to upgrade to Windows 11 and keep your files
Jan 08, 2024 pm 03:45 PM
As we all know, when we upgrade the win11 system, we can choose to retain all files and software, but many friends do not know how to retain it. In fact, just select the corresponding option during installation. Let’s follow the editor’s instructions Get up and take a look. How to keep files when upgrading to win11: 1. We only need to select "keeppersonalfilesandapps" when installing the win11 system and the following interface pops up. 2. If you are using the Chinese version of the installation interface, select "Keep personal files, applications and windows settings" 3. Although the win11 upgrade can keep all files and software, the editor still recommends that you back up your files in advance. 4. Because if
 Detailed steps on how to upgrade computer windows 7 to win10
Jul 11, 2023 pm 08:34 PM
The latest win10 system is released, and many people want to install it. However, since their computers are Windows 7 and they do not want to install dual systems, they want to directly upgrade from Windows 7 to win10 system. Let me share with you a simple method below. 1. First download and install the System Home one-click system reinstallation tool on an available computer, insert an empty USB flash drive of more than 8g, and select the USB flash drive mode to start production. 2. Select the win10 system that needs to be installed in this column and click to start production. 3. After the software automatically completes the production and prompts that it is successful, we can unplug the USB disk and close the software. 4. Insert the USB boot disk into the computer that needs to be installed, and keep pressing the startup hotkey F12 or del etc. to enter the quick startup.
 windows7 system requirements
Jul 16, 2023 pm 08:41 PM
Among many Microsoft systems, although Windows 7 has been released for many years, it is still loved by the majority of users. However, in fact, installing the Win7 system must meet the requirements of the Windows 7 system. There are still many users who do not understand the requirements for installing and running the Win7 system, so then Next, let the editor introduce to you the win7 system requirements. The following win7 system requirements are officially provided by Microsoft: If you want to run Windows7 on your computer, please follow the following methods: 1. 1 gigahertz (GHz) or faster 32-bit (x86) or 64-bit (x64) processor 2. 1GBRAM (32-bit) or 2GBRAM (64-bit) 3. 16GB available hard disk space (32-bit) or 20GB (64-bit)
 Detailed introduction to what configuration is required to upgrade win7 to win10
Jan 03, 2024 pm 08:50 PM
The win7 system has been stopped by Microsoft. Many users have chosen to upgrade to win10, but they don’t know what configuration is required to upgrade win7 to win10. For this reason, we have brought a detailed introduction to see if your configuration meets the standards. What configurations are required to upgrade win7 to win10: 1. CPU 1GHz or above (32-bit or 64-bit processor) 2. Memory 1GB or above based on 32-bit (64-bit 2GB memory) 3. Hard disk 16GB or above available space based on 32-bit (64-bit 20GB or above) ) 4. The graphics card has a WDDM1.0 or higher version driver. The minimum configuration requirements for opening Aero are basically the same. The minimum configuration requirements for opening Aero are basically the same. As long as the user is using win7, it will be fine.
 How to solve the problem of macbook failing to upgrade to win11
Dec 24, 2023 pm 10:00 PM
Many users like to install dual systems on their MacBooks and use Mac and Windows at the same time. Especially since win11 is about to be released recently, I want to experience the win11 system, but I find that my macbook cannot be upgraded to win11. This is because Apple does not support TPM chips, so we can only solve the problem by installing win11 through a virtual machine. What to do if your macbook cannot be upgraded to win11: Method 1: 1. First, we need to go to "Settings" - "Update and Security", and then turn on the "Windows Insider Program" 2. If it cannot be turned on, go to Diagnosis and Feedback and check "Optional Diagnostic Data" and turn on the options below. 3. Then press "⌘+R" on the keyboard
 Detailed tutorial on upgrading win7 to win10
Jul 09, 2023 am 10:33 AM
How to upgrade win7 to win10? The win10 system is now relatively mature, and its functions and performance are relatively stable. So there are many users who use win7 who want to upgrade their system to win10, but they don’t know how to upgrade win7 to win10. It doesn’t matter, the editor will bring you a detailed tutorial on how to upgrade win7 to win10. Friends who are interested, hurry up Come and take a look! 1. Search the Xiaobai one-click system reinstallation official website, download and open the Xiaobai one-click system reinstallation software, and select the win10 system. 2. Select software download. 3. Download the resources and start the installation, please wait patiently. 4. After the environment deployment is completed, select restart. 5. Enter PE and select the second item. 6. Hard disk partition and boot repair. 7
 Introduction to downgrading Windows 10 to Windows 7
Jul 08, 2023 pm 10:37 PM
Some users are not used to it after upgrading to the Windows 10 system. They want to downgrade the system to the Windows 7 system. So how to do it specifically? First, open the computer's settings options, then click Upgrade and Security to find the Repair option, and then click Undo. Exit the Windows 7 system, select the reason and complete the account verification, and finally wait for the system to be downgraded to the Windows 7 system. Introduction to how to downgrade Windows 10 to Windows 7 1. Click on the icon on the taskbar at the bottom right, and in the pop-up page, click on the All Settings option 2. Select Upgrade and Security in the settings, select the Repair option 3. Find the option that will return to Windows 7, and click Start 4. A page will pop up asking you why you returned to Windows.


