Detailed step-by-step tutorial on win7 hard disk partitioning
Under normal circumstances, our computers only have C drive and D drive. Some users need to use multiple drives, but don’t know how to partition them. Recently, a win7 system user wanted to partition the hard drive of his computer. , but don’t know how to operate it, the user is very distressed, so how to partition the hard drive of win7 computer? Today we will bring you the steps to partition the hard drive of win7 computer.
1. Right-click the computer icon, and then open Management-Disk Management. Right-click the free space of the hard disk you want to partition, click New Simple Volume, and then allocate the size of the partition according to your needs. After adjusting, click Next to complete the new partition. How many partitions are needed and so on can be deduced.

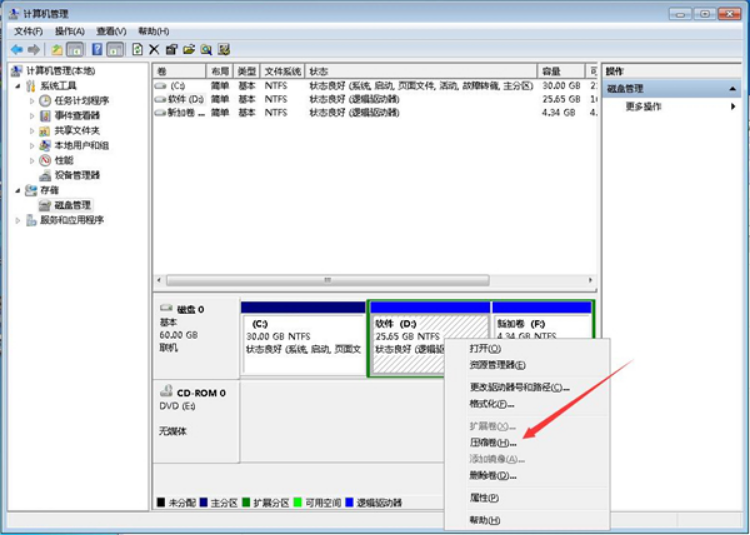
#2. Also open disk management. For example: D drive has 25G and F drive only has 4G. You need to allocate some space from D drive to F drive. Right-click the D drive and click Compress Volume.
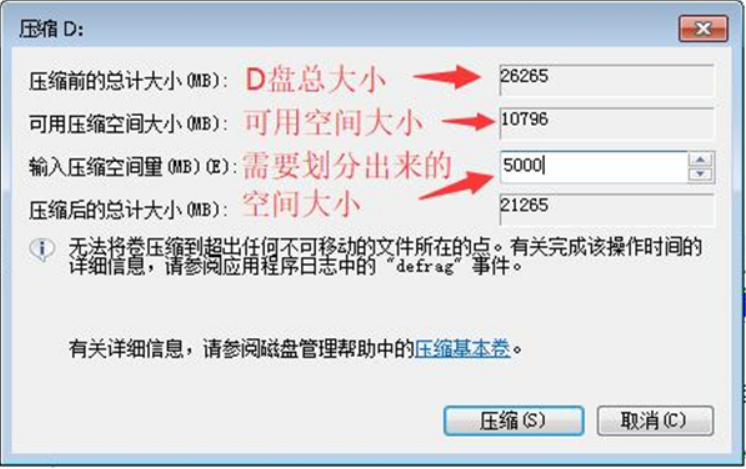
#3. Adjust the size of the space that needs to be compressed, and then click Compress.
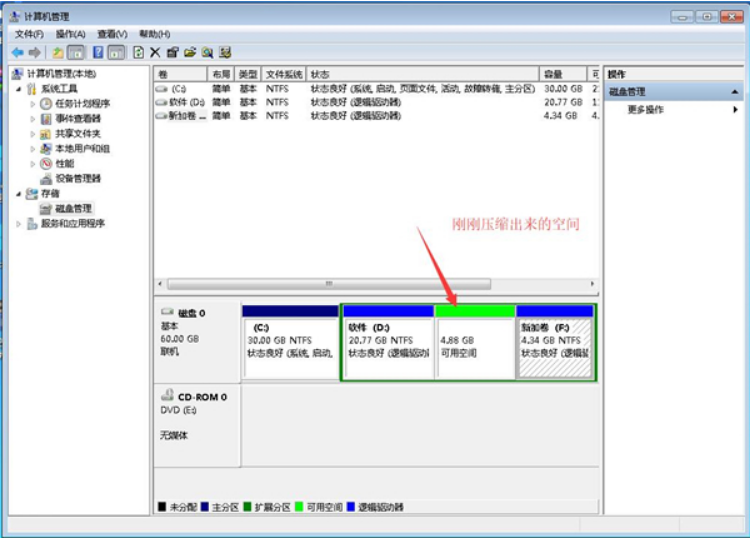
#4. After the compression is completed, a free space will appear. This free space is the space that can be allocated to other partitions.
5. However, the disk management partition that comes with the win7 system can only be allocated to the first partition on the left side of the available space and cannot be allocated to other partitions. Right-click on other partitions and you will I found that the extended volume cannot be clicked. Here I deleted the F drive first (that is, right-clicking the F drive to delete the volume) because there is no data in it. If there is anything, you can put it in another drive first.
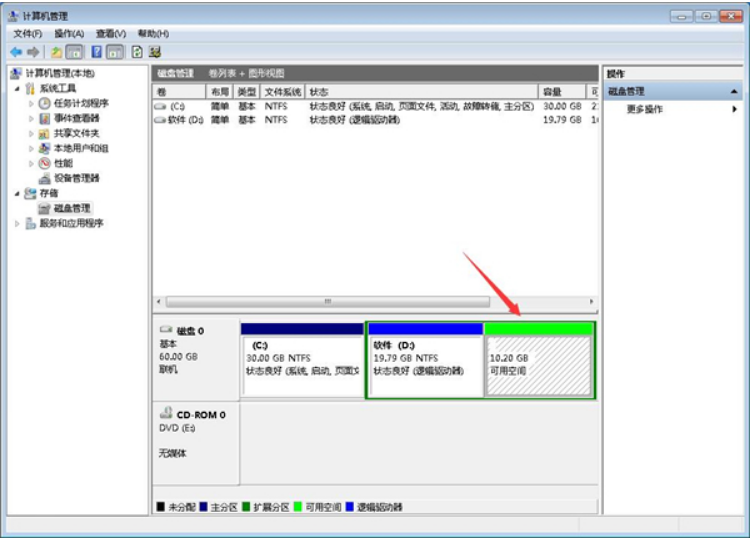
6. Then create a new partition on the available space. The adjustment is completed:
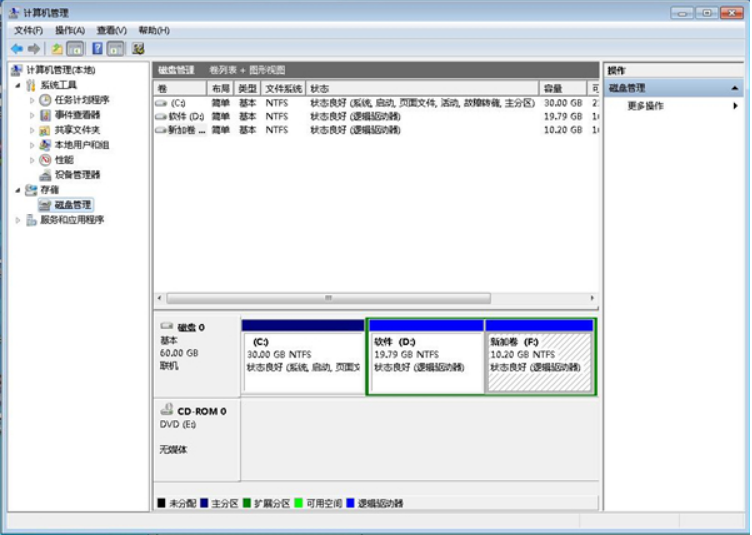
The above is the win7 hard disk Here is a step-by-step tutorial on partitioning, I hope it can help everyone.
The above is the detailed content of Detailed step-by-step tutorial on win7 hard disk partitioning. For more information, please follow other related articles on the PHP Chinese website!

Hot AI Tools

Undresser.AI Undress
AI-powered app for creating realistic nude photos

AI Clothes Remover
Online AI tool for removing clothes from photos.

Undress AI Tool
Undress images for free

Clothoff.io
AI clothes remover

AI Hentai Generator
Generate AI Hentai for free.

Hot Article

Hot Tools

Notepad++7.3.1
Easy-to-use and free code editor

SublimeText3 Chinese version
Chinese version, very easy to use

Zend Studio 13.0.1
Powerful PHP integrated development environment

Dreamweaver CS6
Visual web development tools

SublimeText3 Mac version
God-level code editing software (SublimeText3)

Hot Topics
 1378
1378
 52
52
 Solution to the problem that Win11 system cannot install Chinese language pack
Mar 09, 2024 am 09:48 AM
Solution to the problem that Win11 system cannot install Chinese language pack With the launch of Windows 11 system, many users began to upgrade their operating system to experience new functions and interfaces. However, some users found that they were unable to install the Chinese language pack after upgrading, which troubled their experience. In this article, we will discuss the reasons why Win11 system cannot install the Chinese language pack and provide some solutions to help users solve this problem. Cause Analysis First, let us analyze the inability of Win11 system to
 Solution to Windows 11 black screen with only mouse pointer
Feb 18, 2024 pm 10:50 PM
What should I do if the win11 screen is black and only has mouse arrows? With the continuous development of computer technology, many people are now inseparable from computers. However, sometimes we encounter some problems when using the computer. For example, when using the Win11 system, the screen appears black with only the mouse arrow. This question may be confusing to some non-experts, but don’t worry, we will introduce some solutions below. First, we need to determine whether the problem is temporary or ongoing. If the screen only occasionally goes black, maybe
 How to set CPU performance to full in Win11
Feb 19, 2024 pm 07:42 PM
Many users find that the computer is not running smoothly enough when using the Win11 system. They want to improve CPU performance, but they don't know how to do it. The following will introduce in detail how to set the CPU performance to the highest level in Win11 system to make your computer more efficient. Setting method: 1. Right-click "This PC" on the desktop and select "Properties" in the option list. 2. After entering the new interface, click "Advanced System Settings" in "Related Links". 3. In the window that opens, click the "Advanced" tab at the top, then click the & at the bottom of "Performance"
 Solution for Win11 unable to install Chinese language pack
Mar 09, 2024 am 09:15 AM
Win11 is the latest operating system launched by Microsoft. Compared with previous versions, Win11 has greatly improved the interface design and user experience. However, some users reported that they encountered the problem of being unable to install the Chinese language pack after installing Win11, which caused trouble for them to use Chinese in the system. This article will provide some solutions to the problem that Win11 cannot install the Chinese language pack to help users use Chinese smoothly. First, we need to understand why the Chinese language pack cannot be installed. Generally speaking, Win11
 Strategies to solve Win11's inability to install the Chinese language pack
Mar 08, 2024 am 11:51 AM
Strategies to deal with Win11’s inability to install the Chinese language pack. With the launch of Windows 11, many users can’t wait to upgrade to this new operating system. However, some users have encountered difficulties when trying to install the Chinese language pack, preventing them from using the Chinese interface properly. In this article, we will discuss the problem that Win11 cannot install the Chinese language pack and propose some countermeasures. First, let’s explore why there are problems installing Chinese language packs on Win11. This may be due to the system's
 How to use shortcut keys to take screenshots in Win8?
Mar 28, 2024 am 08:33 AM
How to use shortcut keys to take screenshots in Win8? In our daily use of computers, we often need to take screenshots of the content on the screen. For users of Windows 8 system, taking screenshots through shortcut keys is a convenient and efficient operation method. In this article, we will introduce several commonly used shortcut keys to take screenshots in Windows 8 system to help you take screenshots more quickly. The first method is to use the "Win key + PrintScreen key" key combination to perform full
 How to perform actions that require administrator rights in Windows 11
Feb 18, 2024 am 10:53 AM
What should I do if the operation requested by win11 needs to be improved? With the release of Windows 11, many users can’t wait to upgrade their operating system to get new features and improved user experience. However, when trying to perform certain sensitive operations or change system settings, you may encounter the "The requested operation requires elevation" prompt. So, what should we do when we encounter this situation? First, we need to understand what "the requested operation requires promotion" means. In Windows operating systems, many system-level operations require
 Detailed explanation of obtaining administrator rights in Win11
Mar 08, 2024 pm 03:06 PM
Windows operating system is one of the most popular operating systems in the world, and its new version Win11 has attracted much attention. In the Win11 system, obtaining administrator rights is an important operation. Administrator rights allow users to perform more operations and settings on the system. This article will introduce in detail how to obtain administrator permissions in Win11 system and how to effectively manage permissions. In the Win11 system, administrator rights are divided into two types: local administrator and domain administrator. A local administrator has full administrative rights to the local computer


