Win10 start menu recently used items display example tutorial
There are many application items in the start menu, but it is inconvenient to find them every time you open them. Therefore, it is very convenient to operate on the recently used items. In order to better assist users who are difficult to use, we provide Changed the display method of recently used items in the win10 start menu.
Recently used items in the win10 start menu:
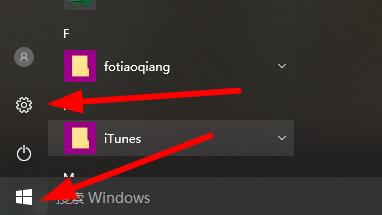
1. First, click Start at the bottom left, and then enter settings.

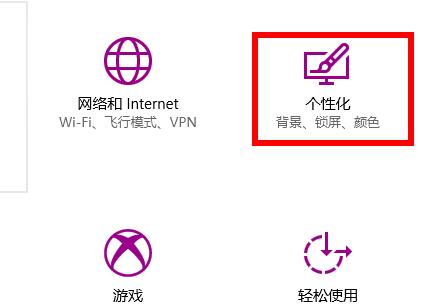
#2. Next, click "Personalization" in Windows settings.

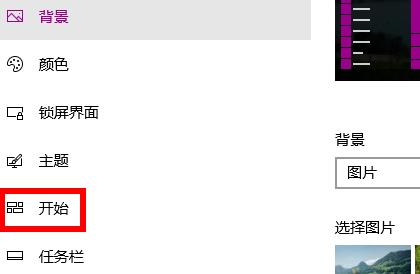
#3. Click "Start" on the left in Personalization.

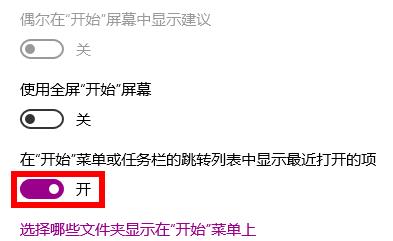
#4. Finally, turn on the switch under "Show recently opened items in the automatic jump directory of the Start menu or taskbar icon".

The above is the detailed content of Win10 start menu recently used items display example tutorial. For more information, please follow other related articles on the PHP Chinese website!

Hot AI Tools

Undresser.AI Undress
AI-powered app for creating realistic nude photos

AI Clothes Remover
Online AI tool for removing clothes from photos.

Undress AI Tool
Undress images for free

Clothoff.io
AI clothes remover

AI Hentai Generator
Generate AI Hentai for free.

Hot Article

Hot Tools

Notepad++7.3.1
Easy-to-use and free code editor

SublimeText3 Chinese version
Chinese version, very easy to use

Zend Studio 13.0.1
Powerful PHP integrated development environment

Dreamweaver CS6
Visual web development tools

SublimeText3 Mac version
God-level code editing software (SublimeText3)

Hot Topics
 When your USB C is not recognized by Windows 11, there are over 5 fixes to choose from.
May 08, 2023 pm 11:22 PM
USB-C connectors are now standard on most modern phones, laptops, and tablets. In other words, we have entered the USB-C era, and the traditional rectangular USB Type-A plugs we have become accustomed to are gradually disappearing. You can now charge your Windows 11 PC and communicate via USB-C connection with other USB Type-C gadgets that have USB-C ports (such as display adapters, docking stations, phones, etc.). Unfortunately, certain software and hardware combinations can cause problems. When this happens, you may see a message indicating that the USB-C connection has failed. In this article, we will show how to fix Win
 How to set up windows 10 eye protection mode. Example tutorial of setting windows 10 eye protection mode.
Jul 15, 2023 pm 01:01 PM
Some Windows 10 users often use the computer at night, but long-term use is not good for their eyes, so they need to set the eye protection mode for the computer. So how should they do this? In fact, you can turn on the dark mode, which also has the function of protecting eyesight. The specific steps are: open the settings control panel, click the system software to enter, and then select the display on the left, and then you can see the dark mode on the right interface. Just turn on its power switch. How to set the eye protection mode in Windows 10: 1. "Win+i" opens the settings and clicks the first "System" to set the channel mark and enter the system settings interface; 2. In the detailed settings area on the right side of the dialog box, there is a night light power switch, the default setting remains on
 How to Put Your Windows 11 Computer to Sleep 8 Ways
May 09, 2023 am 10:31 AM
So you're dealing with something urgent and have all your windows open. Your laptop is running on battery power, you have to have lunch and it's late. Shutting down a system is a costly affair, consider closing any windows you have open. Leaving the system on until your lunch is gone will also drain your battery. Well, sleep mode is your answer. Sleep mode saves the machine's state to system RAM and then shuts down the machine. Even though the machine looks like it's completely shut down, it's still running, but in a very low-power mode. The moment you come back, your system will come back to life with all previously open windows and programs open. Yes, of course, this is one of the best things that windows has. In this article, we
 How to Remove Recommendations from the Start Menu in Windows 11
Apr 14, 2023 am 10:19 AM
How to remove suggestions from the Start menu in Windows 11 You can use native options in Windows 11 to remove suggestions from the Start menu. This will disable suggestions, but the section will still have its dedicated space in the Start menu. Alternatively, you can choose to disable individual recommendations from the Start menu to remove items you don't want recommended. Option 1: Disable recommendations You can use any of the following methods to disable recommendations in the Recommendations section of the Start menu. let's start. Method 1: Using the Settings app press Windows + i and click Personalize. Click Start. Turn off the toggle for the following items. Show recently added apps Show most commonly used apps in start and jump columns
 How to turn recent search history on or off in Windows 11
Apr 15, 2023 am 08:10 AM
Microsoft has added a recent search history feature that appears in the Start menu pane. The recent search history feature notifies users of what items have been recently accessed or searched for on their Windows system. Most users find it convenient because they don't have to remember or recall the files they were looking for recently. However, seeing it when opening the Start menu will irritate some of them. In this article, we will show you how to make it disappear from the Start Menu. If you are interested in learning more about how to disable it on your PC, read this article. How to turn on or off recent search history in Windows 11 Let us see how to disable recent search history on your system with the following simple steps. 1
 6 Best Apps to Customize Your Windows 11 PC
May 02, 2023 am 10:58 AM
There are many reasons to admire Windows 11. A redesigned taskbar, new Start menu, and revamped Settings app are just some of the improved elements to get you excited about. Like OliverTwist, you may want more and want to improve an already great product. In this article, we will explore some of the best Windows 11 apps to enhance your experience. We'll take a deep dive into the newly redesigned Microsoft Store and recommend some of our favorite apps for productivity, media playback, and more. We'll also explore some of the must-have Windows 11 apps on the internet. Can you customize Windows 11? LatestW
 How to edit the start menu in Ubuntu? How to edit the start menu in Ubuntu
Jan 07, 2024 pm 03:26 PM
In the Windows system, users can easily edit the start menu and perform various operations. However, in the Ubuntu system, many users do not know much about it and are relatively unfamiliar with the method of editing the start menu. Therefore, the editor will introduce how to edit the start menu in Ubuntu. Let’s go and see it together! Method 1: Enter the command alacarte directly in the Ubuntu terminal. You can add, modify, hide, and display menus at will, but you cannot delete menus, even if you have root permissions. Method 2: Pay attention to several directories and files. desktop file/usr/share/applications/mime under /usr/share/applications/
 How to enable an administrator account on Windows 11
Apr 15, 2023 pm 07:46 PM
How to Enable or Disable an Administrator Account on Windows 11 Using PowerShell One of the quickest ways to enable an administrator account on Windows 11 is to use PowerShell. You can also use the newer Windows Terminal or, if you prefer, the older Command Prompt (cmd) tool. You need to make sure you run these commands from a user account that already has administrator rights. If you are using a standard user account, you will need to switch to another user account to run this tool. To enable an administrator account using PowerShell on Windows 11: Open by clicking the Start button or pressing the Windows key


