Step-by-step tutorial on how to set up a shared printer in win7
Although printers are now an office necessity, shared printers are not for everyone. How to set up printer sharing in win7? . So, how do we set up a shared printer? Today, the editor will tell you about the step-by-step tutorial on how to set up a shared printer in win7. Let's take a look.
1. Right-click [Computer] and select [Manage]. In the pop-up [Computer Management] window: System Tools->Local Users and Groups->Users. Find [Guest] on the right and double-click it. , uncheck the account is disabled.
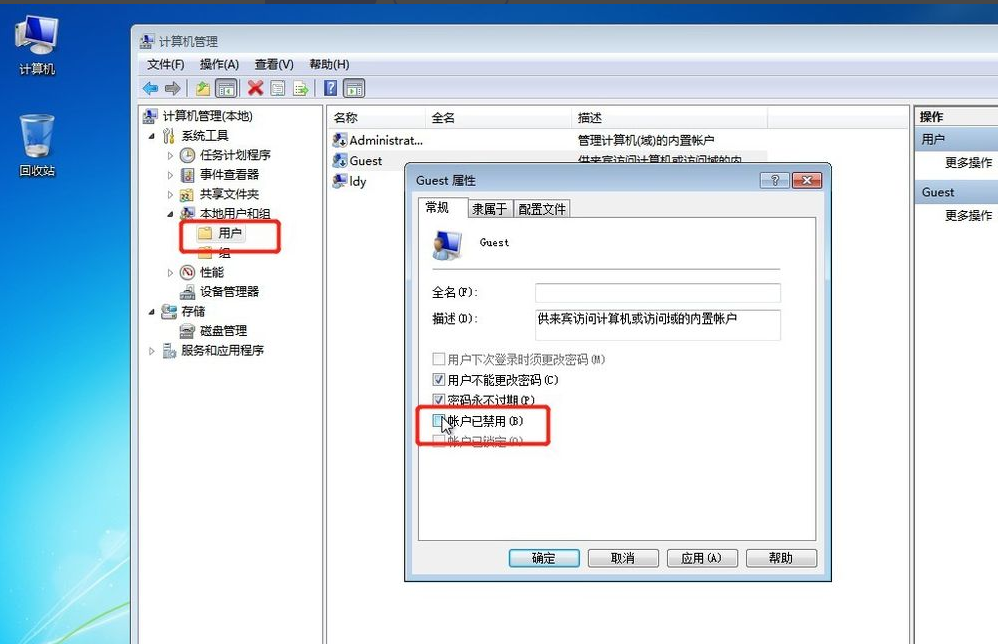
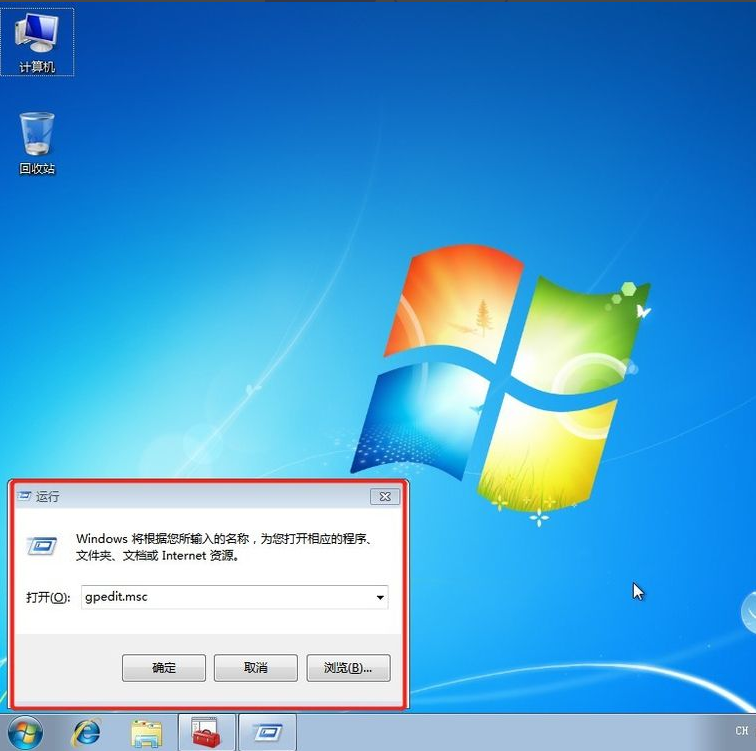
2. Return to the computer desktop, press the win R shortcut key to pop up Run, or click Start in the lower left corner of the computer, find Run on the Start menu, and enter: gpedit in Run .msc to enter the Local Group Policy Editor.
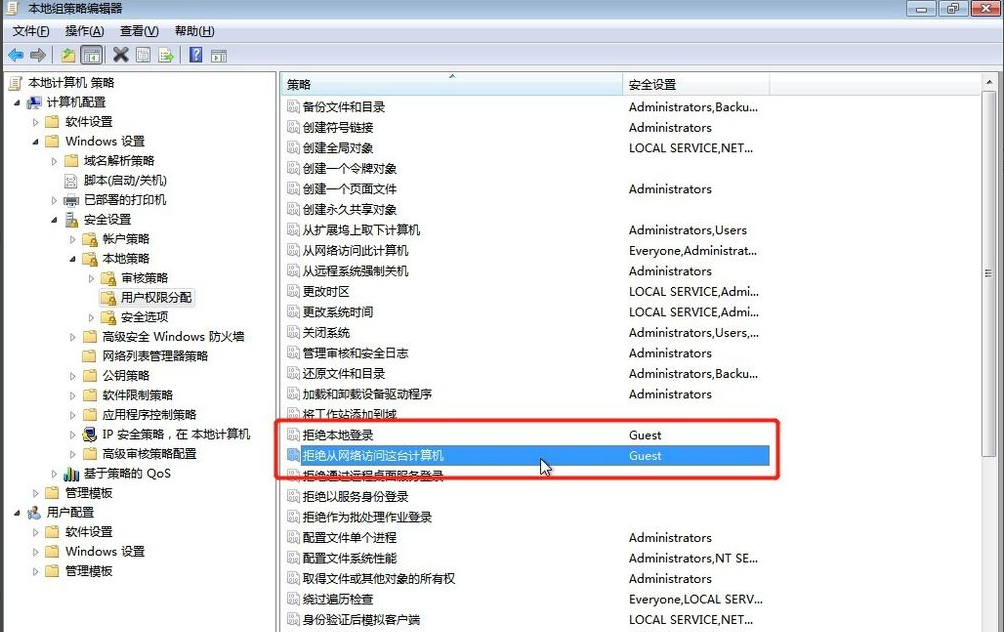
3. In the Local Group Policy Editor interface, Computer Configuration->Windows Settings->Security Settings->Local Policy->User Rights Assignment, on the right Find [Deny local login] and [Deny access to this computer from the network], double-click them and delete the Guest.
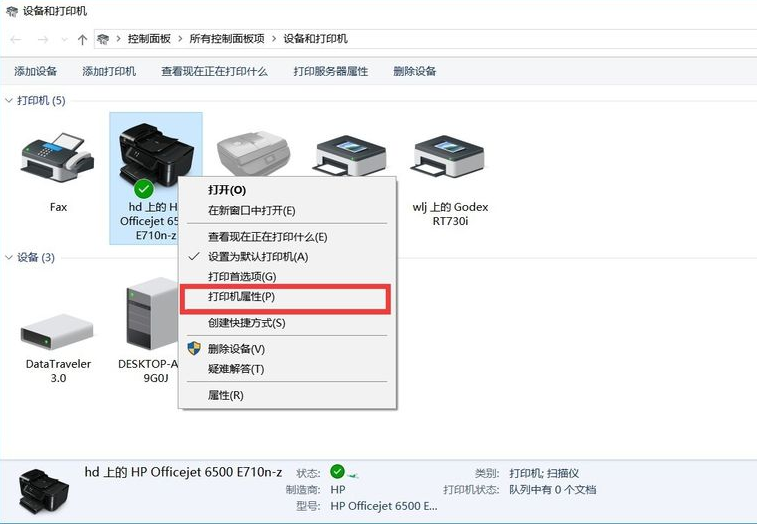
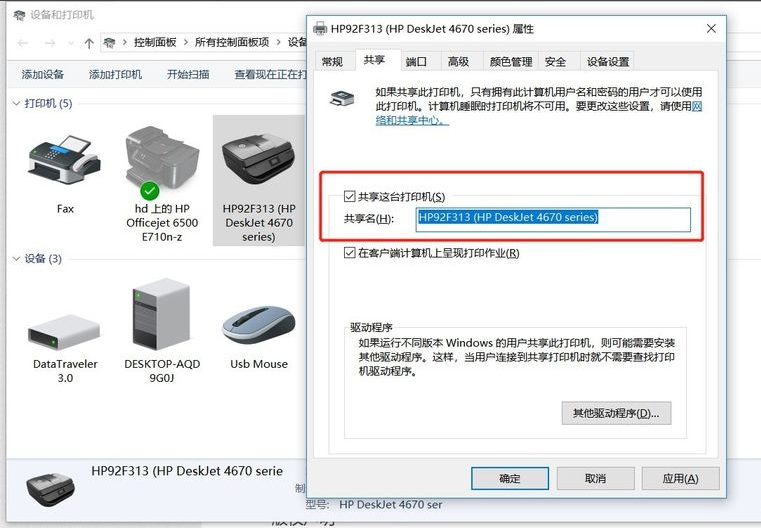
4. Click the [Start] button, select [Devices and Printers], and find the printer you want to share in the pop-up window (provided that the printer is correctly connected and the driver is installed) correctly installed), right-click on the printer and select [Printer Properties].
5. Switch to the [Sharing] tab, check [Share this printer], and set a share name, as shown below.
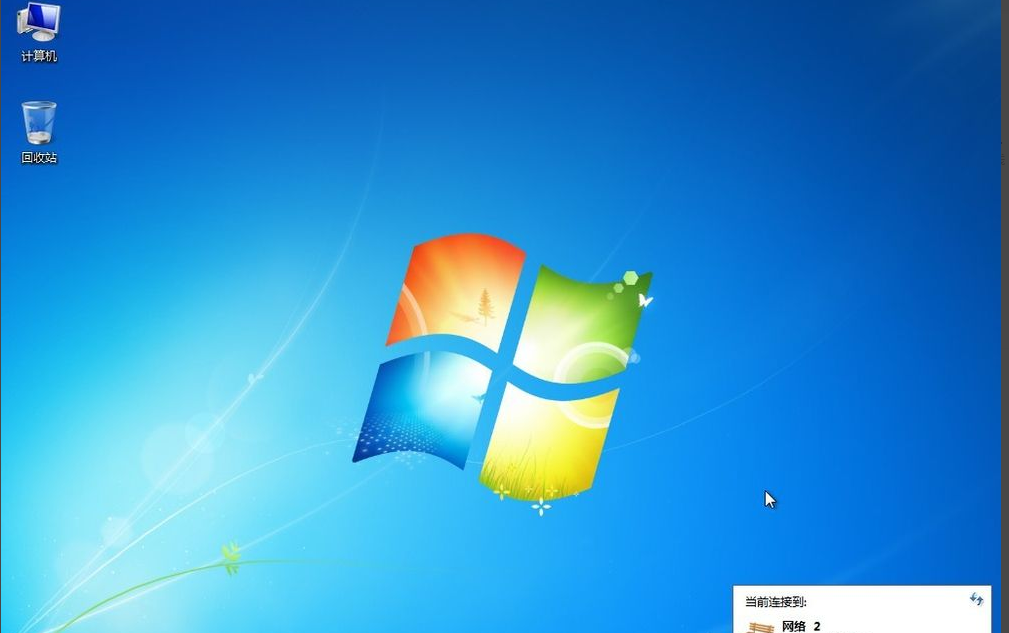
6. Right-click on the network connection icon in the system tray and select [Open Network and Sharing Center], as shown below:
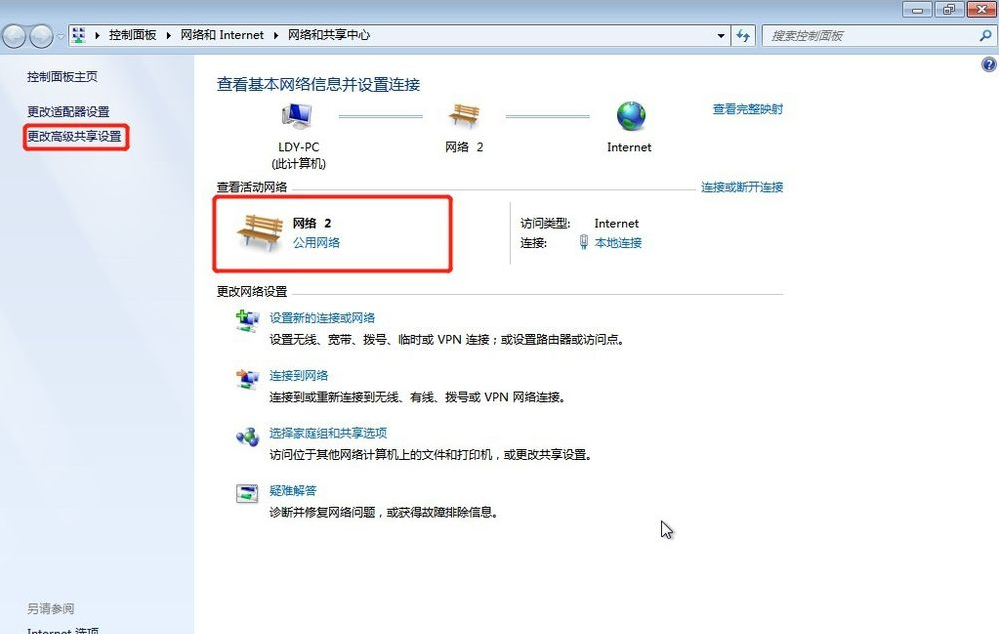
7. Remember whether your network is home, work or public, and then click [Advanced Sharing Settings], as shown below
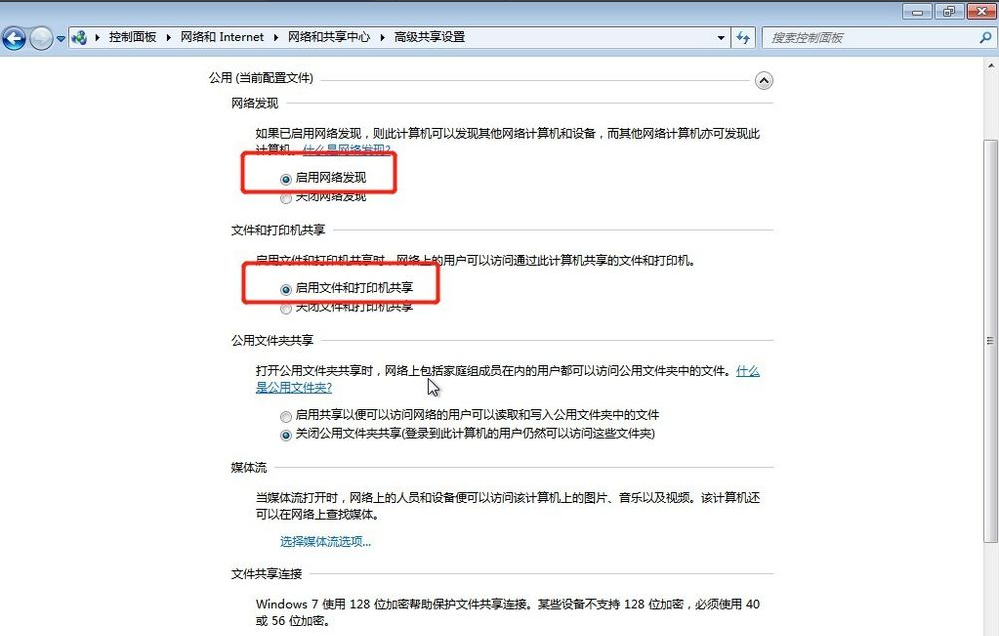
8. Select the corresponding network , just now my network is a public network, then I will select the public network to set up, [Enable network discovery], [Enable file and printer sharing], [Turn off password protected sharing], the settings are as shown below
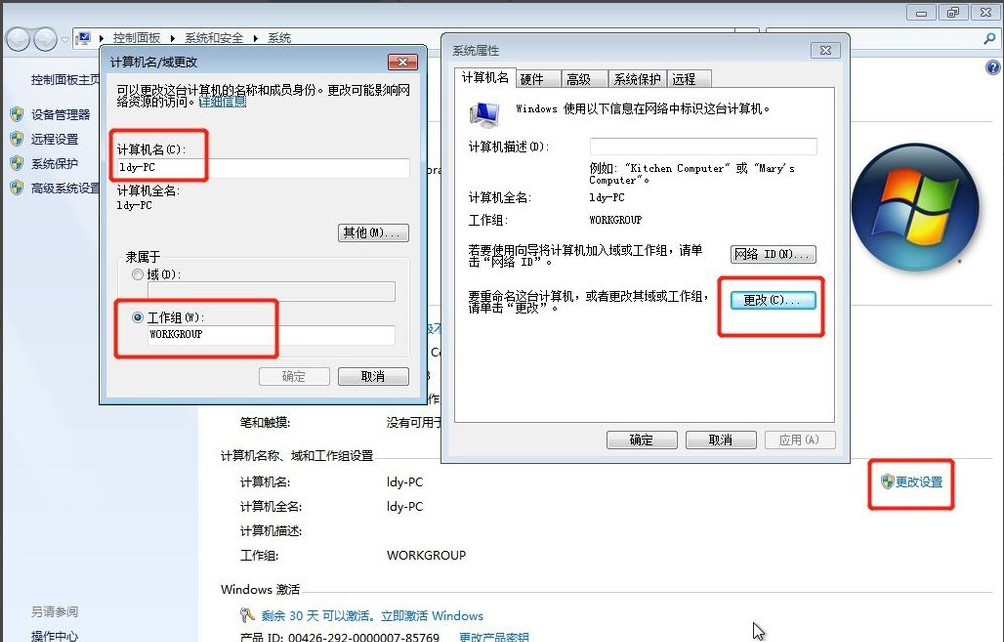
9. Right-click [Computer] and select Properties. Click [Change Settings] in the properties interface. Click [Change] in the computer name tab that pops up. Remember the computer name and workgroup of your computer. The name should be consistent with that of other computers.
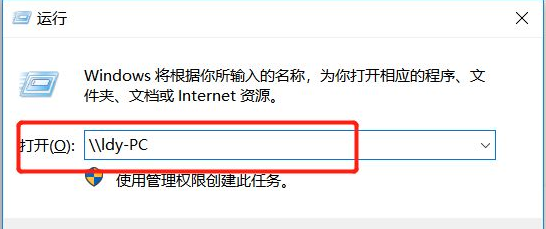
10. Go to another computer and press the win R shortcut key to pop up Run, or click Start in the lower left corner of the computer, find Run on the Start menu, and enter: \\ldy -PC, ldy-PC is the name of the computer sharing the printer.
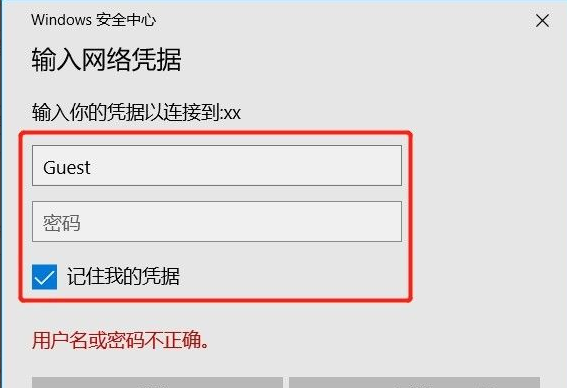
#11. In the pop-up input credentials, the username is: Guest, and the password is empty. Remember to check Remember my credentials.
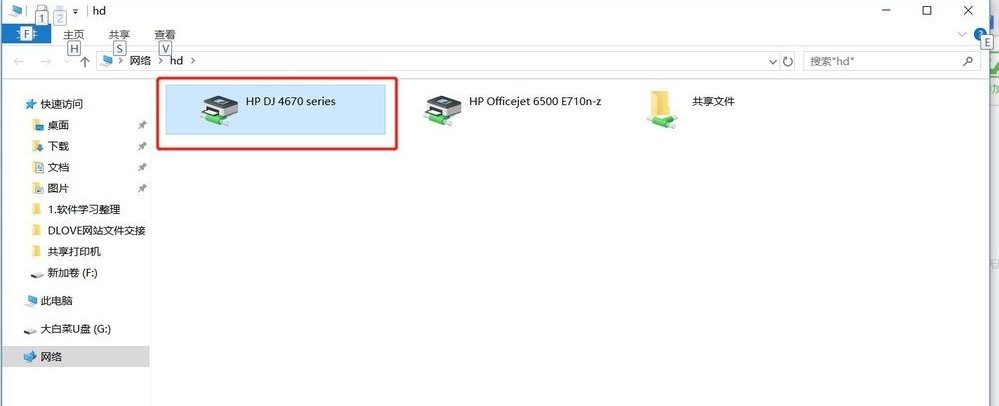
#12. After finding the shared printer, double-click to install it. The printer sharing is now complete.
The above is the step-by-step tutorial on how to set up a shared printer in win7. I hope it can help everyone.
The above is the detailed content of Step-by-step tutorial on how to set up a shared printer in win7. For more information, please follow other related articles on the PHP Chinese website!

Hot AI Tools

Undresser.AI Undress
AI-powered app for creating realistic nude photos

AI Clothes Remover
Online AI tool for removing clothes from photos.

Undress AI Tool
Undress images for free

Clothoff.io
AI clothes remover

AI Hentai Generator
Generate AI Hentai for free.

Hot Article

Hot Tools

Notepad++7.3.1
Easy-to-use and free code editor

SublimeText3 Chinese version
Chinese version, very easy to use

Zend Studio 13.0.1
Powerful PHP integrated development environment

Dreamweaver CS6
Visual web development tools

SublimeText3 Mac version
God-level code editing software (SublimeText3)

Hot Topics
 1385
1385
 52
52
 Solution to the problem that Win11 system cannot install Chinese language pack
Mar 09, 2024 am 09:48 AM
Solution to the problem that Win11 system cannot install Chinese language pack With the launch of Windows 11 system, many users began to upgrade their operating system to experience new functions and interfaces. However, some users found that they were unable to install the Chinese language pack after upgrading, which troubled their experience. In this article, we will discuss the reasons why Win11 system cannot install the Chinese language pack and provide some solutions to help users solve this problem. Cause Analysis First, let us analyze the inability of Win11 system to
 Solution for Win11 unable to install Chinese language pack
Mar 09, 2024 am 09:15 AM
Win11 is the latest operating system launched by Microsoft. Compared with previous versions, Win11 has greatly improved the interface design and user experience. However, some users reported that they encountered the problem of being unable to install the Chinese language pack after installing Win11, which caused trouble for them to use Chinese in the system. This article will provide some solutions to the problem that Win11 cannot install the Chinese language pack to help users use Chinese smoothly. First, we need to understand why the Chinese language pack cannot be installed. Generally speaking, Win11
 How to set CPU performance to full in Win11
Feb 19, 2024 pm 07:42 PM
Many users find that the computer is not running smoothly enough when using the Win11 system. They want to improve CPU performance, but they don't know how to do it. The following will introduce in detail how to set the CPU performance to the highest level in Win11 system to make your computer more efficient. Setting method: 1. Right-click "This PC" on the desktop and select "Properties" in the option list. 2. After entering the new interface, click "Advanced System Settings" in "Related Links". 3. In the window that opens, click the "Advanced" tab at the top, then click the & at the bottom of "Performance"
 How to share wallpaperengine with friends
Mar 18, 2024 pm 10:00 PM
Users can share the wallpapers they obtain with friends when using WallpaperEngine. Many users do not know how to share WallpaperEngine with friends. They can save their favorite wallpapers locally and then share them with friends through social software. How to share wallpaperengine with friends Answer: Save it locally and share it with friends. 1. It is recommended that you save your favorite wallpapers locally and then share them with friends through social software. 2. You can also upload it to the computer through a folder, and then click Share using the creative workshop function on the computer. 3. Use Wallpaperengine on the computer, open the options bar of the creative workshop and find
 How to share screen on WeChat Enterprise
Feb 28, 2024 pm 12:43 PM
More and more enterprises choose to use exclusive enterprise WeChat, which not only facilitates communication between enterprises and customers and partners, but also greatly improves work efficiency. Enterprise WeChat has rich functions, among which the screen sharing function is very popular. During the meeting, by sharing the screen, participants can display content more intuitively and collaborate more efficiently. So how to share your screen efficiently in WeChat Enterprise? For users who don’t know yet, this tutorial guide will give you a detailed introduction. I hope it can help you! How to share screen on WeChat Enterprise? 1. In the blue area on the left side of the main interface of Enterprise WeChat, you can see a list of functions. We find the "Conference" icon. After clicking to enter, three conference modes will appear.
 Strategies to solve Win11's inability to install the Chinese language pack
Mar 08, 2024 am 11:51 AM
Strategies to deal with Win11’s inability to install the Chinese language pack. With the launch of Windows 11, many users can’t wait to upgrade to this new operating system. However, some users have encountered difficulties when trying to install the Chinese language pack, preventing them from using the Chinese interface properly. In this article, we will discuss the problem that Win11 cannot install the Chinese language pack and propose some countermeasures. First, let’s explore why there are problems installing Chinese language packs on Win11. This may be due to the system's
 How to use shortcut keys to take screenshots in Win8?
Mar 28, 2024 am 08:33 AM
How to use shortcut keys to take screenshots in Win8? In our daily use of computers, we often need to take screenshots of the content on the screen. For users of Windows 8 system, taking screenshots through shortcut keys is a convenient and efficient operation method. In this article, we will introduce several commonly used shortcut keys to take screenshots in Windows 8 system to help you take screenshots more quickly. The first method is to use the "Win key + PrintScreen key" key combination to perform full
 Win11 Tips Sharing: Skip Microsoft Account Login with One Trick
Mar 27, 2024 pm 02:57 PM
Win11 Tips Sharing: One trick to skip Microsoft account login Windows 11 is the latest operating system launched by Microsoft, with a new design style and many practical functions. However, for some users, having to log in to their Microsoft account every time they boot up the system can be a bit annoying. If you are one of them, you might as well try the following tips, which will allow you to skip logging in with a Microsoft account and enter the desktop interface directly. First, we need to create a local account in the system to log in instead of a Microsoft account. The advantage of doing this is


