What to do if the brightness adjustment is missing in Windows 7
Sometimes the screen brightness is too bright for a long time and can damage the eyes. Then we can adjust the screen brightness through the system brightness adjustment function, but what happens if we find that our win7 system cannot adjust the brightness? Today, the editor is here to tell you how to solve the problem of missing brightness adjustment in Windows 7. Let’s take a look together.
Method 1.
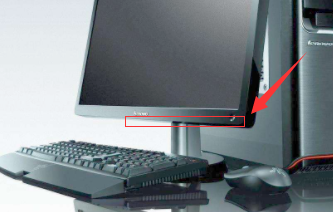
1. If it is a desktop computer, there is usually a button to adjust the screen brightness in the lower right corner of the monitor, which can be adjusted with the plus and minus signs.

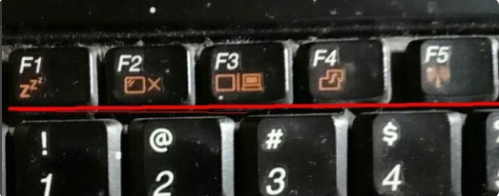
#2. If it is a notebook, you can adjust it through shortcut keys. Generally, the F key above will be marked with a brightness adjustment icon. The shortcut keys for adjusting the brightness of the editor's notebook are Fn (function key) F2 (weak), Fn (function key) F3 (strong).

Method 2: Modify the win7 registry value to retrieve win7 brightness adjustment
1. Press the win R shortcut key on the keyboard to open the run window. Enter the regedit command and click OK.

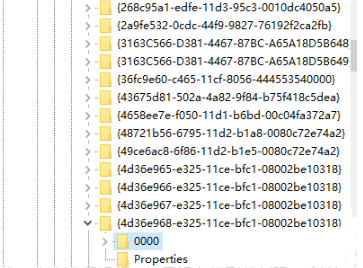
2. Expand the path HKEY_LOCAL_MACHINE \ SYSTEM \ ControlSet001 \ Control \ Class \ {4d36e968-e325-11ce-bfc1-08002be10318} in the registry editor, and then open the 0000 file .

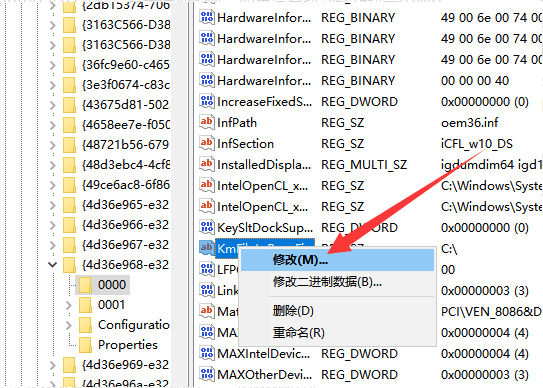
3. Then find the KMD_EnableBrightnessInterface2 file, right-click and select modify. If it is not found, create a new Word value and change its name to the file name.

#4. Modify the numerical data to 0 and click OK.

The above is the solution to what to do if the brightness adjustment is missing in win7. I hope it can help everyone.
The above is the detailed content of What to do if the brightness adjustment is missing in Windows 7. For more information, please follow other related articles on the PHP Chinese website!

Hot AI Tools

Undresser.AI Undress
AI-powered app for creating realistic nude photos

AI Clothes Remover
Online AI tool for removing clothes from photos.

Undress AI Tool
Undress images for free

Clothoff.io
AI clothes remover

AI Hentai Generator
Generate AI Hentai for free.

Hot Article

Hot Tools

Notepad++7.3.1
Easy-to-use and free code editor

SublimeText3 Chinese version
Chinese version, very easy to use

Zend Studio 13.0.1
Powerful PHP integrated development environment

Dreamweaver CS6
Visual web development tools

SublimeText3 Mac version
God-level code editing software (SublimeText3)

Hot Topics
 1378
1378
 52
52
 What to do if the Bootstrap Table uses AJAX to get data garbled
Apr 07, 2025 am 11:54 AM
Solutions to the garbled code of Bootstrap Table when using AJAX to obtain data from the server: 1. Set the correct character encoding of the server-side code (such as UTF-8). 2. Set the request header in the AJAX request and specify the accepted character encoding (Accept-Charset). 3. Use the "unescape" converter of the Bootstrap Table to decode the escaped HTML entity into original characters.
 How to remove the default style in Bootstrap list?
Apr 07, 2025 am 10:18 AM
The default style of the Bootstrap list can be removed with CSS override. Use more specific CSS rules and selectors, follow the "proximity principle" and "weight principle", overriding the Bootstrap default style. To avoid style conflicts, more targeted selectors can be used. If the override is unsuccessful, adjust the weight of the custom CSS. At the same time, pay attention to performance optimization, avoid overuse of !important, and write concise and efficient CSS code.
 Unable to log in to mysql as root
Apr 08, 2025 pm 04:54 PM
The main reasons why you cannot log in to MySQL as root are permission problems, configuration file errors, password inconsistent, socket file problems, or firewall interception. The solution includes: check whether the bind-address parameter in the configuration file is configured correctly. Check whether the root user permissions have been modified or deleted and reset. Verify that the password is accurate, including case and special characters. Check socket file permission settings and paths. Check that the firewall blocks connections to the MySQL server.
 Solutions to the errors reported by MySQL on a specific system version
Apr 08, 2025 am 11:54 AM
The solution to MySQL installation error is: 1. Carefully check the system environment to ensure that the MySQL dependency library requirements are met. Different operating systems and version requirements are different; 2. Carefully read the error message and take corresponding measures according to prompts (such as missing library files or insufficient permissions), such as installing dependencies or using sudo commands; 3. If necessary, try to install the source code and carefully check the compilation log, but this requires a certain amount of Linux knowledge and experience. The key to ultimately solving the problem is to carefully check the system environment and error information, and refer to the official documents.
 Navicat's solution to the database cannot be connected
Apr 08, 2025 pm 11:12 PM
The following steps can be used to resolve the problem that Navicat cannot connect to the database: Check the server connection, make sure the server is running, address and port correctly, and the firewall allows connections. Verify the login information and confirm that the user name, password and permissions are correct. Check network connections and troubleshoot network problems such as router or firewall failures. Disable SSL connections, which may not be supported by some servers. Check the database version to make sure the Navicat version is compatible with the target database. Adjust the connection timeout, and for remote or slower connections, increase the connection timeout timeout. Other workarounds, if the above steps are not working, you can try restarting the software, using a different connection driver, or consulting the database administrator or official Navicat support.
 How to use export default in Vue
Apr 07, 2025 pm 07:21 PM
Export default in Vue reveals: Default export, import the entire module at one time, without specifying a name. Components are converted into modules at compile time, and available modules are packaged through the build tool. It can be combined with named exports and export other content, such as constants or functions. Frequently asked questions include circular dependencies, path errors, and build errors, requiring careful examination of the code and import statements. Best practices include code segmentation, readability, and component reuse.
 MySQL can't be installed after downloading
Apr 08, 2025 am 11:24 AM
The main reasons for MySQL installation failure are: 1. Permission issues, you need to run as an administrator or use the sudo command; 2. Dependencies are missing, and you need to install relevant development packages; 3. Port conflicts, you need to close the program that occupies port 3306 or modify the configuration file; 4. The installation package is corrupt, you need to download and verify the integrity; 5. The environment variable is incorrectly configured, and the environment variables must be correctly configured according to the operating system. Solve these problems and carefully check each step to successfully install MySQL.
 How to solve mysql cannot be started
Apr 08, 2025 pm 02:21 PM
There are many reasons why MySQL startup fails, and it can be diagnosed by checking the error log. Common causes include port conflicts (check port occupancy and modify configuration), permission issues (check service running user permissions), configuration file errors (check parameter settings), data directory corruption (restore data or rebuild table space), InnoDB table space issues (check ibdata1 files), plug-in loading failure (check error log). When solving problems, you should analyze them based on the error log, find the root cause of the problem, and develop the habit of backing up data regularly to prevent and solve problems.


