

Step-by-step tutorial on installing win7 system on ASUS laptop

Asus notebooks attract a large number of users with their excellent quality, novel design, and rich variety of types. However, we all know that the size of computer system failures is not directly related to the computer brand. If our When a laptop fails, how do you reinstall the win7 system? This has stumped a large number of users. For this reason, the editor has specially prepared a tutorial for installing the win7 system on ASUS notebooks. Come and take a look.
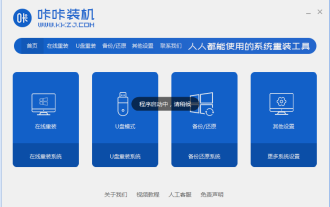
1. First download Xiaobai’s one-click system reinstallation tool to create a U disk boot disk (download address: http://www.xiaobaixitong.com), insert your U disk, select U disk mode, and click one button Make a USB bootable disk.

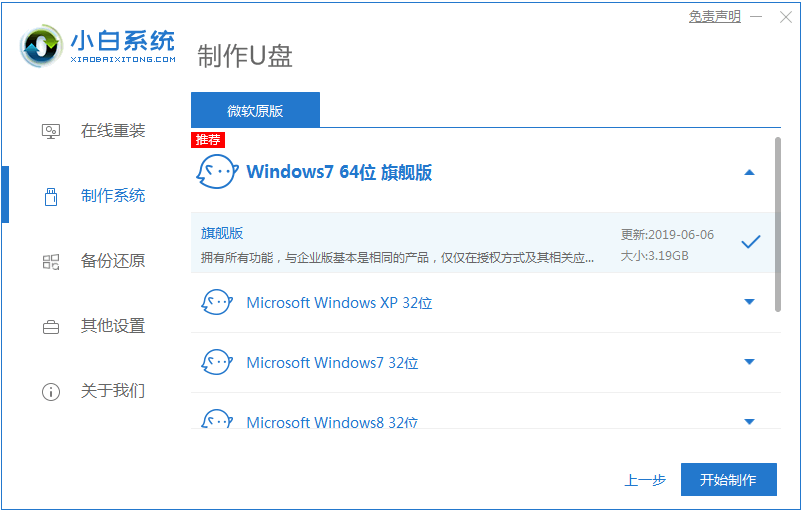
#2. Select an operating system you want to install.
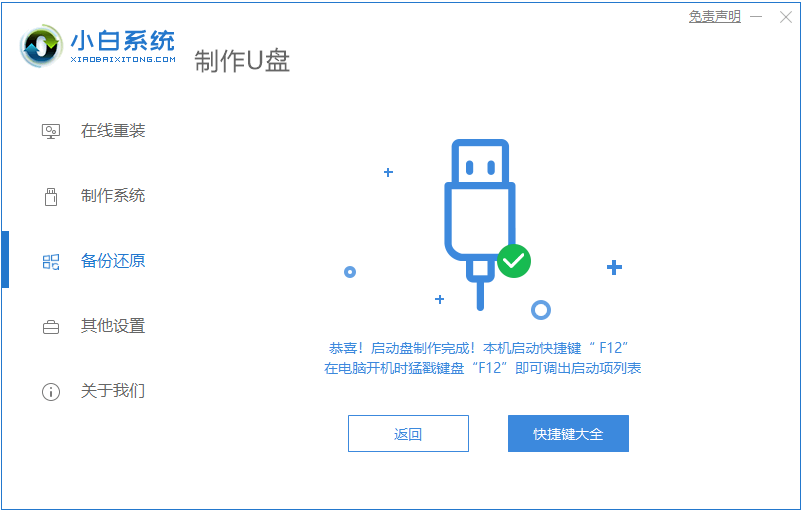
#3. Start downloading the PE system image file. After the download is completed, the U disk boot disk will be created. The following interface appears, indicating that the creation is successful.
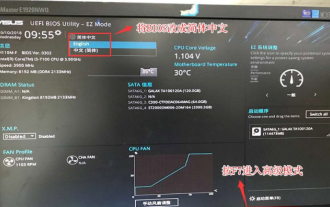
#4. Restart the computer and keep pressing the shortcut keys when turning on the computer. Select the USB option in the interface that comes up (some do not write USB). U disk.

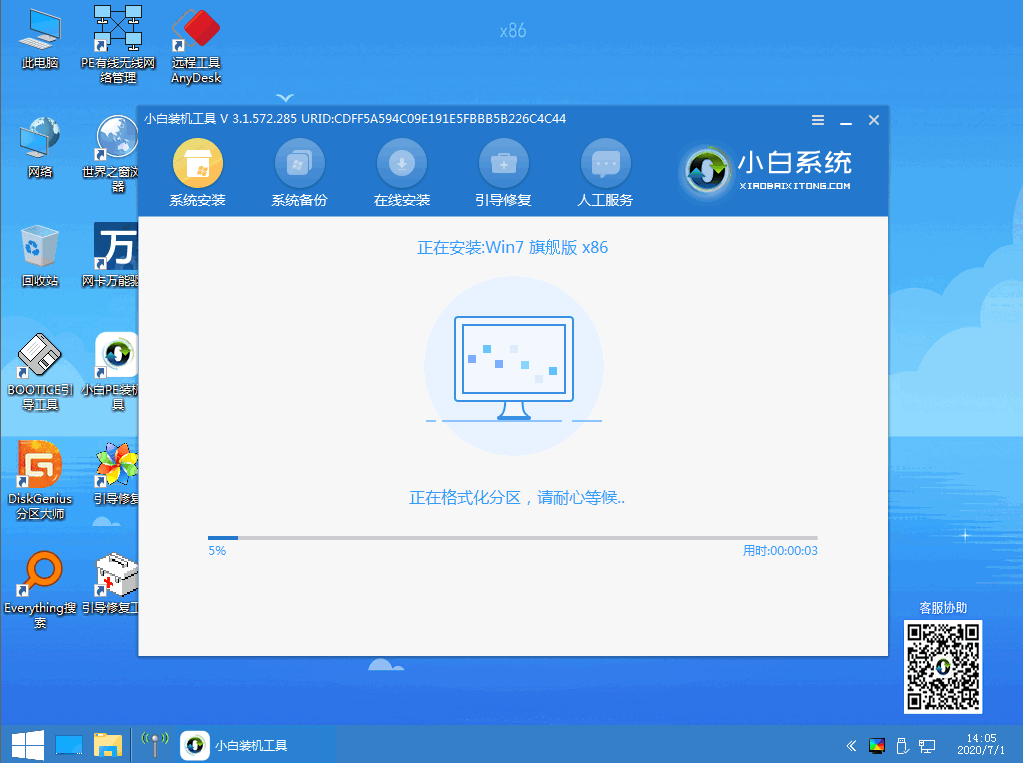
5. After entering the PE system desktop, the PE installation tool will automatically pop up. Here, check the Windows system you downloaded, and select your system disk as the target partition ( Usually C drive), then click to install the system.
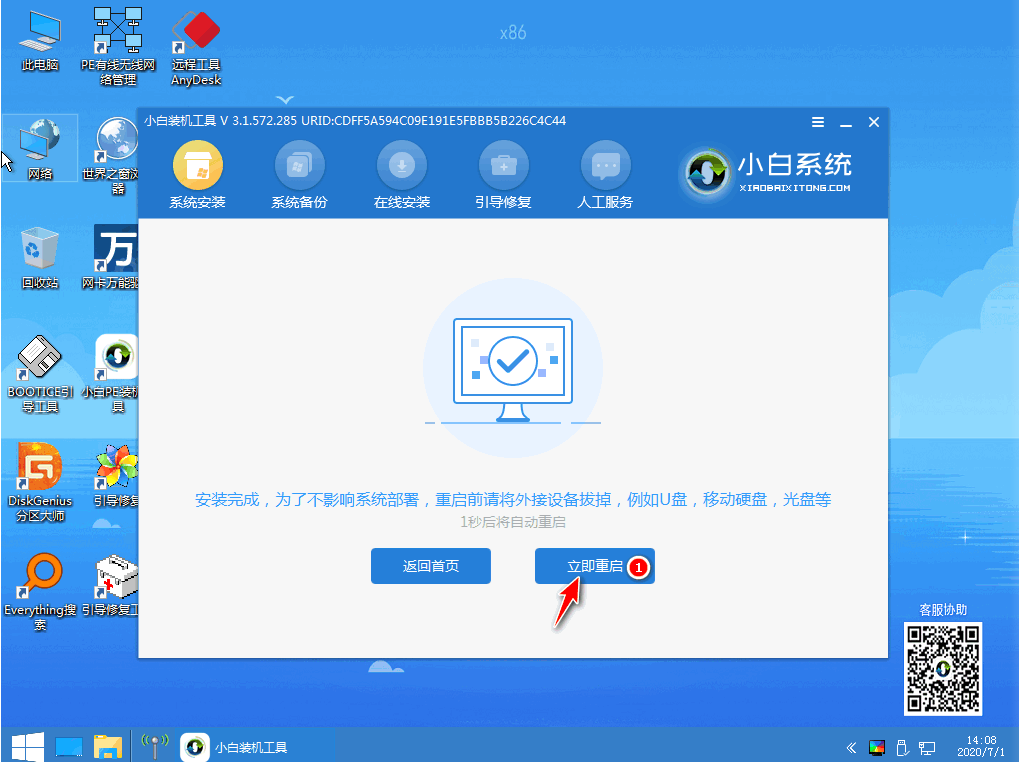
#6. Wait patiently for the download to complete and prepare to restart.
#7. Finally, the installation of win7 ultimate system can be completed.
The above is the step-by-step tutorial for installing win7 system on ASUS laptop. I hope it can help everyone.
The above is the detailed content of Step-by-step tutorial on installing win7 system on ASUS laptop. For more information, please follow other related articles on the PHP Chinese website!

Hot AI Tools

Undresser.AI Undress
AI-powered app for creating realistic nude photos

AI Clothes Remover
Online AI tool for removing clothes from photos.

Undress AI Tool
Undress images for free

Clothoff.io
AI clothes remover

AI Hentai Generator
Generate AI Hentai for free.

Hot Article
Hot Tools

Notepad++7.3.1
Easy-to-use and free code editor

SublimeText3 Chinese version
Chinese version, very easy to use

Zend Studio 13.0.1
Powerful PHP integrated development environment

Dreamweaver CS6
Visual web development tools

SublimeText3 Mac version
God-level code editing software (SublimeText3)
Hot Topics


 What should I do if my ASUS laptop does not support win7 system installation?
Jul 13, 2023 pm 08:49 PM
What should I do if my ASUS laptop does not support win7 system installation?
Jul 13, 2023 pm 08:49 PM
Some netizens reported that they wanted to install the win7 system on their Asus laptops, but found out during the operation that the Asus laptops could not install the win7 system. What should they do? Asus laptops do not support the installation of the win7 system. In this case, it may be a boot setting problem or the motherboard of ASUS itself does not support it. The following editor will teach you how to solve the problem that ASUS notebook does not support the installation of win7 system. Situation 1: Some ASUS motherboards support the installation of win7, but some boot settings in the bios are required. The following takes the ASUS b85 motherboard as an example to demonstrate the specific operation method. 1. Turn on the computer and press the del key continuously to enter the BIOS, then press F7 to switch to advanced mode. 2. Click the (Advanced) page and select CPUConfigu
 How to restore the win7 system on an ASUS laptop with one click
Jul 13, 2023 pm 09:05 PM
How to restore the win7 system on an ASUS laptop with one click
Jul 13, 2023 pm 09:05 PM
I believe that many friends are using ASUS win7 system computers. However, some users find that the ASUS win7 computer they are using has some problems and cannot run. At this time, we can solve the problem by restoring the win7 system with one click. But how can ASUS laptops use one click? How about restoring win7 system? Don’t worry if you encounter problems, today we bring you a win7 system restore tutorial. The specific method is as follows: 1. After pressing the power button, immediately press F9 continuously, and the following interface will pop up. 2. Select the language here. 3. Recovery precautions. 4. Allows you to choose options such as recovering partitions or the entire hard drive. 5. Reminder of backup file issues. 6. Click Finish, the recovery will start automatically, and wait for the recovery to complete. The above is the ASUS brought by the editor
 ASUS laptop has no USB disk boot option settings
Feb 05, 2024 pm 06:15 PM
ASUS laptop has no USB disk boot option settings
Feb 05, 2024 pm 06:15 PM
Today I will share with you how to set up a USB boot disk for ASUS laptops. Let’s take a look at ASUS’s R417N preparation tool: uboot uefi version USB boot disk creation tool to create a uefi boot disk for this special laptop to install the operating system. The steps are the same as for other similar notebooks and you have successfully installed Windows 10. Many people will ask me whether this laptop system is difficult to install and then ask me how to install it. In fact, it needs to be set in the bios. How to set it up? I opened the bios settings to show everyone. OK, restart the computer, and then click f2 and then enter the bios settings like this. If the installation is not completed or the hard disk format is not corrected, it will jump to this screen to how to set it up. In fact, it is very simple to press f7.
 ASUS Fearless Pro 15 laptop graphics version is now available: Optional Ultra 5/7 processor, starting from 5,999 yuan
Mar 08, 2024 am 10:40 AM
ASUS Fearless Pro 15 laptop graphics version is now available: Optional Ultra 5/7 processor, starting from 5,999 yuan
Mar 08, 2024 am 10:40 AM
According to news from this site on March 8, Asus has recently launched the core display version of the Fearless Pro15 notebook, priced from 5,999 yuan. The previously released Ultra9+RTX4060 version is priced at 8,499 yuan. The Asus Intrepid Pro15 notebook core display version can be equipped with Core Ultra5-125H and Ultra7-155H processors, standard 32GB LPDDR5X7467MHz memory and 1TB PCIe4.0 SSD; it uses a metal body with a thickness of 13.9mm and a weight of about 1.5kg. The machine is equipped with a 15.6-inch 2.8K (2880x1620, 16:9 ratio) resolution 120Hz high-brush OLED screen, supports 100% DCI-P3 color gamut, and 600 nits brightness
 Asus laptop win10 to win7bios settings tutorial
Jul 17, 2023 pm 08:37 PM
Asus laptop win10 to win7bios settings tutorial
Jul 17, 2023 pm 08:37 PM
Most of the new computers on the market now come with Windows 10 pre-installed, but for users who are accustomed to using Win 7, how can they change the ASUS brand machine from Win 10 to Win 7? Don’t worry, the editor will share with you how to change win10 to win7. 1. Turn on the computer and press F2 to enter the BIOS. We first set the interface to Simplified Chinese as shown below so that we can see it more clearly. Then click the location in the picture below, or press F7 to enter the advanced mode; 2. After entering the advanced mode, press the → arrow key to move to the "Startup" option and select the safe boot menu; 3. Next, set the operating system type to other operations system. If there is key management, clear the key first;
 ASUS ZenBook 14 2024 Glacier Silver notebook is now available for pre-order, with the Core Ultra 9 version starting at 7,699 yuan
Jan 29, 2024 pm 04:57 PM
ASUS ZenBook 14 2024 Glacier Silver notebook is now available for pre-order, with the Core Ultra 9 version starting at 7,699 yuan
Jan 29, 2024 pm 04:57 PM
According to news from this website on January 29, ASUS Lingyao 142024 notebook was released at the end of last year. At that time, the night sky blue version was launched, equipped with Core Ultra7155H processor, and the initial price was 6,599 yuan. Today, Asus announced that the Glacier Silver version of Lingyao 142024 is now available for pre-order. The highest optional Core Ultra9 version is priced at 7,699 yuan. The machine is available with Core Ultra9185H processor and Ultra7155H processor, with initial prices of 7,699 yuan and 6,599 yuan respectively. It has 32GB LPDDR5x-7467 memory onboard and is equipped with a 1TB PCIe4.0 solid-state drive. In terms of display, the machine uses a 14-inch OLE with a resolution of 2880*1800 and a refresh rate of 120Hz.
 Tutorial on steps to reinstall Windows 7 system on computer
Jul 11, 2023 pm 06:54 PM
Tutorial on steps to reinstall Windows 7 system on computer
Jul 11, 2023 pm 06:54 PM
For those users who don’t know how to reinstall win7 system, although reinstalling win7 system is very simple and you can search a lot of information and explanations on the website, there are still some novices who don’t know how to reinstall it. This tutorial will talk about reinstallation in detail now. Once you learn the specific steps of the system, you can reinstall it yourself. 1. First download a KaKa installation machine, and then enter the main interface. 2. Select and install win7 system. 3. Please wait patiently for the download of the win7 mirror system. 4. After the deployment is completed, please follow the instructions and wait for the restart. 5. During the restart process, please enter the computer pe system through the PE system installed by Kaka. 6. After the restart is completed, the automatic installation of the win7 system begins. 7. When you encounter a pop-up window, please click "OK". 8. After the installation is completed, please follow
 How to set the optical drive as the first startup item on an ASUS laptop? ASUS computer setup optical drive startup tutorial
Feb 11, 2024 am 09:48 AM
How to set the optical drive as the first startup item on an ASUS laptop? ASUS computer setup optical drive startup tutorial
Feb 11, 2024 am 09:48 AM
How to set up the CD-ROM drive for ASUS laptop? For many computer users, this problem is uncommon and therefore unclear on how to resolve it. So this tutorial brings you a detailed tutorial on setting the optical drive as the first startup item on ASUS laptops. Users who encounter the same problem should take a look. 1. First open the ASUS laptop and quickly press F2 during startup to enter the BIOK interface; 2. Find BOOT and use the keyboard's arrow keys to move to BOOT; 3. Select bootdevicepriority and press Enter to enter; 4. If the setting in 1stbootdevice is not CD /What about DVD? Select 1stbootdevice and press Enter. A dialog box will pop up to enter Settings &