How to import fonts into PS in Win7 system
PS software is our most commonly used image editing software, and most people have been exposed to this software. In order to meet users' special font needs, some users need to import the fonts they need from the computer, and PS software provides a large number of fonts to choose from. The method of importing fonts into PS in Win7 system is as follows.
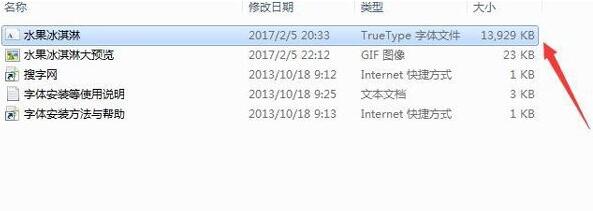
1. You need to download the PS font package from the Internet, then unzip and double-click the file to enter, select the top font file, and copy ctrl c.

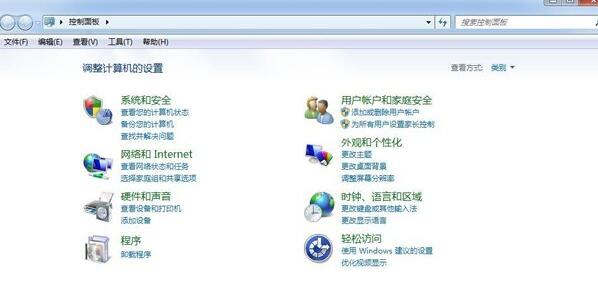
#2. Click the start button in the lower left corner of the computer, find the control panel and open it.

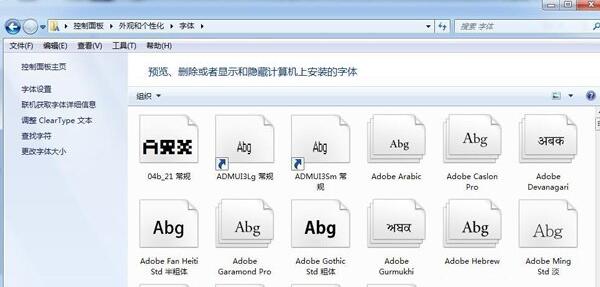
#3. Open Appearance and Personalization and click Fonts.

#4. Paste the copied new font ctrl v and reopen ps.
The above is the detailed content of How to import fonts into PS in Win7 system. For more information, please follow other related articles on the PHP Chinese website!

Hot AI Tools

Undresser.AI Undress
AI-powered app for creating realistic nude photos

AI Clothes Remover
Online AI tool for removing clothes from photos.

Undress AI Tool
Undress images for free

Clothoff.io
AI clothes remover

AI Hentai Generator
Generate AI Hentai for free.

Hot Article

Hot Tools

Notepad++7.3.1
Easy-to-use and free code editor

SublimeText3 Chinese version
Chinese version, very easy to use

Zend Studio 13.0.1
Powerful PHP integrated development environment

Dreamweaver CS6
Visual web development tools

SublimeText3 Mac version
God-level code editing software (SublimeText3)

Hot Topics
 Detailed explanation of the steps to obtain Win11 system administrator permissions
Mar 08, 2024 pm 09:09 PM
Windows 11, as the latest operating system launched by Microsoft, is deeply loved by users. In the process of using Windows 11, sometimes we need to obtain system administrator rights in order to perform some operations that require permissions. Next, we will introduce in detail the steps to obtain system administrator rights in Windows 11. The first step is to click "Start Menu". You can see the Windows icon in the lower left corner. Click the icon to open the "Start Menu". In the second step, find and click "
 How to initialize the computer in win7
Jan 07, 2024 am 11:53 AM
The win7 system is a very excellent high-performance system. During the continuous use of win7, many friends are asking how to initialize the computer in win7! Today, the editor will bring you how to restore the factory settings of a win7 computer. Related information on how to initialize the computer in win7: Detailed instructions with pictures and text. Steps: 1. Open the "Start Menu" and enter. 2. Click to enter the settings at the bottom of the left side. 3. In the Win10 update and recovery settings interface, select. 4. Click below "Remove all content and reinstall Windows". 5. You can see the following "Initialization" settings, and then click. 6. Enter the "Your computer has multiple drives" setting option. There are two options here, you can choose according to the situation.
 How to delete installed language pack in win10 system
Jan 06, 2024 pm 10:37 PM
When we use the win10 operating system, in some cases we may need to delete the language pack in the system. At this time, just find the language option first, then choose to add a language pack. During this process, uncheck the language pack to be deleted and then delete it. How to delete the installed language pack in win10 system: 1. Use win+i to open settings and find the time and language options. 2. Select the "Language" option in the time and language options. 3. Select "Add Language" and go to the next step. 4. Uncheck the language pack when adding a language. After the addition is completed, you can download the language pack and voice pack separately;
 Introduction to the process of extracting line drawings in PS
Apr 01, 2024 pm 12:51 PM
1. Open the software and import a piece of material, as shown in the picture below. 2. Then ctrl+shift+u to remove color. 3. Then press ctrl+J to copy the layer. 4. Then reverse ctrl+I, and then set the layer blending mode to Color Dodge. 5. Click Filter--Others--Minimum. 6. In the pop-up dialog box, set the radius to 2 and click OK. 7. Finally, you can see the line draft extracted.
 How to automate tasks using PowerShell
Feb 20, 2024 pm 01:51 PM
If you are an IT administrator or technology expert, you must be aware of the importance of automation. Especially for Windows users, Microsoft PowerShell is one of the best automation tools. Microsoft offers a variety of tools for your automation needs, without the need to install third-party applications. This guide will detail how to leverage PowerShell to automate tasks. What is a PowerShell script? If you have experience using PowerShell, you may have used commands to configure your operating system. A script is a collection of these commands in a .ps1 file. .ps1 files contain scripts executed by PowerShell, such as basic Get-Help
 How to display file suffix under Win11 system? Detailed interpretation
Mar 09, 2024 am 08:24 AM
How to display file suffix under Win11 system? Detailed explanation: In the Windows 11 operating system, the file suffix refers to the dot after the file name and the characters after it, which is used to indicate the type of file. By default, the Windows 11 system hides the suffix of the file, so that you can only see the name of the file in the file explorer but cannot intuitively understand the file type. However, for some users, displaying file suffixes is necessary because it helps them better identify file types and perform related operations.
 How to install Windows 7 system on computer to Android phone
Jan 05, 2024 pm 06:41 PM
When we use the win7 operating system, we will inevitably encounter situations that require us to reinstall the system. So for the question of how to install the win7 system on an Android phone to a computer, the editor thinks that we first need to install a relevant emulator software on our phone, and then download the required operating system to our phone, and connect it to the computer to install it. operate. Let’s take a look at how the editor did it for detailed steps~ How to install win7 system on an Android phone on a computer 1. First download and install DriverDroid, and then set it up according to the setup wizard after running it. 2. Then note that the Android phone has obtained ROOT and needs to be connected to a computer during setup. 3. Move the bios file automatically downloaded by the phone to the image root directory (phone memory/D
 Complete list of ps shortcut keys
Mar 11, 2024 pm 04:31 PM
1. Ctrl + N: Create a new document. 2. Ctrl + O: Open a file. 3. Ctrl + S: Save the current file. 4. Ctrl + Shift + S: Save as. 5. Ctrl + W: Close the current document. 6. Ctrl + Q: Exit Photoshop. 7. Ctrl + Z: Undo. 8. Ctrl + Y: Redo. 9. Ctrl + X: Cut the selected content. 10. Ctrl + C: Copy the selected content.


