Win7 system language bar setting tutorial
Recently, Win7 system users reported that every time they opened the chat dialog box, they had to frequently switch between Chinese/English input methods, which caused great trouble to users. Next, the editor will share with you a detailed explanation of the language bar settings in Win7 system, so that you can easily play with the language bar settings without worrying about switching languages.
Win7 system language bar setting tutorial.
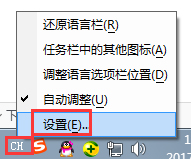
Right-click the language bar in the lower right corner of the desktop and click Settings;
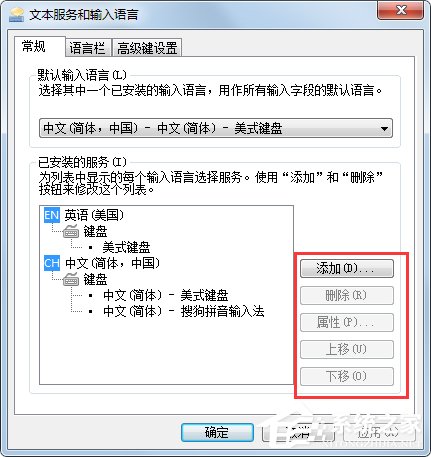
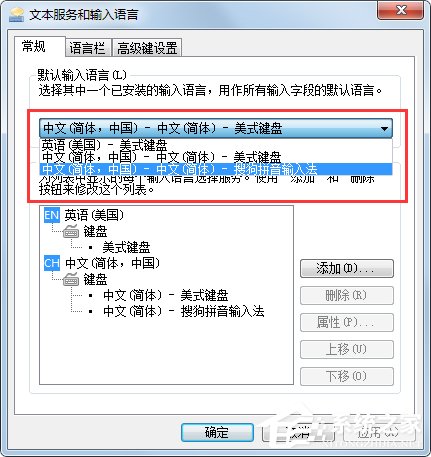
2. Click the pop-up text service and input language dialog box, Select the General option to add according to your personal preferences. Delete the input method installed on the operating machine and set the default input method;
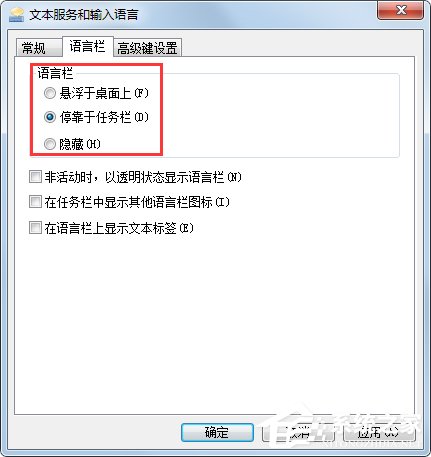
3. Click the language bar to select the language bar style and position;
4. Click Advanced Key Settings and set the shortcut keys for input method switching according to personal habits;
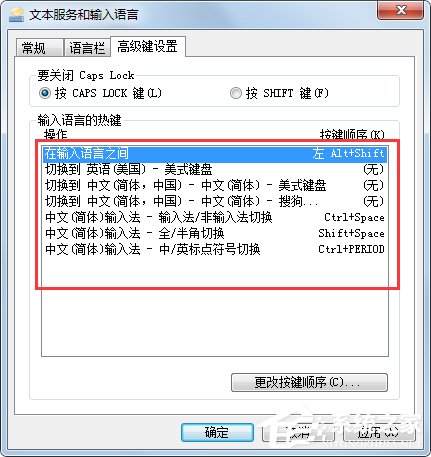
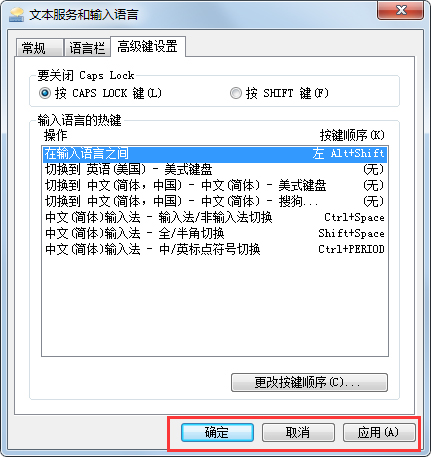
The above is a detailed explanation of the Win7 system language bar settings shared by the editor. I believe that by following the above steps you will be able to switch languages easily and thus save time.
The above is the detailed content of Win7 system language bar setting tutorial. For more information, please follow other related articles on the PHP Chinese website!

Hot AI Tools

Undresser.AI Undress
AI-powered app for creating realistic nude photos

AI Clothes Remover
Online AI tool for removing clothes from photos.

Undress AI Tool
Undress images for free

Clothoff.io
AI clothes remover

Video Face Swap
Swap faces in any video effortlessly with our completely free AI face swap tool!

Hot Article

Hot Tools

Notepad++7.3.1
Easy-to-use and free code editor

SublimeText3 Chinese version
Chinese version, very easy to use

Zend Studio 13.0.1
Powerful PHP integrated development environment

Dreamweaver CS6
Visual web development tools

SublimeText3 Mac version
God-level code editing software (SublimeText3)

Hot Topics
 1393
1393
 52
52
 1207
1207
 24
24
 Learn about Xiaomi Do Not Disturb mode and how to set it up on Xiaomi Mi 11
Jan 03, 2024 pm 05:48 PM
There is a function on Xiaomi mobile phones called Do Not Disturb mode. Many friends have discovered this function, but they don’t know what it means. Today we will share some popular science about what Do Not Disturb mode is, and we will also share the specific method on how to set Do Not Disturb mode on Xiaomi Mi 11. Do Not Disturb mode is a feature that allows your phone to be undisturbed for a specific period of time. When Do Not Disturb mode is turned on, the phone will automatically block notifications such as incoming calls and text messages to avoid disturbing the user's normal life or work. This is great for those who want to be undisturbed while sleeping, in meetings, or focusing on work. To set the Do Not Disturb mode on Xiaomi Mi 11, you can follow the steps below: 1. Open the settings menu of your phone. 2. Find the "Sounds and Vibration" option in the settings menu and click
 Detailed explanation of the steps to obtain Win11 system administrator permissions
Mar 08, 2024 pm 09:09 PM
Windows 11, as the latest operating system launched by Microsoft, is deeply loved by users. In the process of using Windows 11, sometimes we need to obtain system administrator rights in order to perform some operations that require permissions. Next, we will introduce in detail the steps to obtain system administrator rights in Windows 11. The first step is to click "Start Menu". You can see the Windows icon in the lower left corner. Click the icon to open the "Start Menu". In the second step, find and click "
 How to initialize the computer in win7
Jan 07, 2024 am 11:53 AM
The win7 system is a very excellent high-performance system. During the continuous use of win7, many friends are asking how to initialize the computer in win7! Today, the editor will bring you how to restore the factory settings of a win7 computer. Related information on how to initialize the computer in win7: Detailed instructions with pictures and text. Steps: 1. Open the "Start Menu" and enter. 2. Click to enter the settings at the bottom of the left side. 3. In the Win10 update and recovery settings interface, select. 4. Click below "Remove all content and reinstall Windows". 5. You can see the following "Initialization" settings, and then click. 6. Enter the "Your computer has multiple drives" setting option. There are two options here, you can choose according to the situation.
 How to delete installed language pack in win10 system
Jan 06, 2024 pm 10:37 PM
When we use the win10 operating system, in some cases we may need to delete the language pack in the system. At this time, just find the language option first, then choose to add a language pack. During this process, uncheck the language pack to be deleted and then delete it. How to delete the installed language pack in win10 system: 1. Use win+i to open settings and find the time and language options. 2. Select the "Language" option in the time and language options. 3. Select "Add Language" and go to the next step. 4. Uncheck the language pack when adding a language. After the addition is completed, you can download the language pack and voice pack separately;
 How to display file suffix under Win11 system? Detailed interpretation
Mar 09, 2024 am 08:24 AM
How to display file suffix under Win11 system? Detailed explanation: In the Windows 11 operating system, the file suffix refers to the dot after the file name and the characters after it, which is used to indicate the type of file. By default, the Windows 11 system hides the suffix of the file, so that you can only see the name of the file in the file explorer but cannot intuitively understand the file type. However, for some users, displaying file suffixes is necessary because it helps them better identify file types and perform related operations.
 How to implement dual system switching in Win10 system
Jan 03, 2024 pm 05:41 PM
Many friends may not be used to the win system when they first come into contact with it. There are dual systems in the computer. At this time, you can actually switch between the two systems. Let's take a look at the detailed steps for switching between the two systems. How to switch between two systems in win10 system 1. Shortcut key switching 1. Press the "win" + "R" keys to open Run 2. Enter "msconfig" in the run box and click "OK" 3. In the open "System Configuration" In the interface, select the system you need and click "Set as Default". After completion, "Restart" can complete the switch. Method 2. Select switch when booting 1. When you have dual systems, a selection operation interface will appear when booting. You can use the keyboard " Up and down keys to select the system
 How to install Windows 7 system on computer to Android phone
Jan 05, 2024 pm 06:41 PM
When we use the win7 operating system, we will inevitably encounter situations that require us to reinstall the system. So for the question of how to install the win7 system on an Android phone to a computer, the editor thinks that we first need to install a relevant emulator software on our phone, and then download the required operating system to our phone, and connect it to the computer to install it. operate. Let’s take a look at how the editor did it for detailed steps~ How to install win7 system on an Android phone on a computer 1. First download and install DriverDroid, and then set it up according to the setup wizard after running it. 2. Then note that the Android phone has obtained ROOT and needs to be connected to a computer during setup. 3. Move the bios file automatically downloaded by the phone to the image root directory (phone memory/D
 Learn how to set up Apple shortcuts
Feb 19, 2024 pm 02:57 PM
Apple Shortcut Command Settings Tutorial With the advancement of technology, we have gradually discovered many convenient and fast tools and functions, which make our lives more convenient. Apple's Shortcuts are one of them. Shortcuts is an application launched by Apple in the iOS12 system. It allows users to customize commands to use iOS devices more efficiently. This article will introduce you to how to set up Apple shortcuts, hoping to help you make better use of this feature. 1. Download and install


