
 Common Problem
How to turn off Lenovo Win10 Firewall. Introduction to how to turn off Lenovo Win10 Firewall.
Common Problem
How to turn off Lenovo Win10 Firewall. Introduction to how to turn off Lenovo Win10 Firewall.
How to turn off Lenovo Win10 Firewall. Introduction to how to turn off Lenovo Win10 Firewall.

How to turn off Lenovo Win10 firewall? Firewalls can provide users with a better and safer computer network experience. Recently, some users asked how to turn off the firewall on Lenovo Win10 computers. In fact, the method is very simple. Let’s take a look at the operation method with the editor!
Introduction to how to turn off the Lenovo Win10 firewall
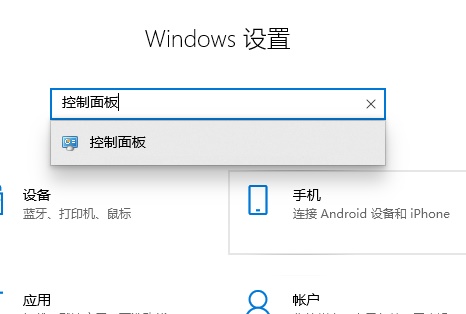
1. Click Settings, enter "Control Panel" and open the "Control Panel".
2. Find “windows firewall”.
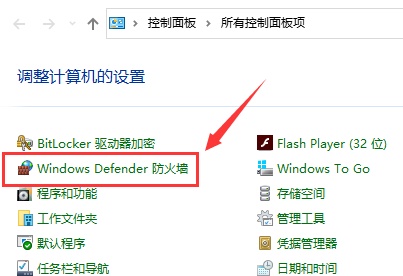
#3. Click "Start or turn off Windows Defender Firewall".
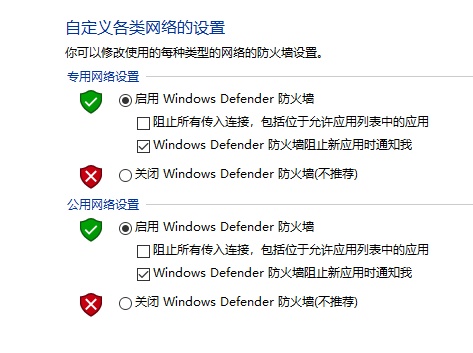
#4. Select Close and confirm.
The above is the detailed content of How to turn off Lenovo Win10 Firewall. Introduction to how to turn off Lenovo Win10 Firewall.. For more information, please follow other related articles on the PHP Chinese website!

Hot AI Tools

Undresser.AI Undress
AI-powered app for creating realistic nude photos

AI Clothes Remover
Online AI tool for removing clothes from photos.

Undress AI Tool
Undress images for free

Clothoff.io
AI clothes remover

AI Hentai Generator
Generate AI Hentai for free.

Hot Article
Hot Tools

Notepad++7.3.1
Easy-to-use and free code editor

SublimeText3 Chinese version
Chinese version, very easy to use

Zend Studio 13.0.1
Powerful PHP integrated development environment

Dreamweaver CS6
Visual web development tools

SublimeText3 Mac version
God-level code editing software (SublimeText3)
Hot Topics
 1377
1377
 52
52

 Permanent Activation Key: Get win11 pro
Jan 09, 2024 pm 07:25 PM
Permanent Activation Key: Get win11 pro
Jan 09, 2024 pm 07:25 PM
The win11 system used by many users has not been activated, so an activation key is required to activate the system normally for use. For your convenience, here is a summary of the following permanent activation keys for the professional version. You can follow the steps below Steps to operate. Win11 Professional Edition Permanent Activation Key 1. Professional Edition Activation Key N4RI7-LY8RR-F425S-B1NZP-V62X6NPBRX-V2Z76-55R67-12X06-E7I2UN87B8-FBJN1-I830V-4HHC0-81IRCNX06F-73HC2-71ZG3-67F52-M3X5JNLGG3-JMV Z5- TK7NA-8M4
 Tips for easily switching the sound output device in Win11
Jan 08, 2024 pm 10:42 PM
Tips for easily switching the sound output device in Win11
Jan 08, 2024 pm 10:42 PM
Users who play games must listen to the sound. When changing devices, they must switch the sound more quickly. Maybe you don’t know how to operate it quickly. For this reason, we have brought a tutorial. Let’s take a look at the speed of win11. Switch the sound output method. Method 1 to quickly switch the sound output device in win11: (fastest) 1. Use the shortcut key "win+g" to open xboxgamebgar. 2. Then display it at the top of the screen. 3. Then click directly on the panel to change the audio output device. Method 2: 1. You can also open the operation center through the small speaker in the lower right corner of the taskbar. 2. Then click "Manage Audio Devices" on the right. 3. Then you can switch the sound output.
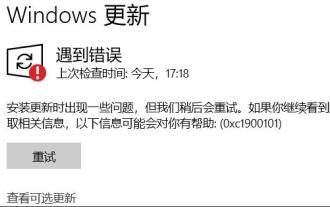 How to solve win11 update error 0xc1900101
Dec 30, 2023 pm 01:18 PM
How to solve win11 update error 0xc1900101
Dec 30, 2023 pm 01:18 PM
After the launch of win11, many users wanted to experience the update in advance, but they encountered the update error 0xc1900101 when updating the win11 system. This may be because there are some problems in the system. You can use the tutorials launched by Microsoft to solve them first. It is not possible. You can also install using a mirror system. What to do about win11 update error 0xc1900101: Method 1: 1. First, we open the control panel, change the viewing mode to "Large Icons", and then enter "Management Tools" 2. In the management tools, we click to enter "Services" 3. Then Find the "Windowsupdate" service in Services, right-click it and "Stop" 4. Then we go to "C:\Windows\Soft
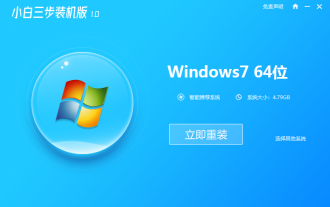 Teach you how to upgrade 32-bit win7 to 64-bit system
Jul 15, 2023 pm 05:41 PM
Teach you how to upgrade 32-bit win7 to 64-bit system
Jul 15, 2023 pm 05:41 PM
As long as the computer hardware supports it, generally speaking, 64-bit systems run much faster than 32-bit systems. Therefore, some users who have installed a 32-bit win7 system want to upgrade win7 to a 64-bit system. So how to upgrade 32-bit win7 to a 64-bit system? The editor below will teach you how to upgrade your 32-bit win7 to a 64-bit system. Under normal circumstances, the Win7 32-bit system cannot be upgraded to the 64-bit system. If you want to change the 32-bit system to a 64-bit system, you can only reinstall the Win7 system. The following are the specific steps to reinstall the win764-bit system: 1. Open the computer and download the Xiaobai three-step installation tool and open it, select other systems, select the win764-bit system, and then click Reinstall Now. 2. Then start automatically
 Xiaohongshu begins testing AI chatbot 'Da Vinci'
Jan 15, 2024 pm 12:42 PM
Xiaohongshu begins testing AI chatbot 'Da Vinci'
Jan 15, 2024 pm 12:42 PM
Xiaohongshu is working to enrich its products by adding more artificial intelligence features. According to domestic media reports, Xiaohongshu is internally testing an AI application called "Davinci" in its main app. It is reported that the application can provide users with AI chat services such as intelligent question and answer, including travel guides, food guides, geographical and cultural knowledge, life skills, personal growth and psychological construction, etc. According to reports, "Davinci" uses the LLAMA model under Meta A product for training, the product has been tested since September this year. There are rumors that Xiaohongshu was also conducting an internal test of a group AI conversation function. Under this function, users can create or introduce AI characters in group chats, and have conversations and interactions with them. Image source: T
 Solve the 'error: expected primary-expression before ')' token' problem in C++ code
Aug 27, 2023 pm 12:28 PM
Solve the 'error: expected primary-expression before ')' token' problem in C++ code
Aug 27, 2023 pm 12:28 PM
Solve the "error:expectedprimary-expressionbefore')'token" problem in C++ code. In C++ programming, we sometimes encounter some error prompts, such as "expectedprimary-expressionbefore')'token". This error is usually caused by incorrect syntax or expressions used in the code, causing the compiler to fail to understand the meaning of the code. This article will
 Why is the network connection in win11 blank?
Jan 11, 2024 pm 06:21 PM
Why is the network connection in win11 blank?
Jan 11, 2024 pm 06:21 PM
While trying to modify the network connection method, some users accidentally discovered that the network adapter opened during the switching process was empty, causing them to be unable to successfully complete the switching operation. Faced with such a dilemma, how should we solve this problem? What's going on with the blank network connection in win11? 1. Driver problem. The network adapter driver equipped on the computer is incompatible with the current environment or version or even appears to be too old. Solution: Upgrade or reinstall the corresponding network adapter driver. 2. Hardware problem: The network adapter hardware has physical damage or even complete failure. Solution: Replace the original network adapter hardware. 3. System setting problem. Solution to Win11 system setting error on the computer: We can
 win11 service optimization setting tutorial
Jan 02, 2024 pm 12:59 PM
win11 service optimization setting tutorial
Jan 02, 2024 pm 12:59 PM
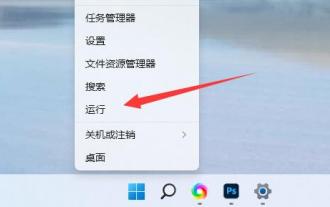
In win11, there are many useless services that are turned on by default. If we feel that our system is stuck, we can try to optimize and turn them off. So how to optimize the settings of win11 services? In fact, just turn off these unnecessary ones. How to optimize the settings of win11 services: 1. First, right-click the start menu and select "Run" 2. Then enter "services.msc" and confirm to open the service list. 3. After opening, you can first click "Startup Type" and change the priority display to "Automatic" 4. Then select the unnecessary service and click "Stop" to close it. 5. After stopping, double-click to open it and change it to "Disable" to completely close it. 6. If we don’t know which services need to be shut down, we can select it and “draw” on the left