Step-by-step tutorial for installing win7 system on Acer laptop
The win7 system operation interface is more beautiful and the user visual effect is good. At the same time, the win7 system does not have high requirements for computer hardware configuration. It can be installed on almost all computers. Some users want to install the win7 system on Acer notebooks, but they cannot Now that you know how to operate it, the editor here will teach you how to install win7 system on Acer laptop.
1. Keep pressing the F2 key while booting to enter the BIOS, switch to Boot, select Boot Mode and press Enter, select Legacy and press Enter;

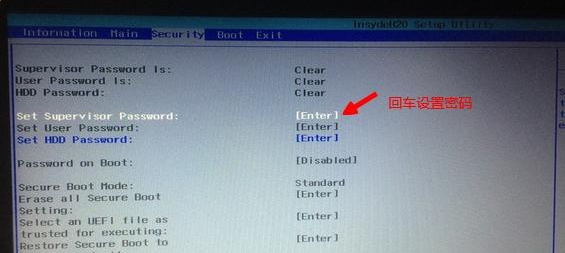
2. When set to Legacy, Secure Boot is turned off by default. If Secure Boot is gray and cannot be set, go to Security, select Set Supervisor Password and press Enter to set the password, and then disable Secure Boot;

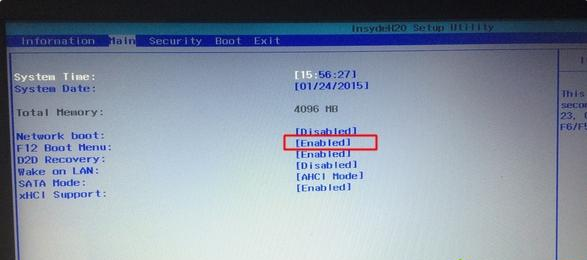
3. Go to Main, select F12 Boot Menu and press Enter, set it to Enabled, press F10 to select Yes and press Enter to save the changes;

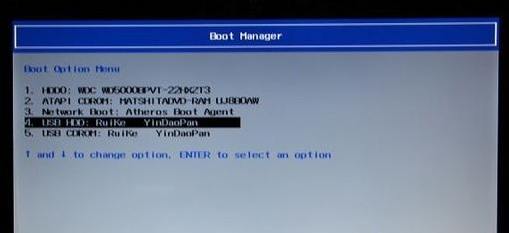
4. Insert the USB boot disk and restart Press F12 to open Boot Manager, select USB HDD and press Enter to boot from the U disk;

5. Boot to the U disk interface and select to run the PE system;

6. Open the DiskGenius partition tool on the PE desktop, click "Hard Disk" and select "Delete All Partitions", then select "Convert Partition Table to MBR", and finally perform quick partitioning;

7. After partitioning, open the PE installation tool, select to install win7 to the C drive, and confirm;


The above is the detailed content of Step-by-step tutorial for installing win7 system on Acer laptop. For more information, please follow other related articles on the PHP Chinese website!

Hot AI Tools

Undresser.AI Undress
AI-powered app for creating realistic nude photos

AI Clothes Remover
Online AI tool for removing clothes from photos.

Undress AI Tool
Undress images for free

Clothoff.io
AI clothes remover

AI Hentai Generator
Generate AI Hentai for free.

Hot Article

Hot Tools

Notepad++7.3.1
Easy-to-use and free code editor

SublimeText3 Chinese version
Chinese version, very easy to use

Zend Studio 13.0.1
Powerful PHP integrated development environment

Dreamweaver CS6
Visual web development tools

SublimeText3 Mac version
God-level code editing software (SublimeText3)

Hot Topics
 1378
1378
 52
52
 Acer laptop win10 to win7 tutorial
Jul 12, 2023 pm 09:05 PM
How to set up the bios of Acer computer from win10 to win7? After buying an Acer desktop computer, many friends tried to change win10 to win7 system but failed. The editor below will tell you how to install win7 system on Acer laptop computer. 1. First, we open the computer browser and search the official website of Magic Pig One-Click System Reinstallation, download it and open it. 2. After downloading, we open it and click online reinstallation. 3. Next, we will wait patiently for it to be installed. 4. The installation is complete. Next we need to click to restart the computer now. 5. After restarting the computer, we still need to return to the main interface to continue completing the installation. Then our installation is completed. The above are the details of changing Acer notebook from win10 to win7.
 Details on whether the 2nd generation i5 can install win11
Jan 11, 2024 pm 11:09 PM
Although Microsoft stated in its press conference that win11 can support at least the eighth-generation Intel processor, in fact, according to tests by netizens, even the second-generation i5 can install win11 normally. However, its performance and official version are uncertain. Let’s take a look at it below. Can win11 be installed on the 2nd generation i5? Answer: It can be installed, but it can only be installed through a mirror. 1. In the processor support form provided by Microsoft, we can see that the minimum requirements for Intel Core processors are eighth-generation processors. 2. But this requirement is only required for system detection when automatically upgrading win11. 3. Therefore, we can directly install the win11 system by skipping system detection. 4. In addition, we
 Tutorial on steps to reinstall Windows 7 system on computer
Jul 11, 2023 pm 06:54 PM
For those users who don’t know how to reinstall win7 system, although reinstalling win7 system is very simple and you can search a lot of information and explanations on the website, there are still some novices who don’t know how to reinstall it. This tutorial will talk about reinstallation in detail now. Once you learn the specific steps of the system, you can reinstall it yourself. 1. First download a KaKa installation machine, and then enter the main interface. 2. Select and install win7 system. 3. Please wait patiently for the download of the win7 mirror system. 4. After the deployment is completed, please follow the instructions and wait for the restart. 5. During the restart process, please enter the computer pe system through the PE system installed by Kaka. 6. After the restart is completed, the automatic installation of the win7 system begins. 7. When you encounter a pop-up window, please click "OK". 8. After the installation is completed, please follow
 Acer launches new TravelMate business notebook series: Core Ultra / Ryzen 8040, new AI features
Jun 11, 2024 am 09:02 AM
According to news from this website on May 31, Acer today launched the latest generation of TravelMate commercial AI laptops with built-in NPU, equipped with Intel Core Ultra and AMD Ryzen 8040 series processors. A total of 4 models have been launched this time. Acer TravelMate P614 TravelMate P614-inch laptop is equipped with Intel Core Ultra5/7 processor, optional vPro support, and is equipped with a 2.8KOLED screen certified by DisplayHDRT TrueBlack500, covering 100% DCI-P3 color gamut. Its detailed parameters are as follows: The computer is also equipped with two Thunderbolt 4 ports, 65Wh battery, weight 1.19kg. Acer Travel
 Detailed step-by-step tutorial on reinstalling win7 system
Jul 08, 2023 am 11:45 AM
There are still many users using win7 system, and many need to reinstall the system. Today I will bring you a step-by-step tutorial on reinstalling the win7 system. I hope everyone can successfully reinstall the system after watching the tutorial and continue to use the win7 system happily. Let’s take a closer look at the following tutorial on reinstalling win7 system. 1. Download a system home one-click reinstallation system software on your computer and open it. 2. Turn off the anti-virus software and select the Windows 7 system to download. 3. Then wait patiently for the system to download. 4. After the environment deployment is completed, we restart the computer. 5. After restarting, the system will pop up the Windows Startup Manager interface. Select the second one to enter the pe system interface. 6. Continue to install the Windows 7 system in this PE system.
 Detailed step-by-step tutorial on how to install the system after assembling the computer
Jul 10, 2023 pm 08:21 PM
Many people do not like to buy a complete computer, but will buy computer hardware to assemble it themselves. The system is an essential environment for the operation of the computer. We must install the system after assembling the computer, otherwise the computer will not be usable. Some users After assembling the computer but not knowing how to install the system, the editor here will give you a detailed tutorial on how to install the system after assembling the computer. 1. Make a U disk boot disk, then insert the U disk into the computer. After restarting, press F12, F11, Esc and other shortcut keys to open the boot menu, select the USB option and press Enter; 2. Start to enter the U disk main menu and press Enter. Enter the PE system; 3. Open the DiskGenius partition tool under the PE system, click [Hard Disk] - [Quick Partition]; 4. Set the number of partitions, and set the size of each partition, C drive
 Step-by-step tutorial for downloading and installing the win7 mirror system
Jul 18, 2023 pm 04:25 PM
A system image is used to restore the contents of a computer, which contains the drives we need to run the system. With the development of technology, we now often use it to install systems. Maybe many friends don't know much about its installation system, so I will introduce to you how to install the system using win7 mirror. 1. Download a Xiaobai three-step installation version of the software on your computer and open it. Select the win7 system and click Reinstall Now. 2. The software downloads the system image and we wait for a while. 3. After the download is completed, the software will automatically reinstall the Windows system online. 4. After the installation is complete, click Restart now. (At this point the software will automatically help us reinstall the system, we don’t need to do anything) 5. After restarting, select the second option in the menu to enter WindowsP
 Step-by-step tutorial for downloading and installing the win7 operating system
Jul 21, 2023 am 09:53 AM
How to install win7 system easily? Although there are many ways to install the system, many novice users still don't know which method is the most convenient and simple to install quickly. The editor below will teach you the step-by-step tutorial on downloading and installing the win7 operating system. Come and take a look. 1. Reinstall the system software with one click in the installation bar. There is no pressure to install the computer. You can download and install the win7 system here. 2. Click on win7 system to download and install. 3. Wait for the system image download to complete. 4. After downloading, deploy the environment. After the environment is deployed, we need to restart the computer to install it. 5. After restarting the computer, the windows startup manager interface will appear. We choose the second one to enter the computer’s pe installation system. 6. In the pe interface of the computer


