 Common Problem
 How to check the computer configuration graphics card in Win10? How to query the computer's graphics card configuration in Win10
How to check the computer configuration graphics card in Win10? How to query the computer's graphics card configuration in Win10
Occasionally when you are playing a game, you will want to check the graphics card configuration on your computer to see if it meets the requirements of the game. However, many friends do not know how to check, so if you encounter such a situation, you should How to do it? Let’s take a look at the solutions with the editor below.
How to query the computer's graphics card configuration in Win10
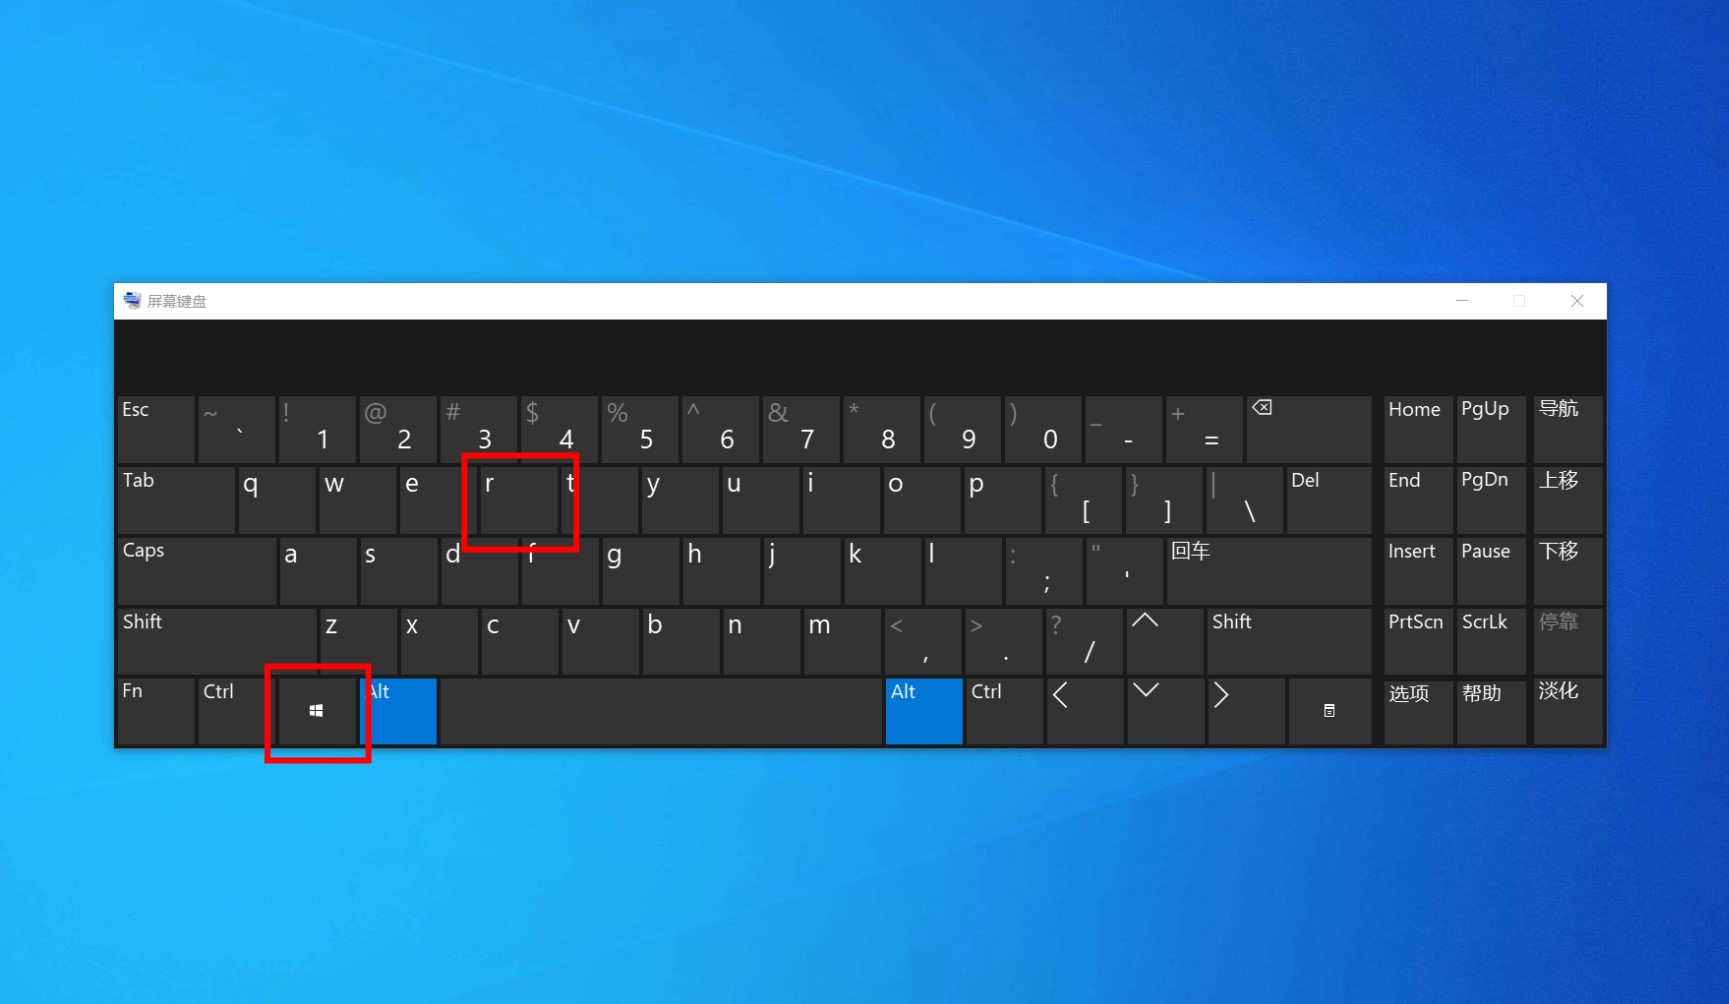
1. Press and hold win r to open the run
First press and hold win r on the keyboard of the computer Open the run window.

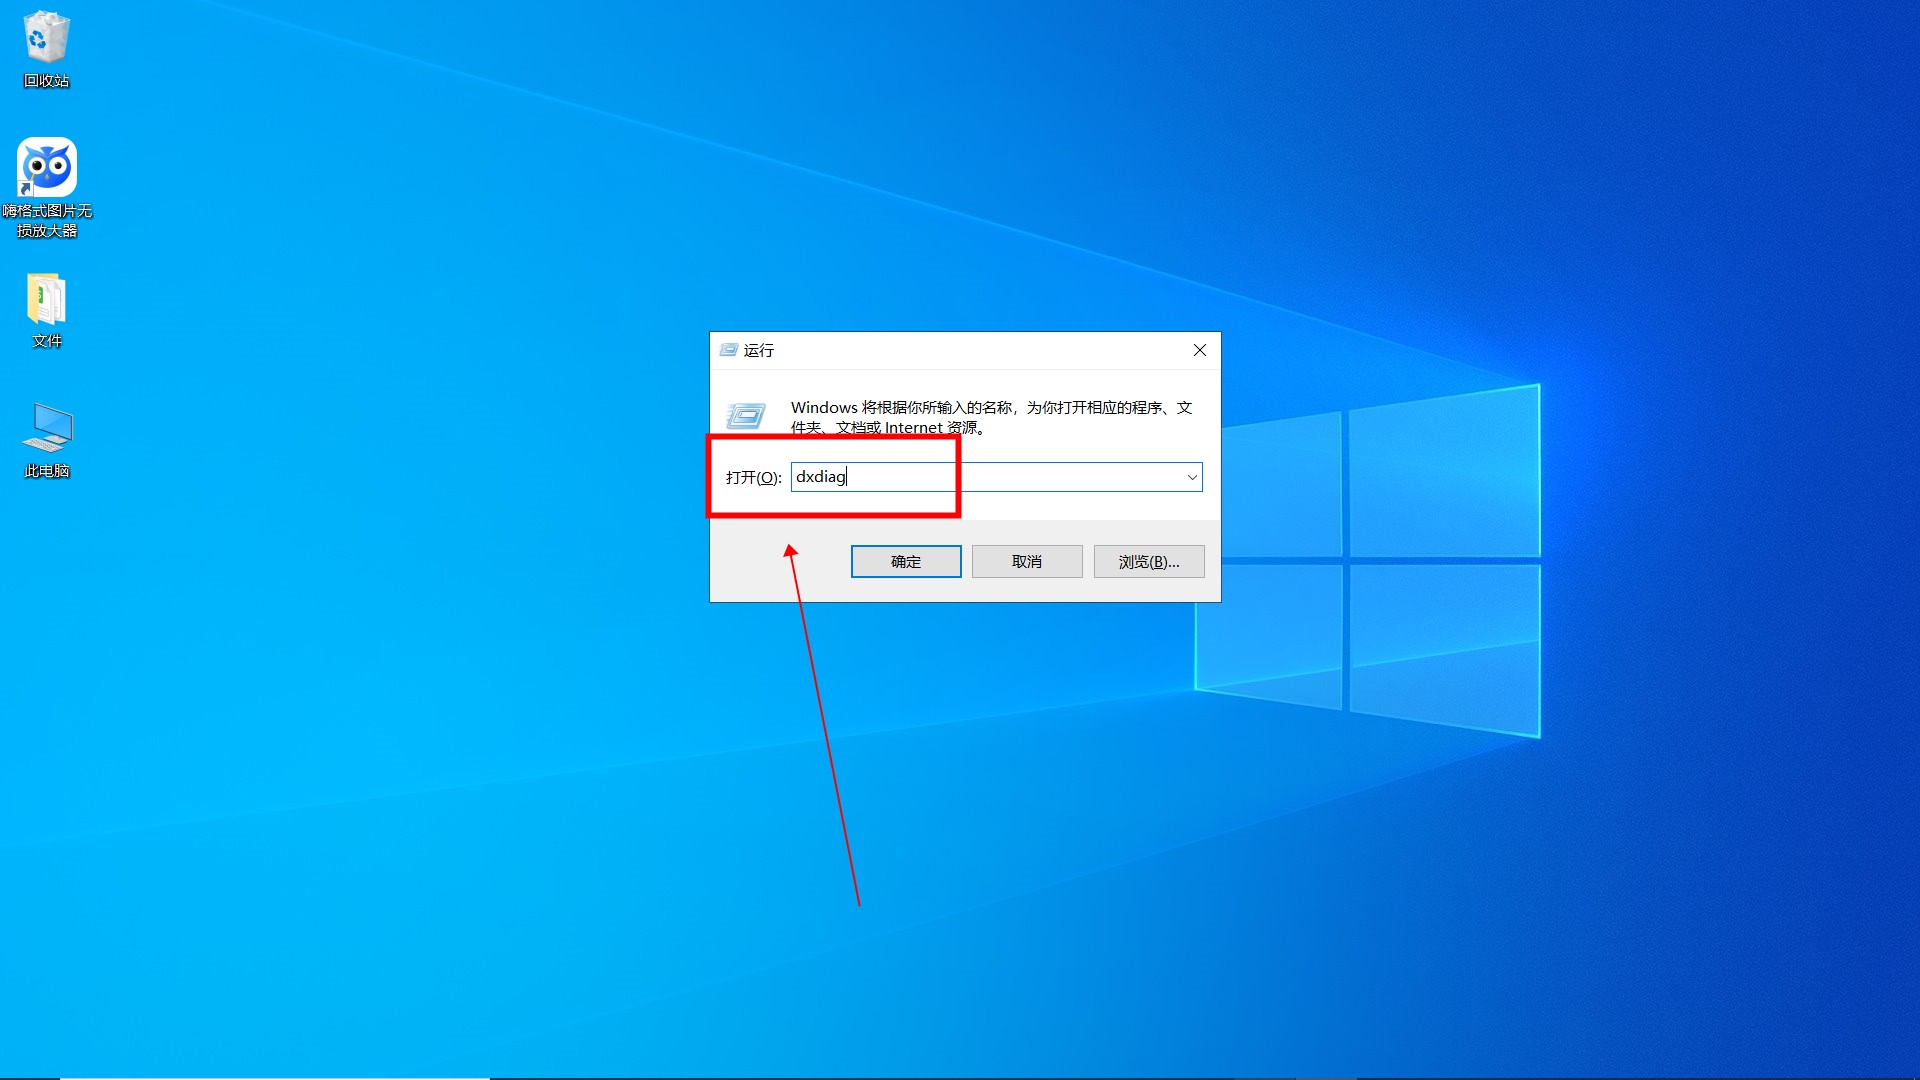
2. Type dxdiag and confirm
Then in the run window, type the command "dxdiag" and click OK.

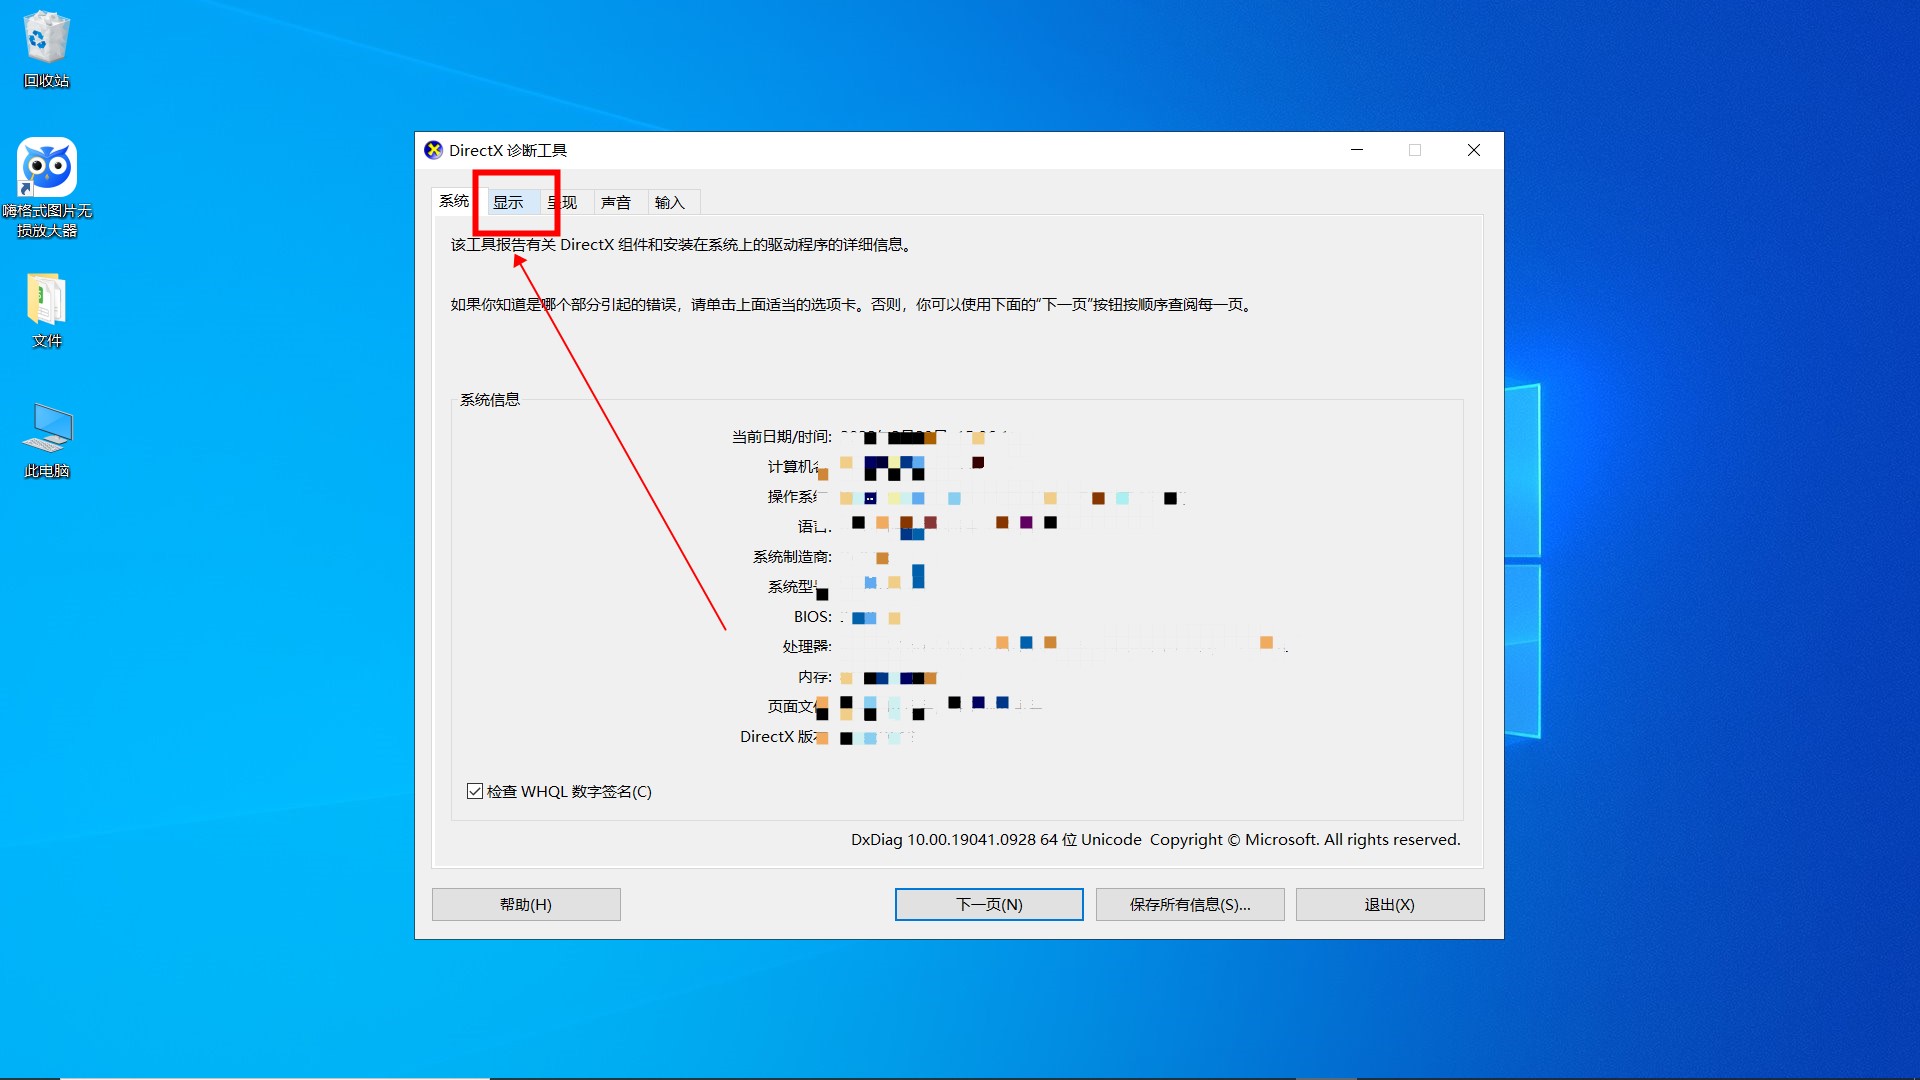
#3. Click the Show menu bar
In the opened Directx diagnosis tool dialog box, click the "Show" menu bar.

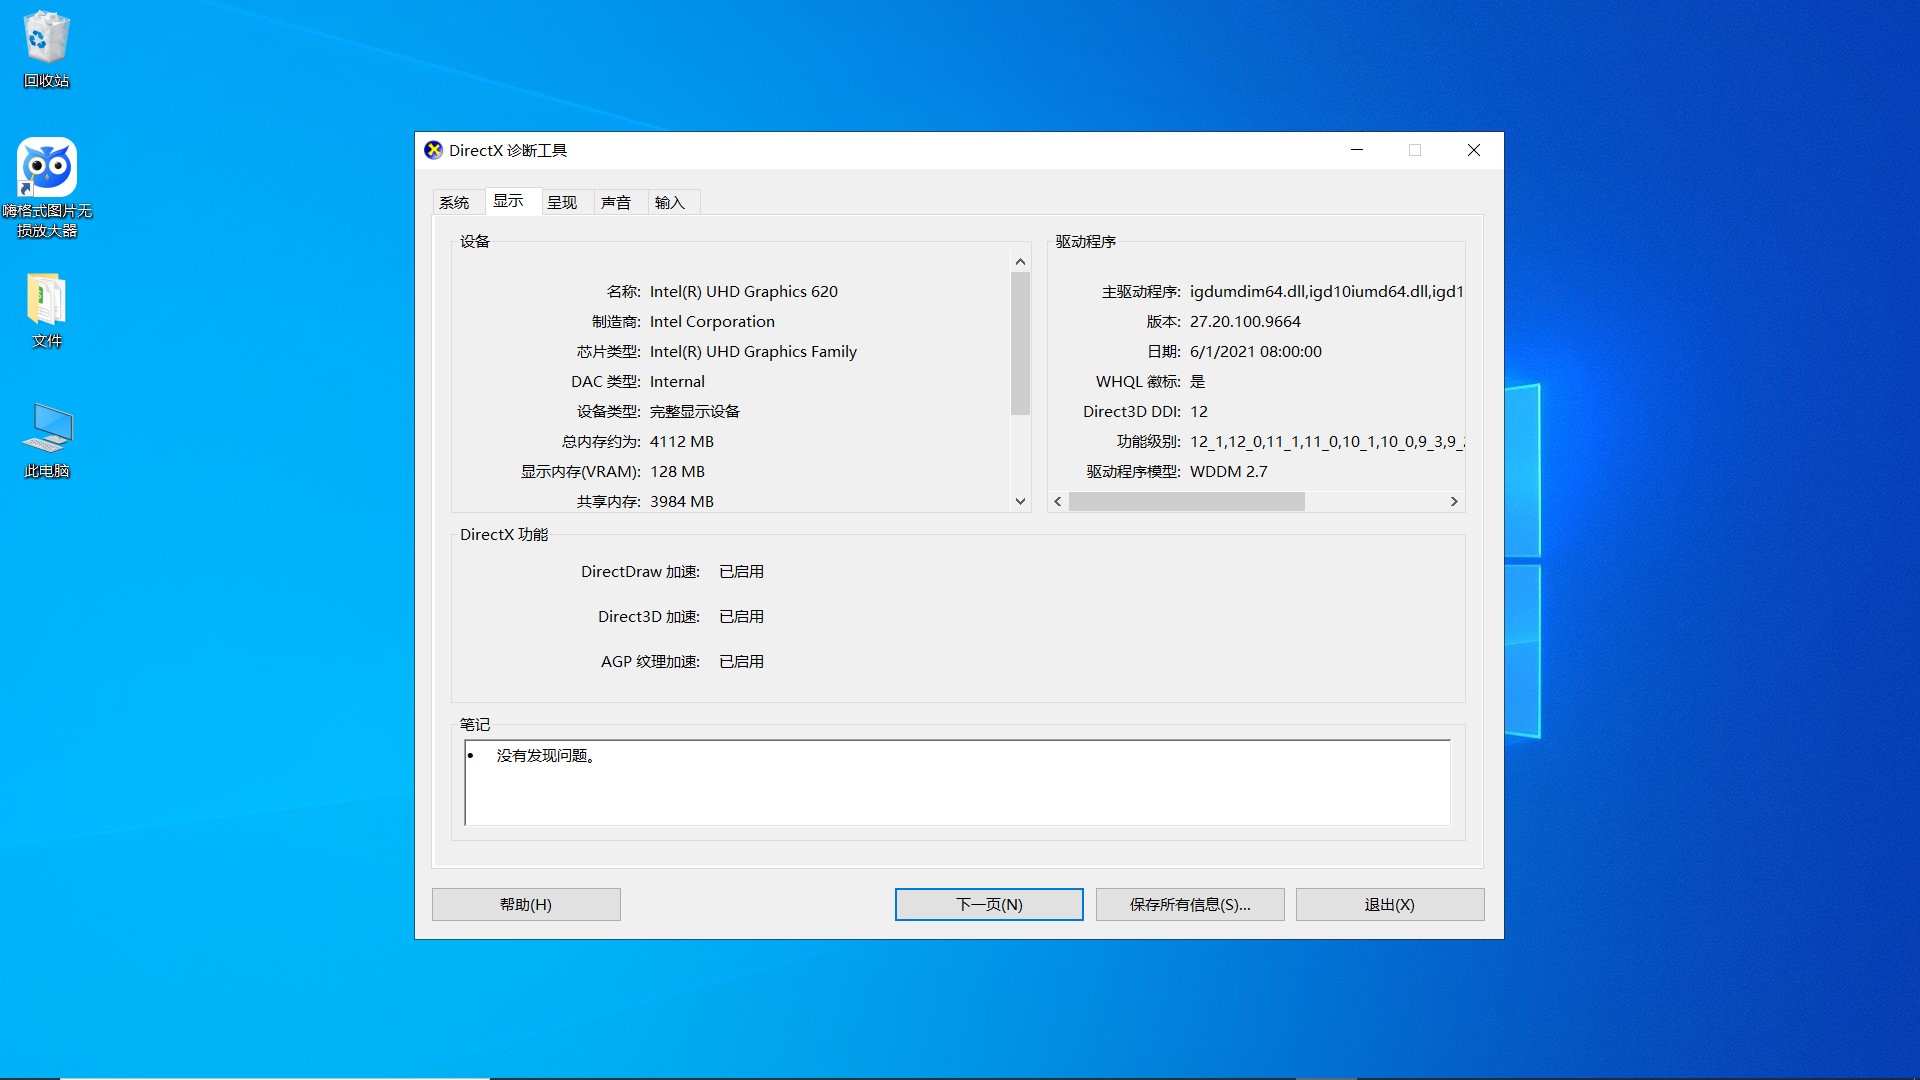
#4. Check the graphics card information
In this way, you can query the graphics card information of the computer configuration.

The above is the detailed content of How to check the computer configuration graphics card in Win10? How to query the computer's graphics card configuration in Win10. For more information, please follow other related articles on the PHP Chinese website!

Hot AI Tools

Undresser.AI Undress
AI-powered app for creating realistic nude photos

AI Clothes Remover
Online AI tool for removing clothes from photos.

Undress AI Tool
Undress images for free

Clothoff.io
AI clothes remover

AI Hentai Generator
Generate AI Hentai for free.

Hot Article

Hot Tools

Notepad++7.3.1
Easy-to-use and free code editor

SublimeText3 Chinese version
Chinese version, very easy to use

Zend Studio 13.0.1
Powerful PHP integrated development environment

Dreamweaver CS6
Visual web development tools

SublimeText3 Mac version
God-level code editing software (SublimeText3)

Hot Topics
 win7 configuration update fails to restore changes
Dec 29, 2023 pm 07:26 PM
When we restart the computer or turn on win7, we may encounter the problem that win7 configuration update failed to restore changes. At this time, we can try to restart the computer, enter safe mode and modify the settings to solve the problem. Win7 configuration update failed to restore changes 1. First restart the computer and press "F8" on the keyboard. 2. Then select "Safe Mode" and press Enter to enter. 3. After entering safe mode, press "Win+R" on the keyboard to open Run. 4. Enter "services.msc" in Run and press Enter to open it. 5. Then double-click to open "windowsupdate" and change the startup type to "disabled" 6. After disabling it, open the "Control Panel" 7. Then open "windowsupdat"
 Win11 configuration environment variable tutorial
Jan 06, 2024 pm 08:05 PM
By configuring environment variables for win11, you can modify the parameters of related software and system files. So where are the environment variables for win11? In fact, we only need to find the advanced system settings. Tutorial on configuring environment variables in win11: 1. First, we right-click this computer and click "Properties" 2. After entering, we usually open the "System" settings directly. 3. Then click the “About” option in the lower right corner. 4. Then click "Advanced System Settings" in the relevant link. 5. After opening, click "Environment Variables" under System Properties to modify the configuration there.
 What should I do if 35% of the win7 configuration update fails?
Jan 02, 2024 pm 11:29 PM
The win7 system is a classic system that has been used by the general public for many years, but recently many friends have suddenly reported that their win7 system has a problem of 35% of the win7 configuration not being updated. Today, the editor will bring you a computer Let’s take a look at the solution to the stuck update configuration. Solution to the problem that 35% of the win7 configuration update does not work: Operation steps: 1. Restart the computer and keep pressing f8. When you get to the advanced startup options, select "Safe Mode" to enter. 2. If it still shows that Windows Update failed to be configured after entering safe mode, wait for a while to see if the configuration is successful. At this time, it may take as little as 15 minutes or as long as several hours. 3. After the configuration is completed, normal startup will skip displaying the configuration windows.
 How to check the computer configuration graphics card in Win10? How to query the computer's graphics card configuration in Win10
Jul 14, 2023 pm 04:09 PM
Occasionally when playing a game, everyone will want to check the graphics card configuration on their computer to see if it meets the requirements of the game. However, many friends still don’t know how to check, so what should they do if they encounter such a situation? ? Let’s take a look at the solutions with the editor below. How to query the computer's graphics card configuration in Win10 1. Press and hold win+r to open the run. First, press and hold win+r on the computer's keyboard to open the run window. 2. Type dxdiag and click OK. Then in the run window, type the command "dxdiag" and click OK. 3. Click the Show menu bar. In the opened Directx Diagnosis Tool dialog box, click the "Show" menu bar. 4. Check the graphics card information so that you can query the computer
 How to check the graphics card model in win10
Jun 29, 2023 pm 12:05 PM
How to check the graphics card model in win10? Do you know the performance of your computer? Among computers with win10 system, an important part that affects the user experience is the computer’s graphics card model. The more advanced the graphics card model can bring The better the user experience is, which leads some users to want to know what their graphics card model is. The following editor will bring you the method of checking the graphics card model in win10. How to check the graphics card model in win10 1. First, right-click a blank space on the desktop and click [Display Settings] in the pop-up menu. 2. Then click [Advanced display settings] below. 3. Finally, in the advanced display settings interface, you can check the graphics card model. The above is about how to check the graphics card model in win10-
 How to solve win7 configuration update failure
Dec 23, 2023 am 08:43 AM
The win7 system is a classic system with excellent performance, but recently many friends have encountered the problem of a blue screen when the win7 update fails! What to do? Today, the editor has brought you the solution to the blue screen when the win7 configuration update fails. If you need it, take a look. Solution to win7 configuration update failure: Operation steps: 1. After the computer is forced to shut down and restarted, immediately press the hot key F8 to enter the advanced startup interface. At this time, use the keyboard arrow keys to select "Safe Mode" up and down, and then press Enter to confirm entry. 2. After entering the Windows system desktop in safe mode, press the keyboard shortcut Win+R at the same time to open the run window and enter "services.msc" to open the service settings. 3. In the service world
 Introduction to the minimum win10 configuration requirements
Jul 07, 2023 pm 09:49 PM
Many friends, due to lack of budget when assembling their own computers, want to assemble a low-end computer that can run the win10 system smoothly. At this time, they must consider the win10 system configuration requirements. Let’s talk about the minimum minimum requirements for installing win10 on the computer. Configure it. 1. [Processor]: The installation of Win10 system requires that the computer’s processor speed cannot be lower than 1GHz. Everyone knows that the core part of a computer is the computer's processor. The main frequency of the processor directly affects the running speed of the computer. 2. [Running Memory]: The Win1032-bit operating system requires that the memory cannot be less than 1GB, while the Win1064-bit operating system requires that the memory cannot be less than 2GB. Running memory is what we often call memory sticks. Some computers
 How to successfully configure Win11 user settings
Dec 22, 2023 pm 03:46 PM
In the user configuration file, we can modify system settings such as startup and shutdown. So how to open the win11 user configuration? In fact, we only need to find the advanced system settings, where we can modify the user configuration file. How to open win11 user configuration: First, right-click "This PC" and open "Properties". Second, open the "Advanced System Settings". Third, click the "Settings" button under the user profile. Step 4: After entering, you can perform operations such as changing the type, deleting, and copying the user configuration.


