

Teach you how to enter bios on Lenovo notebook

Many times we need to enter the bios to set up USB disk boot, administrator password and other operations. Different computers have different methods of entering bios settings, and different models of our Lenovo laptops have different methods of entering bios settings. , so how to enter the bios settings of Lenovo computers? Come and take a look with the editor.
How to enter the bios of Lenovo laptop:
1. First we open the Lenovo laptop and press F12 when booting. If the startup hotkey is set, press Fn F12.

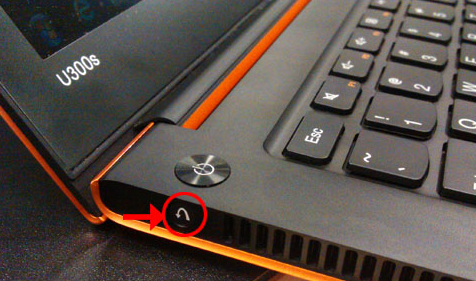
2. Then for some IdeaPad U or S series, such as IdeaPad U300s, you can press the one-click recovery button and select BIOS Setup is entered; in the shutdown state, press the NOVO hotkey to boot into the BIOS settings.
3. Then enter the bios settings.

4. Press the Tab key on the keyboard, select App Menu, and then click the enter key.

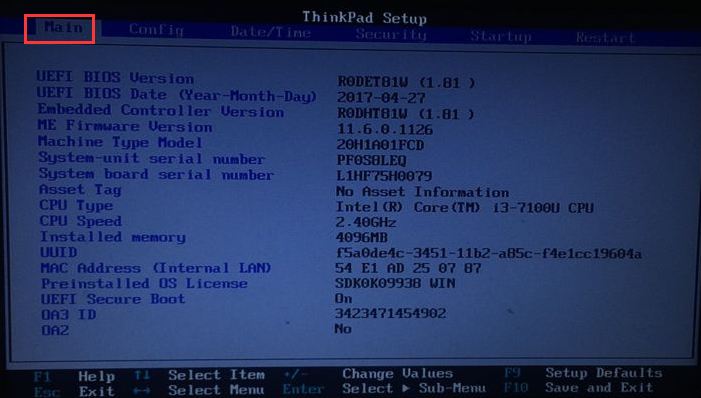
5. Enter the bios interface, main is the basic information of the computer.
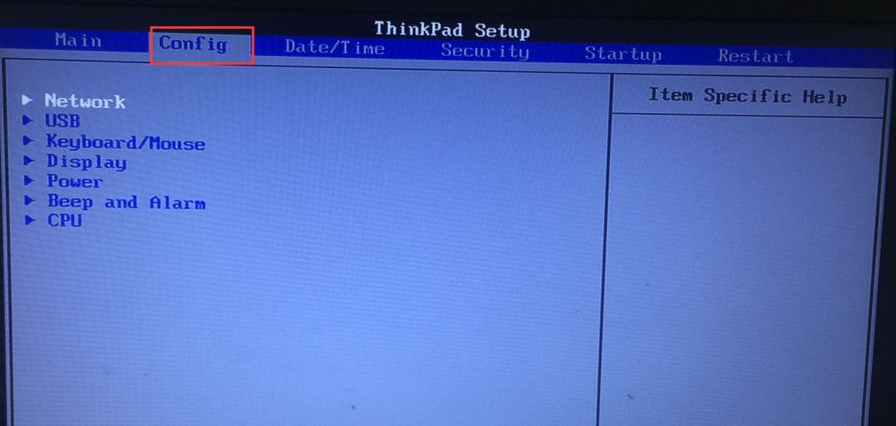
6.config can configure some applications of the computer.
7.Date/Time is the system time.

8.Security is the system security option and you can set a password.

The above is how to enter the bios settings of a Lenovo notebook. I hope it can help everyone.
The above is the detailed content of Teach you how to enter bios on Lenovo notebook. For more information, please follow other related articles on the PHP Chinese website!

Hot AI Tools

Undresser.AI Undress
AI-powered app for creating realistic nude photos

AI Clothes Remover
Online AI tool for removing clothes from photos.

Undress AI Tool
Undress images for free

Clothoff.io
AI clothes remover

AI Hentai Generator
Generate AI Hentai for free.

Hot Article
Hot Tools

Notepad++7.3.1
Easy-to-use and free code editor

SublimeText3 Chinese version
Chinese version, very easy to use

Zend Studio 13.0.1
Powerful PHP integrated development environment

Dreamweaver CS6
Visual web development tools

SublimeText3 Mac version
God-level code editing software (SublimeText3)
Hot Topics
 1377
1377
 52
52

 Check if Lenovo laptop supports TPM? How to turn on and off TPM on Lenovo laptop?
Mar 14, 2024 am 08:30 AM
Check if Lenovo laptop supports TPM? How to turn on and off TPM on Lenovo laptop?
Mar 14, 2024 am 08:30 AM
Recently, some Lenovo notebook partners have upgraded their systems to Win11. At this time, they need to check the computer to see if it supports TPM. If the computer supports TPM, it can be turned on in the motherboard BIOS. But how to enable the tpm function on Lenovo computers? Does it support opening? The following tutorial will introduce in detail the TPM activation of Lenovo notebooks. 1. Check whether TPM is supported 1. Right-click the start menu-Run (or press the Win+R keys on the keyboard), enter TPM.msc-press Enter. 2. As shown in the red box in the figure below, "TPM is ready for use" indicates that the machine supports TPM, and the version is version 2.0 shown in the red box below. 3. If
 How to enter bios on Colorful motherboard? Teach you two methods
Mar 13, 2024 pm 06:01 PM
How to enter bios on Colorful motherboard? Teach you two methods
Mar 13, 2024 pm 06:01 PM
Colorful motherboards enjoy high popularity and market share in the Chinese domestic market, but some users of Colorful motherboards still don’t know how to enter the bios for settings? In response to this situation, the editor has specially brought you two methods to enter the colorful motherboard bios. Come and try it! Method 1: Use the U disk startup shortcut key to directly enter the U disk installation system. The shortcut key for the Colorful motherboard to start the U disk with one click is ESC or F11. First, use Black Shark Installation Master to create a Black Shark U disk boot disk, and then turn on the computer. When you see the startup screen, continuously press the ESC or F11 key on the keyboard to enter a window for sequential selection of startup items. Move the cursor to the place where "USB" is displayed, and then
 How to enter bios on Asus computer to set up USB boot
Jul 12, 2023 am 09:22 AM
How to enter bios on Asus computer to set up USB boot
Jul 12, 2023 am 09:22 AM
When we encounter a problem when using a computer, many times we can use a USB flash drive to reinstall the system to solve the problem. At this time, we need to enter the BIOS to set up the USB boot. However, many friends do not know how to enter the BIOS to set up the USB boot on the ASUS computer. So today I will teach you how to set up the BIOS on the ASUS computer to set up the USB boot. Let’s take a look below! How to set up USB disk startup in ASUS computer bios: 1. Press and hold the F2 key when booting to enter the bios. 2. Press the direction keys to move the cursor and select the BOOT (Tools) setting option. 3. When we move the cursor to boot, press the up and down arrow keys to move the cursor to the "HarddriveBBSPriorities" option, and then
 How to enter the Lenovo notebook bios and enable the USB disk boot option
Jul 14, 2023 pm 05:41 PM
How to enter the Lenovo notebook bios and enable the USB disk boot option
Jul 14, 2023 pm 05:41 PM
Many times we need to enter the BIOS to set the administrator password, set the USB disk to boot, and other operations. Different brands of computers have different methods of entering the BIOS. Let's take a look at how to set startup items in Lenovo BIOS. 1. Now let’s officially talk about the process of entering the BIOS. When booting to Logon, quickly press the Del key (some may be the F8 key) to enter the BIOS. 2. After entering the BIOS, select "Security", find "SecureBoot", and press Enter to enter the subkeys. 3. In the subkey, set the value of SecureBoot to "Disabled". To enable the traditional method, this secure boot item must be turned off, Disab
 How to adjust the screen brightness of Lenovo ThinkPad X13 notebook?
Jan 04, 2024 pm 06:37 PM
How to adjust the screen brightness of Lenovo ThinkPad X13 notebook?
Jan 04, 2024 pm 06:37 PM
We have all experienced this situation: when we go from indoors to outdoors, the brightness of the mobile phone screen automatically adjusts according to the ambient light, but most laptops do not have this feature, so we need to manually adjust the screen brightness. Today, I will introduce to you how to adjust the screen brightness of Lenovo ThinkPad X13. Lenovo ThinkPad The following uses ThinkPadX13 as an example to introduce these two adjustment methods. The first is to adjust the screen brightness through the buttons. On ThinkPad X13, there is usually a dedicated button or key combination for adjusting the screen.
 Teach you how to enter bios on Lenovo notebook
Jul 14, 2023 pm 11:13 PM
Teach you how to enter bios on Lenovo notebook
Jul 14, 2023 pm 11:13 PM
Many times we need to enter the bios to set up the USB boot, administrator password and other operations. Different computers have different methods of entering the bios settings, and different models of our Lenovo laptops have different methods of entering the bios settings. So how do you enter the bios settings on a Lenovo computer? What about the bios settings? Come and take a look with the editor. How to enter the bios of a Lenovo laptop: 1. First, we open the Lenovo laptop and press F12 when booting. If a startup hotkey is set, press Fn+F12. 2. Then some IdeaPadU or S series, such as IdeaPadU300s, can be restored with one click Press the button and select BIOS Setup to enter; in the shutdown state, press the NOVO hotkey to boot
 Some Lenovo Legion laptops won't boot after Windows BIOS update
May 04, 2023 pm 11:25 PM
Some Lenovo Legion laptops won't boot after Windows BIOS update
May 04, 2023 pm 11:25 PM
Some unlucky Lenovo laptop users (particularly those with a Legion) apparently ran into serious trouble after installing a BIOS update pushed via the Lenovo Vantage app. According to various reports, BIOS updates available in both Windows 10 and Windows 11 can cause some nasty boot failures. It is worth noting that only some Lenovo Legion models are affected, including the Legion5 and Legion7 lineup. BIOS update version GKCN53WW causes random Blue Screen of Death errors with a rather obscure stop code "DRIVER_POWER_STATE_F
 What is the difference between Lenovo y7000p and y9000p
Jun 08, 2023 am 10:14 AM
What is the difference between Lenovo y7000p and y9000p
Jun 08, 2023 am 10:14 AM
The differences between Lenovo y7000p and y9000p are: 1. The body design is different. Y7000p is relatively thick and heavy with a conventional body design, while the Y9000p is lighter and thinner, with a metal body design. 2. The processors are different. Y7000p is an Intel i5-12500h processor, while Y9000p is Intel i9-12900h processor; 3. The graphics card configuration is different, Y7000p has an rtx3050/3050ti graphics card, Y9000p has an rtx3060/3070 graphics card, etc.