Tutorial on how to use win7 system repair function
Jul 15, 2023 am 09:25 AMIn the process of using computers, we will inevitably encounter some system problems. Some system problems are more serious, so we need to repair the system. There are many ways to repair the system. The editor will share with you below. Let’s learn about the step-by-step tutorial on repairing win7 system.
1. Press the F8 key repeatedly during startup to enter the advanced startup options and select "Repair Computer".
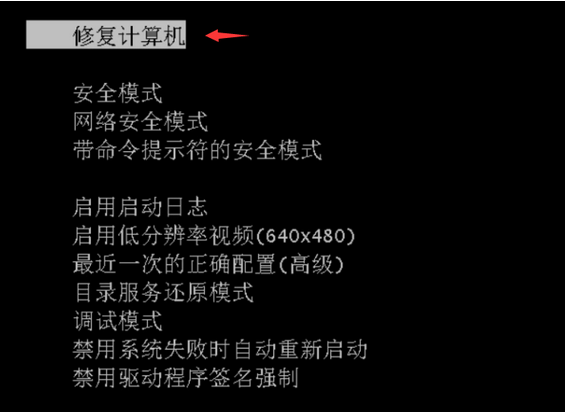
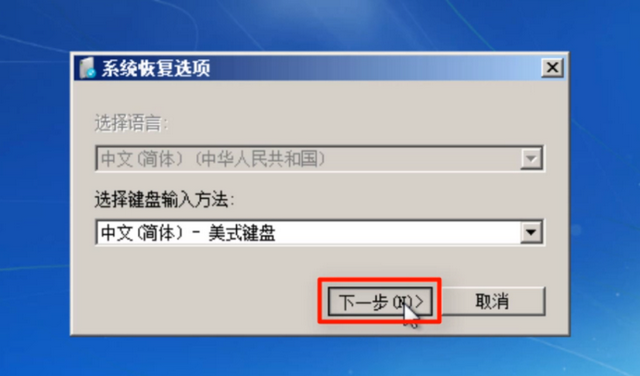
#2. Click "Next" in the pop-up operation interface.
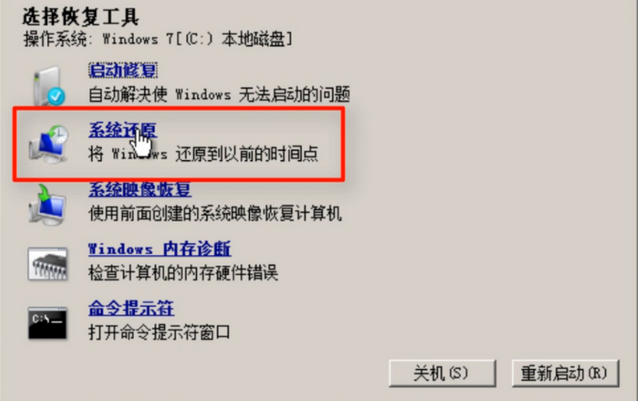
#3. Then find the "System Restore" option and click it, and then select "Next" according to the prompts.
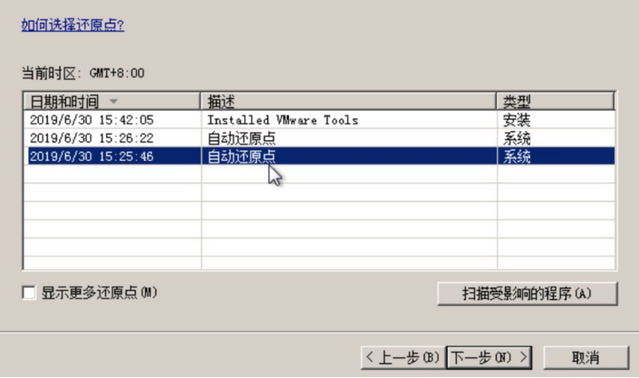
#4. Select the "Automatic Restore Point" of the system that needs to be restored, and then select "Next".
5. Click "Finish" and then select "Yes" in the prompt box.

#6. Wait patiently, and finally click "Restart".
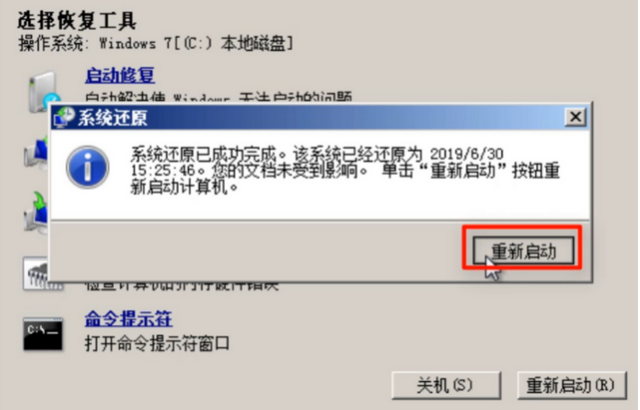
#The above is the step-by-step tutorial on repairing the win7 system. I hope it can help everyone.
The above is the detailed content of Tutorial on how to use win7 system repair function. For more information, please follow other related articles on the PHP Chinese website!

Hot Article

Hot tools Tags

Hot Article

Hot Article Tags

Notepad++7.3.1
Easy-to-use and free code editor

SublimeText3 Chinese version
Chinese version, very easy to use

Zend Studio 13.0.1
Powerful PHP integrated development environment

Dreamweaver CS6
Visual web development tools

SublimeText3 Mac version
God-level code editing software (SublimeText3)

Hot Topics
 How to use exescope? Detailed usage tutorial
Mar 13, 2024 pm 10:40 PM
How to use exescope? Detailed usage tutorial
 The difference between vivox100s and x100: performance comparison and function analysis
Mar 23, 2024 pm 10:27 PM
The difference between vivox100s and x100: performance comparison and function analysis
 How to use Aisi Assistant-Aisi Assistant usage tutorial
Mar 06, 2024 pm 12:10 PM
How to use Aisi Assistant-Aisi Assistant usage tutorial
 How to use Thunder magnet link - Tutorial on using Thunder magnet link
Mar 05, 2024 pm 05:22 PM
How to use Thunder magnet link - Tutorial on using Thunder magnet link
 How to use Enterprise WeChat - Tutorial on using Enterprise WeChat
Mar 04, 2024 pm 02:28 PM
How to use Enterprise WeChat - Tutorial on using Enterprise WeChat
 How to use ons simulator - ons simulator usage tutorial
Mar 04, 2024 pm 01:10 PM
How to use ons simulator - ons simulator usage tutorial
 What is Discuz? Definition and function introduction of Discuz
Mar 03, 2024 am 10:33 AM
What is Discuz? Definition and function introduction of Discuz


