Tutorial on repairing your computer after Windows setup
After installing the Windows operating system, the computer may have some problems. At this time, we need to repair the computer. The operation of entering the BIOS may make some beginners feel embarrassed. What should we do? Now I will sort out how to set it up step by step so that you can learn about it together.
1. Place the system disk in the optical drive.

Then enter the biossetup CD to boot. The way to enter bios is to press the computer's power button, or restart the computer, and then immediately press the bios hotkey. The hotkey is usually DEL. , or F1.F2, try again.

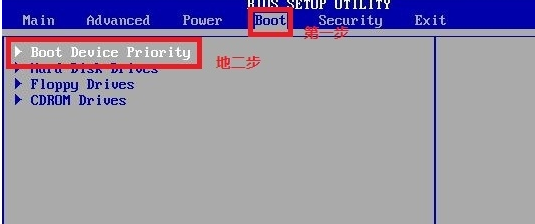
3. Enter the bios interface, select the direction key of the boot option, select the boot start option, and press Enter.
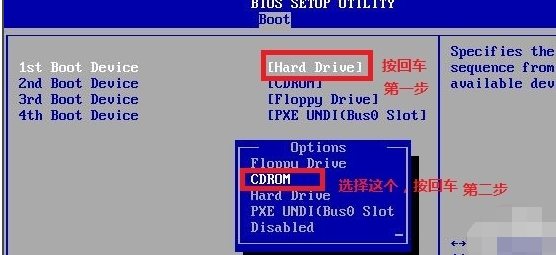
4. Select the first boot item, return, select the CD option, and enter.
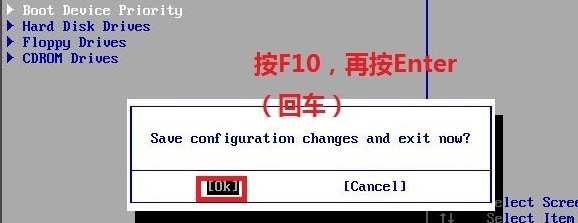
5. Press F10 to save.
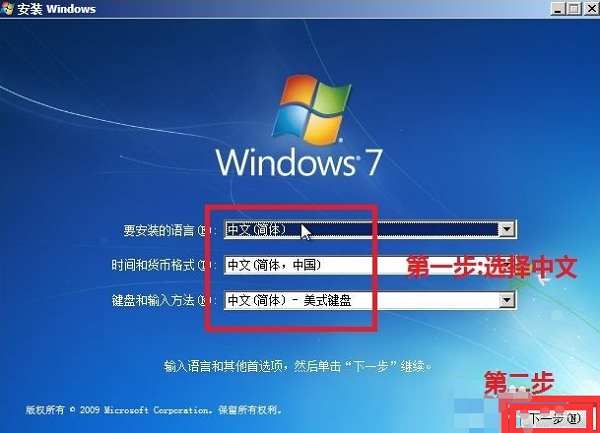
#6. Enter the Windows installation interface, select Chinese and click Next.
#7. The interface shown in the figure is displayed, click Install Now and click Repair Computer.
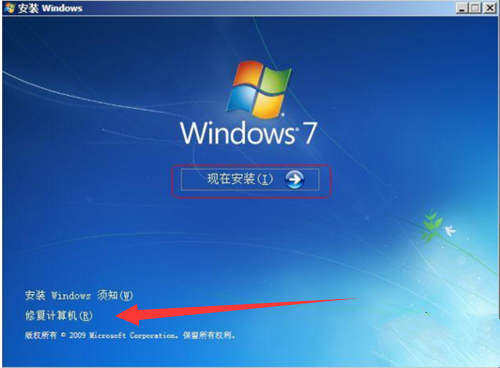
8. The system recovery option appears. You can choose startup options, system recovery, memory diagnosis, etc. If it is a startup problem, you can choose startup repair and wait for the computer to automatically repair.
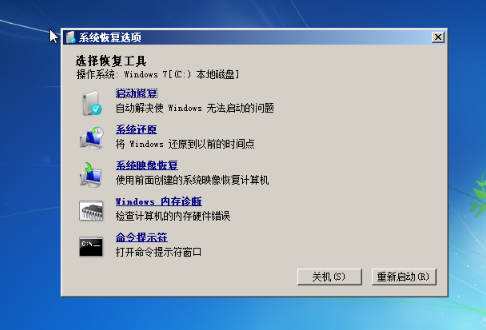
After installing the windows language, you can use these methods to repair your computer.
The above is the detailed content of Tutorial on repairing your computer after Windows setup. For more information, please follow other related articles on the PHP Chinese website!

Hot AI Tools

Undresser.AI Undress
AI-powered app for creating realistic nude photos

AI Clothes Remover
Online AI tool for removing clothes from photos.

Undress AI Tool
Undress images for free

Clothoff.io
AI clothes remover

AI Hentai Generator
Generate AI Hentai for free.

Hot Article

Hot Tools

Notepad++7.3.1
Easy-to-use and free code editor

SublimeText3 Chinese version
Chinese version, very easy to use

Zend Studio 13.0.1
Powerful PHP integrated development environment

Dreamweaver CS6
Visual web development tools

SublimeText3 Mac version
God-level code editing software (SublimeText3)

Hot Topics
 deepseek web version official entrance
Mar 12, 2025 pm 01:42 PM
The domestic AI dark horse DeepSeek has risen strongly, shocking the global AI industry! This Chinese artificial intelligence company, which has only been established for a year and a half, has won wide praise from global users for its free and open source mockups, DeepSeek-V3 and DeepSeek-R1. DeepSeek-R1 is now fully launched, with performance comparable to the official version of OpenAIo1! You can experience its powerful functions on the web page, APP and API interface. Download method: Supports iOS and Android systems, users can download it through the app store; the web version has also been officially opened! DeepSeek web version official entrance: ht
 In-depth search deepseek official website entrance
Mar 12, 2025 pm 01:33 PM
At the beginning of 2025, domestic AI "deepseek" made a stunning debut! This free and open source AI model has a performance comparable to the official version of OpenAI's o1, and has been fully launched on the web side, APP and API, supporting multi-terminal use of iOS, Android and web versions. In-depth search of deepseek official website and usage guide: official website address: https://www.deepseek.com/Using steps for web version: Click the link above to enter deepseek official website. Click the "Start Conversation" button on the homepage. For the first use, you need to log in with your mobile phone verification code. After logging in, you can enter the dialogue interface. deepseek is powerful, can write code, read file, and create code
 How to solve the problem of busy servers for deepseek
Mar 12, 2025 pm 01:39 PM
DeepSeek: How to deal with the popular AI that is congested with servers? As a hot AI in 2025, DeepSeek is free and open source and has a performance comparable to the official version of OpenAIo1, which shows its popularity. However, high concurrency also brings the problem of server busyness. This article will analyze the reasons and provide coping strategies. DeepSeek web version entrance: https://www.deepseek.com/DeepSeek server busy reason: High concurrent access: DeepSeek's free and powerful features attract a large number of users to use at the same time, resulting in excessive server load. Cyber Attack: It is reported that DeepSeek has an impact on the US financial industry.


