How to set up a shared printer on a Win7 computer
Printer is a printing tool often used in our office. It is convenient for employees to add printer sharing options. Printer printing tasks can be performed directly on their own computers. The following is a small series that shares how to set up a shared printer on a Win7 computer. Let’s take a look at how to set it up! . let us see!
How to set up a shared printer on a Win7 computer?
Step one: Cancel the disabled user in the Guest attribute.
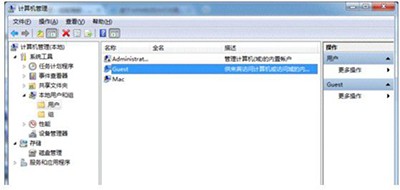
1. Click the Start button, right-click Computer, and select Manage, as shown in the figure. Find the Guest user in the computer management window that pops up, as shown in the figure.

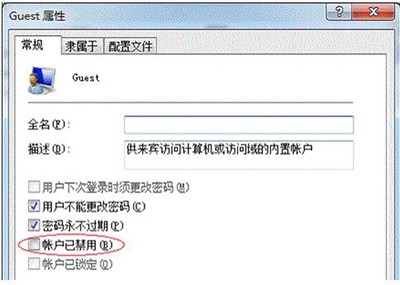
2. Double-click Guest to open the Guest properties window and make sure the check in front of the Account has been disabled option is unchecked, as shown in the figure.

Step 2: Set up a shared printer.
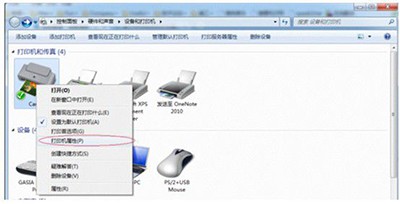
1. Click the Start button, select Devices and Printers, find the printer you want to share in the pop-up window, right-click the printer, and select Printer Properties, as shown in the figure.

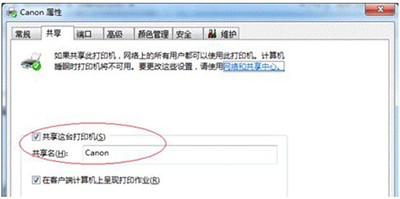
#2. Switch to the Sharing tab, check the shared printer and set the share name (please remember the share name, you can use the later settings), as shown below:

The above is the detailed content of How to set up a shared printer on a Win7 computer. For more information, please follow other related articles on the PHP Chinese website!

Hot AI Tools

Undresser.AI Undress
AI-powered app for creating realistic nude photos

AI Clothes Remover
Online AI tool for removing clothes from photos.

Undress AI Tool
Undress images for free

Clothoff.io
AI clothes remover

AI Hentai Generator
Generate AI Hentai for free.

Hot Article

Hot Tools

Notepad++7.3.1
Easy-to-use and free code editor

SublimeText3 Chinese version
Chinese version, very easy to use

Zend Studio 13.0.1
Powerful PHP integrated development environment

Dreamweaver CS6
Visual web development tools

SublimeText3 Mac version
God-level code editing software (SublimeText3)

Hot Topics
 1377
1377
 52
52
 How to solve win11 shared printer 0x00000040
Mar 28, 2024 am 09:33 AM
Error code 0x00000040 indicates that the printer driver is out of date, a firewall is blocking communication, file and printer sharing is not enabled, or permissions are not set correctly when sharing a printer. Solutions include: 1. Update printer driver; 2. Enable printer sharing; 3. Check firewall settings; 4. Enable file and printer sharing; 5. Grant sharing permissions; 6. Restart printer and computer; 7. Check network connection .
 How to solve the problem of offline shared printer in win11
Mar 28, 2024 am 09:30 AM
To resolve the shared printer offline issue in Windows 11, follow these steps: Check the network connection and shared printer status. Update the printer driver on the access computer. Reconnect to the shared printer. Enable the print spooler. Disable bidirectional support. Clear the print spooler cache.
 How to solve the problem that the candidate word box is not displayed when typing in the input method in Windows 11 system
Apr 11, 2024 pm 05:20 PM
Recently, some users have encountered the problem that the candidate word box cannot be displayed normally when typing in the Microsoft input method when using the Windows 11 operating system. This prevents users from conveniently selecting the required Chinese characters when entering text, affecting work efficiency and user experience. . What should you do if you encounter this situation? The following brings you detailed solutions, let’s take a look. Solution 1. Right-click the input method icon in the taskbar in the lower right corner and select "More Keyboard Settings" in the option box. 2. Then click the three-dot icon on the right side of Chinese and select "Language Options" in the option list. 3. Then click the three dots icon on the right side of the input method and select "Keyboard Options" to open it. 4. Then click the "General" option. 5. Finally, press the switch under "Compatibility"
 How to set the scheduled time for publishing works on Douyin? How does it set the video duration?
Mar 27, 2024 pm 06:11 PM
Publishing works on Douyin can attract more attention and likes, but sometimes it may be difficult for us to publish works in real time. In this case, we can use Douyin's scheduled release function. Douyin’s scheduled release function allows users to automatically publish works at a scheduled time, which can better plan the release plan and increase the exposure and influence of the work. 1. How to set the scheduled time for publishing works on Douyin? To set a scheduled release time, first go to Douyin's personal homepage, find the "+" button in the upper right corner, and click to enter the release page. There is a clock icon in the lower right corner of the publishing page. Click to enter the scheduled publishing interface. In the interface, you can choose the type of work you want to publish, including short videos, long videos, and live broadcasts. Next, you need to set a time for your work to be published. TikTok provides
 How to set up a shared printer in win11
Mar 27, 2024 am 09:24 AM
Here are the steps to set up a shared printer in Windows 11: Enable printer sharing and determine the network name. On the other computer, add the printer and select "WSD Port." In the Port Name field, enter a network name. Test the shared printer to verify that it is working properly.
 Printer operation cannot be completed error 0x0000709 Solution
Apr 20, 2024 pm 10:10 PM
In daily office and study, printers are indispensable tools. However, encountering printer errors is a very common situation. Recently, some users have encountered error code 0x0000709 when using the printer, and the system prompts that the operation cannot be completed. We have prepared four solutions to this problem, let’s take a look. Method 1: NT6 Printer Sharing Repair Tool The NT6 Printer Sharing Repair Tool is an excellent printer repair tool that can easily solve the problem of printer sharing link failure caused by updating patches, such as the recent problem when connecting Win10 and Win11 to share a printer. Errors reported, printer error codes 0x0000011b, 0x00000709 and other issues. This tool provides
 How to use shortcut keys to take screenshots in Win8?
Mar 28, 2024 am 08:33 AM
How to use shortcut keys to take screenshots in Win8? In our daily use of computers, we often need to take screenshots of the content on the screen. For users of Windows 8 system, taking screenshots through shortcut keys is a convenient and efficient operation method. In this article, we will introduce several commonly used shortcut keys to take screenshots in Windows 8 system to help you take screenshots more quickly. The first method is to use the "Win key + PrintScreen key" key combination to perform full
 Can win11 share printer with win10?
Apr 18, 2024 am 01:54 AM
Yes, Win11 and Win10 can share a printer, the following steps are required: Connect the printer on Win11 and install the driver. Enable printer sharing on Win11. Add a network printer and install the driver on Win10. Verify sharing is successful.


