

Win7 ultimate version original system installation tutorial

Many people want to download the win7 ultimate version system, but they don’t know how to install it. For users without computer experience, we can use tools to quickly install the win7 ultimate system, which is a good choice. The editor will share with you an easy-to-use installation tutorial for the original system of win7 ultimate version.
The specific installation steps are as follows:
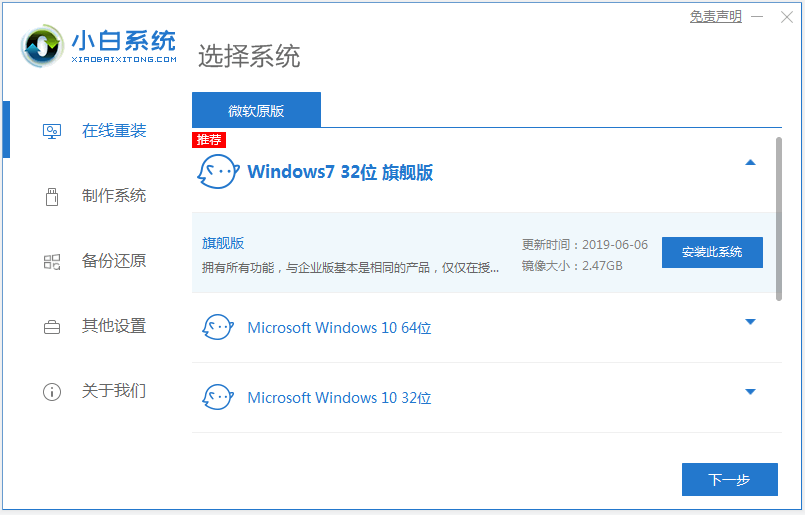
1. Download and install the Xiaobai one-click system reinstallation tool on your computer and open it. Select the original win7 ultimate system that needs to be installed, and click to install this system. (Be sure to back up important data on drive C before installation, and turn off the anti-virus software on your computer to avoid being intercepted)
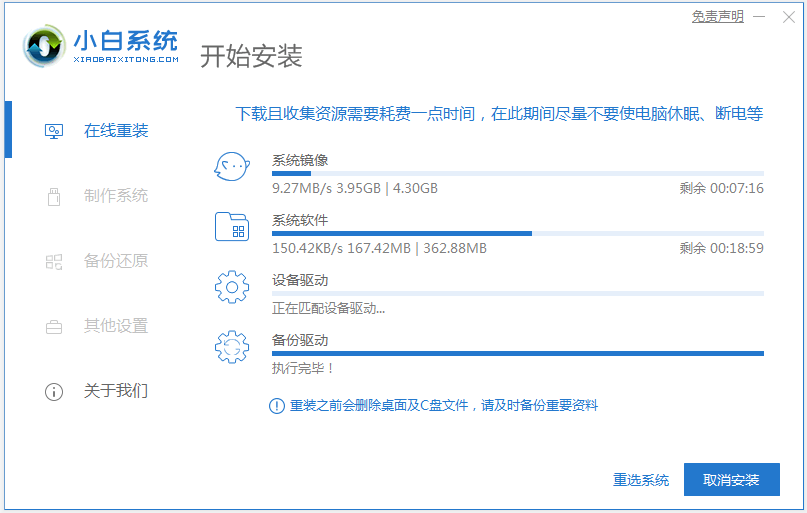
2. Wait for the software to download system image file data, etc.
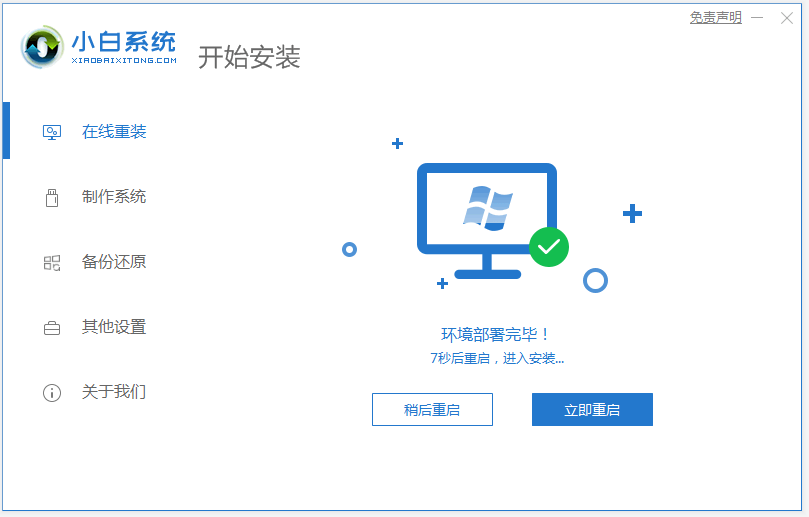
#3. After the deployment is completed, choose to restart the computer.
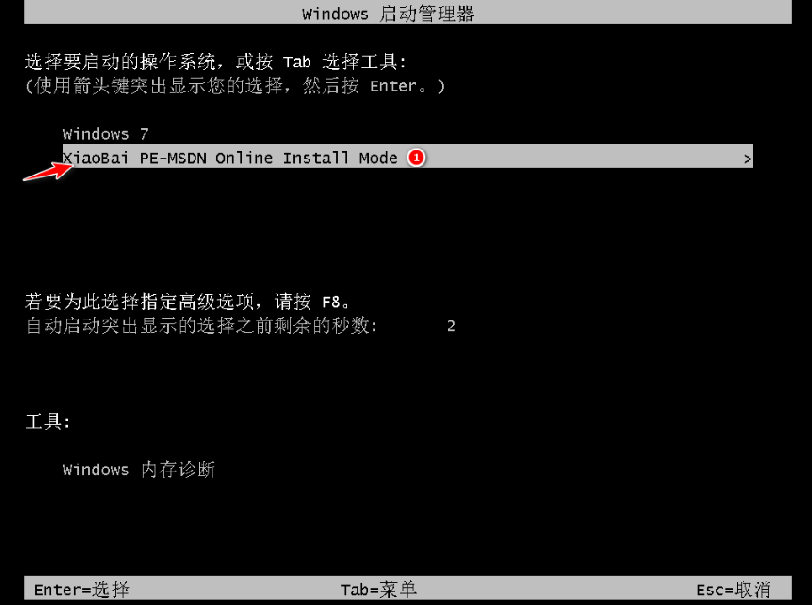
#4. After the computer restarts, it enters the boot options interface and selects the xiaobai-pe system to enter.
#5. After entering the pe system, the Xiaobai installation tool automatically starts to install the win7 system.

#6. After the installation is completed, manually click Restart Now.
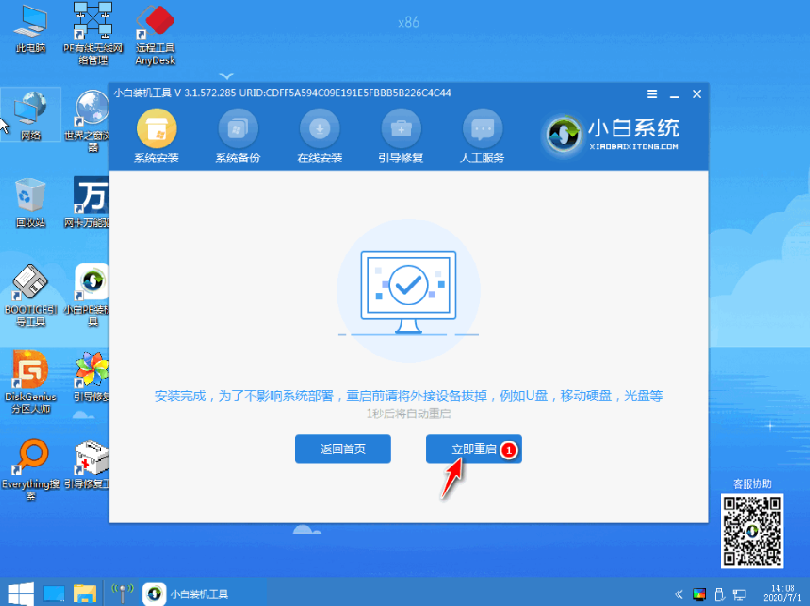
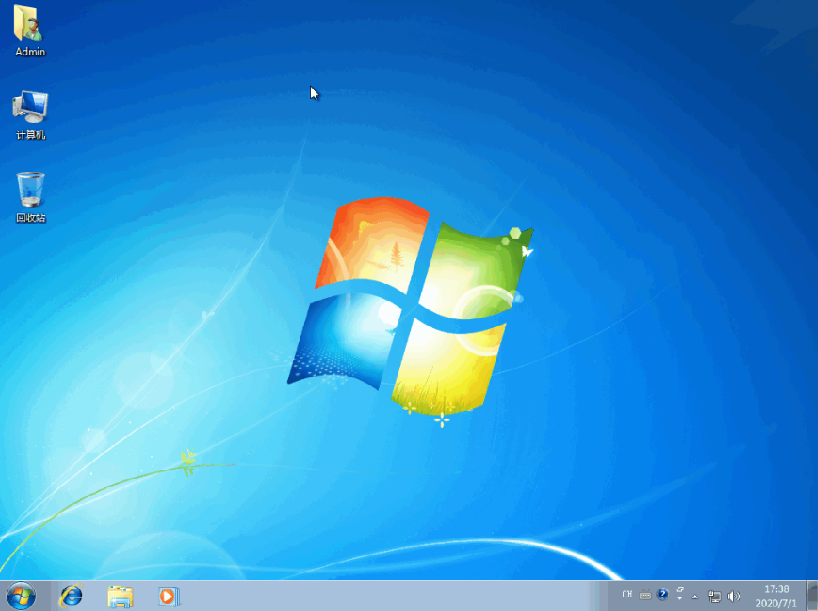
#7. During this period, the computer may be automatically restarted several times. After the final installation is completed, entering the system win7 desktop indicates that the installation is successful.
The above is the original system installation tutorial for win7 ultimate version. The purpose of installing the system can be very conveniently achieved through Xiaobai tools. Friends who need it can follow the tutorial. oh.
The above is the detailed content of Win7 ultimate version original system installation tutorial. For more information, please follow other related articles on the PHP Chinese website!

Hot AI Tools

Undresser.AI Undress
AI-powered app for creating realistic nude photos

AI Clothes Remover
Online AI tool for removing clothes from photos.

Undress AI Tool
Undress images for free

Clothoff.io
AI clothes remover

AI Hentai Generator
Generate AI Hentai for free.

Hot Article
Hot Tools

Notepad++7.3.1
Easy-to-use and free code editor

SublimeText3 Chinese version
Chinese version, very easy to use

Zend Studio 13.0.1
Powerful PHP integrated development environment

Dreamweaver CS6
Visual web development tools

SublimeText3 Mac version
God-level code editing software (SublimeText3)
Hot Topics
 1378
1378
 52
52

 How to solve the problem of stuck installation of dx9 components in win11
Dec 26, 2023 am 08:37 AM
How to solve the problem of stuck installation of dx9 components in win11
Dec 26, 2023 am 08:37 AM
The dx9 component is a very good program that can help us play games. It can improve the picture quality and smoothness of our various games. However, many users get stuck when installing the dx9 component on the win11 system. In fact, we can install it on win11 Install dx12 on the computer, let’s take a look below. What should I do if the dx9 component is stuck when installing win11? 1. The win11 system supports dx12, not dx9, so we cannot install dx9 normally. 2. Of course, it may also be because there is a problem with our dx9 installation package. You can re-download a dx9 and give it a try. 3. As the latest DirectX program, dx12 has better performance and effects than dx9, and can improve more games.
 Methods and tutorials to solve the problem of Simplified Chinese installation in win11
Dec 22, 2023 am 10:09 AM
Methods and tutorials to solve the problem of Simplified Chinese installation in win11
Dec 22, 2023 am 10:09 AM
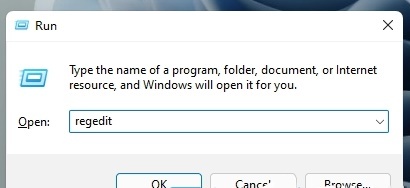
Some users found that the win11 system they installed was not the Chinese version, and did not want to reinstall the system. They wanted to install a simplified Chinese package directly, but found that the installation failed. This may be because when downloading and installing the Simplified Chinese package, it was blocked by the system firewall. You can install it normally by temporarily turning it off. What to do if win11 fails to install Simplified Chinese: 1. First press the "win+r" key combination on the keyboard to call up run, enter "regedit" and press Enter to confirm. 2. Then enter the "Computer\HKEY_LOCAL_MACHINE\SOFTWARE\Policies\Microsoft\WindowsDefender" path. 3. Right-click on the blank space on the right side.
 How to solve the problem that Win11 installation requires TPM2.0
Dec 26, 2023 pm 09:50 PM
How to solve the problem that Win11 installation requires TPM2.0
Dec 26, 2023 pm 09:50 PM
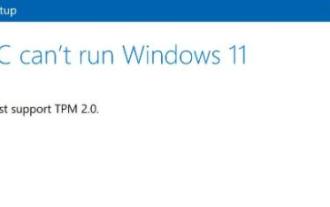
Many users have encountered problems titled "ThePCmustsupportTPM2.0" during the installation process of Windows 11 systems. We can successfully enable the TMP function in the BIOS settings interface or cleverly replace the corresponding files to bypass TPM detection. be resolved effectively! Let’s explore these solutions in depth together! What to do if win11 installation prompts tpm2.0? Method 1: 1. First restart the computer, restart the computer and use shortcut keys (hot keys) to enter the BIOS setting interface. 2. In this BIOS setting, look for TMP or CMOC related options and start them successfully. 2. Replace files 1. If in front of the BIOS setup interface
 What should I do if radmin cannot be installed remotely on win10?
Jan 07, 2024 pm 01:09 PM
What should I do if radmin cannot be installed remotely on win10?
Jan 07, 2024 pm 01:09 PM
Radmin is a powerful tool that can help you remotely control any computer with Windows operating system! Then, in the Windows 10 operating system, when radmin cannot connect remotely, we can solve it as follows. What should I do if radmin cannot be remotely installed on win10? 1. Ensure that the network connection is normal. Ensure that both the local computer and the target computer can connect to the Internet. Try other remote control software or the Ping command to see how the network connection is. 2. Check the firewall settings. Sometimes the firewall settings may affect radmin's remote connection. So make sure the firewall settings on your computer allow Radmin to pass smoothly. The specific steps are as follows: 1. In Windows 10
 How to solve the problem of stuck win11 installation interface
Dec 26, 2023 pm 05:55 PM
How to solve the problem of stuck win11 installation interface
Dec 26, 2023 pm 05:55 PM
Many users are stuck in the installation interface when installing the win11 system and cannot continue the installation. For this reason, the following is a solution to the problem that the win11 installation is stuck in the installation interface. In fact, many times the system is unstable or lacks drivers. It's caused by this. Let's solve it quickly. What to do if the win11 installation is stuck on the installation interface: 1. First, click Skip in the lower left corner. At this time, you can skip the installation and enter the system directly, but the driver will be missing. 2. After entering, click the win icon in the lower left corner to open the settings. 3. Then select “Device Manager” inside. 4. After entering, you can see the "Display Adapter" option, click to open it. 5. Right-click to select the graphics card and click "Uninstall Device". 6. After the uninstallation is complete, re-download the driver and install it.
 Solve the problem of missing drive during Win11 installation
Jan 04, 2024 pm 04:37 PM
Solve the problem of missing drive during Win11 installation
Jan 04, 2024 pm 04:37 PM
When we install the win11 system, we need to select the corresponding driver for installation, but some friends said that they found that there is no driver to choose from when selecting. This may be because we have not installed the corresponding processor driver. Let’s take a look at the solution below. Bar. What to do if the driver cannot be found during the win11 installation? Method 1: 1. First, we restart the computer, use the hotkey to enter the bios settings at boot, then press "F7" or click "AdvancedMode" in the lower right corner 2. Then under the advanced tab, Find "VMDsetupmenu" 3. Select "EnableVMDcontroller" below and change it to "Enabled" 4. After the setting is completed,
 How to Enter the BIOS of an HP Computer and Install Windows 11
Jan 08, 2024 pm 04:02 PM
How to Enter the BIOS of an HP Computer and Install Windows 11
Jan 08, 2024 pm 04:02 PM
HP computers are a very widely used computer brand with a large number of users. Since the launch of win11, many HP computer users want to use their own computers to upgrade the win11 system, but they encounter the problem of prompting tpm and don't know how to enter the bios to install win11. Let's take a look with the editor. How to enter the bios of HP computer to install win111. First, the user restarts the computer. When the HP logo appears, press the "Esc" key. 2. Then enter the menu page as shown below, and then press the "F10" key to enter the BIOS setting page. 3. Next, click to enter the "Security" tab at the top, and then select the "TPM Embedded Security Protection" option at the bottom
 Tutorial on reinstalling win10 system in Dabaicai
Jan 12, 2024 am 11:30 AM
Tutorial on reinstalling win10 system in Dabaicai
Jan 12, 2024 am 11:30 AM
Dabaicai is a very easy-to-use USB disk system reinstallation tool, but many friends who have never used it are still at a loss for the interface. In fact, the operation method of reinstalling the system in Dabaicai is very simple. You just need to move your fingers according to the steps. Let’s take a look below. Tutorial on reinstalling win10 system in Dabaicai 1. First insert the USB disk, open the Dabaicai U disk startup tool, in the "Default Mode" tab, change "Mode" to "USB-HDD" and set "Format" to " NTFS". 2. Then click "Create a USB bootable disk with one click" below. Note: Creating a system disk will cause all the original files in the USB disk to be lost, so remember to back it up. 3. After the production is completed, download the system to be installed to the USB flash drive. The win of this earth system