Teach you how to record screen on win7 computer
Generally, Windows systems have their own screen recording function. Therefore, if we need to record some computer tutorials and other videos, in addition to using third-party tools, we can also use the system's own tools to record the screen. So how to record screen on win7 computer? The editor below will teach you how to record the screen of your win7 computer.
The specific method is as follows:
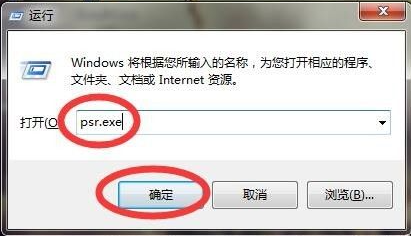
1. Use the shortcut key "Win R" to quickly open the run window, enter "psr.exe" in the run window, and click OK. At this time, the "Problem Step Recorder" window will pop up, which is the screen recorder.

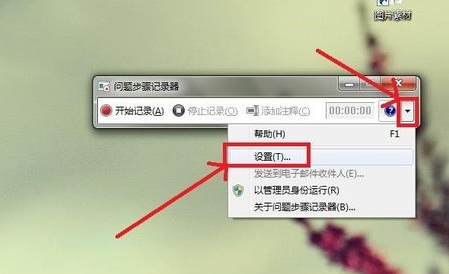
#2. Click the triangle button in the upper right corner of the "Problem Step Recorder" window, click Settings, and the "Problem Step Recorder" will pop up Settings" window, where you can save the path of the recorded file.
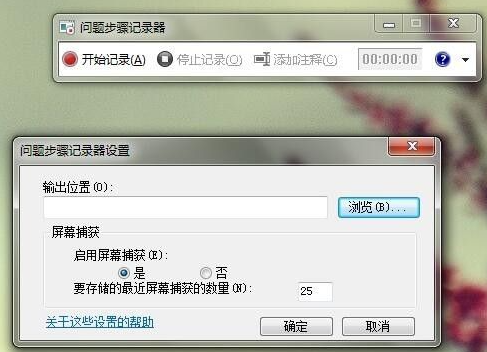
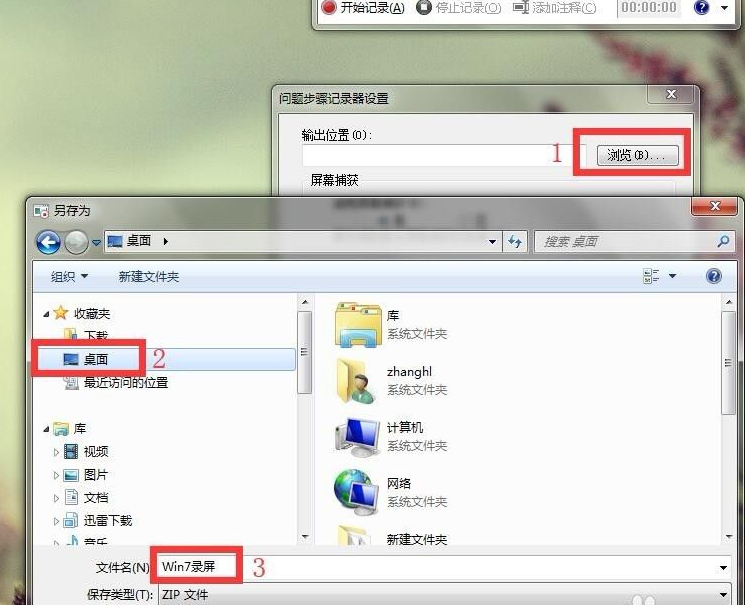
3. Click "Browse", select the location to save (select the desktop here), and enter the file name (enter "Win7 here" Screen Recording"), click "Save". Return to the "Problem Step Recorder Settings" window and click "OK".
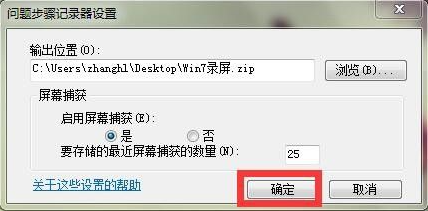
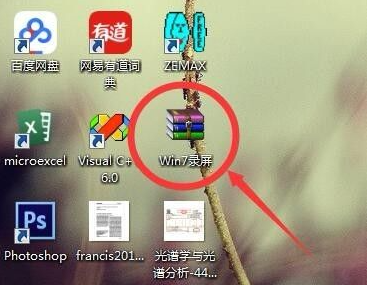
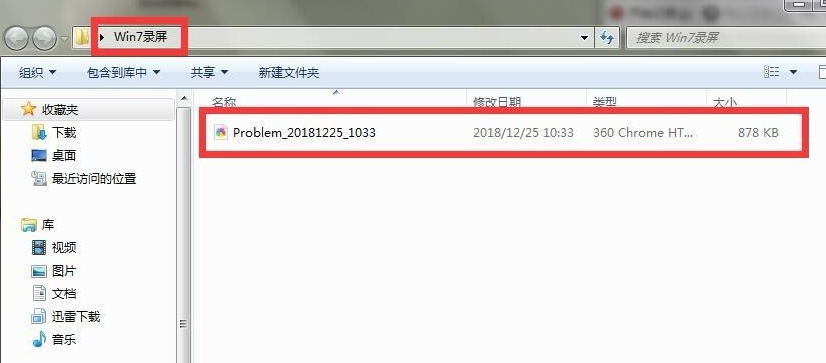
4. Click "Start Recording". After the recording is completed, click "Stop Recording" and you will find a compressed file on the desktop. "Win7 Screen Recording", unzip and open it, double-click the opened file, and the previous steps will be recorded in detail in the form of a web page.
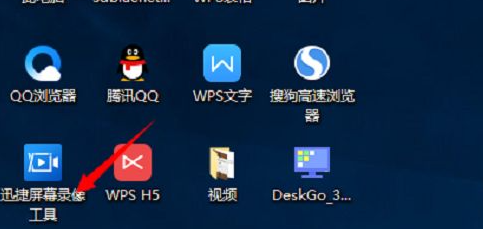
5. If you are not used to using the screen recording function that comes with the win7 system, you can also use third-party tools to record the screen. For example, "Swift Screen Recording Tool" will be more convenient to use.
#The above is the method of recording the screen of win7 computer. Friends in need can refer to the tutorial to operate.
The above is the detailed content of Teach you how to record screen on win7 computer. For more information, please follow other related articles on the PHP Chinese website!

Hot AI Tools

Undresser.AI Undress
AI-powered app for creating realistic nude photos

AI Clothes Remover
Online AI tool for removing clothes from photos.

Undress AI Tool
Undress images for free

Clothoff.io
AI clothes remover

AI Hentai Generator
Generate AI Hentai for free.

Hot Article

Hot Tools

Notepad++7.3.1
Easy-to-use and free code editor

SublimeText3 Chinese version
Chinese version, very easy to use

Zend Studio 13.0.1
Powerful PHP integrated development environment

Dreamweaver CS6
Visual web development tools

SublimeText3 Mac version
God-level code editing software (SublimeText3)

Hot Topics
 Solution to the problem that Win11 system cannot install Chinese language pack
Mar 09, 2024 am 09:48 AM
Solution to the problem that Win11 system cannot install Chinese language pack With the launch of Windows 11 system, many users began to upgrade their operating system to experience new functions and interfaces. However, some users found that they were unable to install the Chinese language pack after upgrading, which troubled their experience. In this article, we will discuss the reasons why Win11 system cannot install the Chinese language pack and provide some solutions to help users solve this problem. Cause Analysis First, let us analyze the inability of Win11 system to
 Solution for Win11 unable to install Chinese language pack
Mar 09, 2024 am 09:15 AM
Win11 is the latest operating system launched by Microsoft. Compared with previous versions, Win11 has greatly improved the interface design and user experience. However, some users reported that they encountered the problem of being unable to install the Chinese language pack after installing Win11, which caused trouble for them to use Chinese in the system. This article will provide some solutions to the problem that Win11 cannot install the Chinese language pack to help users use Chinese smoothly. First, we need to understand why the Chinese language pack cannot be installed. Generally speaking, Win11
 Strategies to solve Win11's inability to install the Chinese language pack
Mar 08, 2024 am 11:51 AM
Strategies to deal with Win11’s inability to install the Chinese language pack. With the launch of Windows 11, many users can’t wait to upgrade to this new operating system. However, some users have encountered difficulties when trying to install the Chinese language pack, preventing them from using the Chinese interface properly. In this article, we will discuss the problem that Win11 cannot install the Chinese language pack and propose some countermeasures. First, let’s explore why there are problems installing Chinese language packs on Win11. This may be due to the system's
 How to record screen on Xiaomi Mi 14Ultra?
Feb 23, 2024 pm 12:22 PM
Xiaomi Mi 14 Ultra is a very popular new model on the market. The performance configuration of this mobile phone is very powerful. It has maintained a very good sales level since its launch. Many users who bought this mobile phone do not know what Xiaomi Mi 14 Ultra is. Record screen? Next, the editor will introduce it to you! How to record screen on Xiaomi Mi 14Ultra? 1. We slide out the control center from the top right side of the screen. 2. Slide out the control center and click Screen Recording. 3. Another method is to click Screen Recording in the Utilities folder on the mobile phone desktop. 4. Then we click the red button to record the screen. I believe that after reading the above article, you already know how to record the screen of Xiaomi 14Ultra. About Xiaomi 14U
 How to record screen on Xiaomi Mi 11_Xiaomi Mi 11 screen recording tutorial
Mar 25, 2024 pm 02:26 PM
1. First, we need to open the phone, then slide down from the top of the screen to exit the status bar, then find the [Screen] button in the status bar, click the button to enter the screen recording. 2. Then we need to find the red recording point on the desktop. Click the red dot to start, click again to close, and you can close it on the right. 3. You can also find the screen recording tool on your phone, click to enter the recording tool interface, and click Record in the lower right corner to start recording.
 How to use shortcut keys to take screenshots in Win8?
Mar 28, 2024 am 08:33 AM
How to use shortcut keys to take screenshots in Win8? In our daily use of computers, we often need to take screenshots of the content on the screen. For users of Windows 8 system, taking screenshots through shortcut keys is a convenient and efficient operation method. In this article, we will introduce several commonly used shortcut keys to take screenshots in Windows 8 system to help you take screenshots more quickly. The first method is to use the "Win key + PrintScreen key" key combination to perform full
 Detailed explanation of obtaining administrator rights in Win11
Mar 08, 2024 pm 03:06 PM
Windows operating system is one of the most popular operating systems in the world, and its new version Win11 has attracted much attention. In the Win11 system, obtaining administrator rights is an important operation. Administrator rights allow users to perform more operations and settings on the system. This article will introduce in detail how to obtain administrator permissions in Win11 system and how to effectively manage permissions. In the Win11 system, administrator rights are divided into two types: local administrator and domain administrator. A local administrator has full administrative rights to the local computer
 Apple 15 screen recording tutorial
Mar 08, 2024 pm 03:10 PM
If you want to use the screen recording function on the Apple 15 mobile phone, you can do it through the built-in screen recording function or through third-party screen recording software. It is very simple. Today I will share with you the specific screen recording method. . How to record screen on iPhone 15? Answer: Use the built-in screen recording function and third-party software 1. Use the system's built-in screen recording function and just tap on the control center to start recording. 2. If the function is not found, you can add it to the control center through customized settings. 3. You can use the auxiliary tool floating ball to set the screen recording options. This function can also be added through custom settings. 4. If the relevant screen recording function is not found in the floating ball, you can also customize it. 5. The system’s built-in screen recording cannot meet your needs. It is recommended that you consider using the application


