How to restore group policy to default in Win7?
Group Policy is the primary tool for Windows administrators to define and manage programs, network resources, and operating system behavior for users and computers. However, excessive changes may cause abnormalities in operations. So how do we restore the policy group? Let’s take a look together below.
Method/Process:
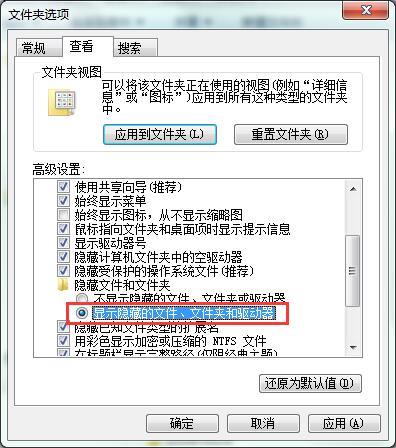
1. First go to the path C:\Windows\System32, then click the tool option in the system32 folder and select the folder option, as shown below Shown:

2. After switching to the folder options dialog box, switch to the search menu bar, pull down the advanced settings, find hidden files and folders, and click to select Indicate the hidden files, folders and controllers and save them clearly, as shown in the following figure:

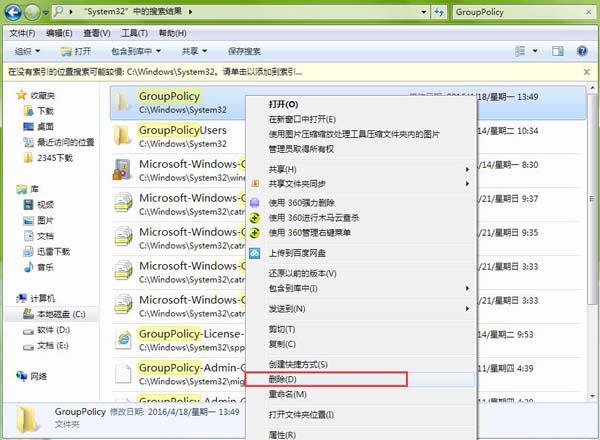
3. Then search for the GroupPolicy folder in the system32 folder and search on Baidu , delete the GroupPolicy folder, as shown in the following figure:

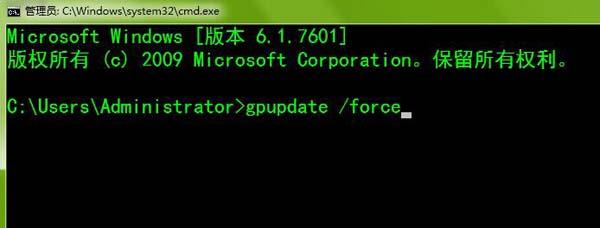
4. After the deletion is completed, press the keyboard shortcut win r to open the run window, and type cmd to call out cmd, type gpupdate/force and press Enter to execute, as shown in the figure below:

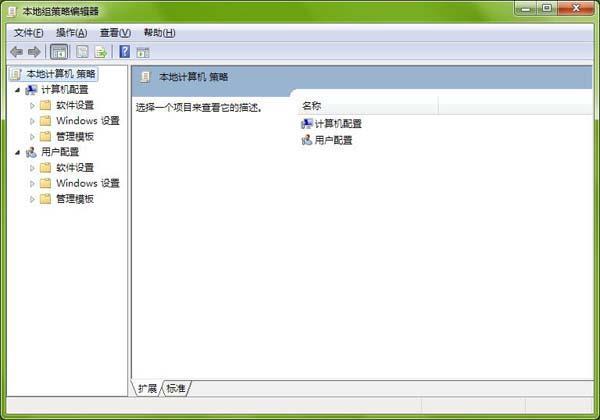
5. Finally, open the local group policy editing software again, and you will find All settings in the group policy have been restored to the default settings, as shown in the following figure:

The above is the detailed content of How to restore group policy to default in Win7?. For more information, please follow other related articles on the PHP Chinese website!

Hot AI Tools

Undresser.AI Undress
AI-powered app for creating realistic nude photos

AI Clothes Remover
Online AI tool for removing clothes from photos.

Undress AI Tool
Undress images for free

Clothoff.io
AI clothes remover

AI Hentai Generator
Generate AI Hentai for free.

Hot Article

Hot Tools

Notepad++7.3.1
Easy-to-use and free code editor

SublimeText3 Chinese version
Chinese version, very easy to use

Zend Studio 13.0.1
Powerful PHP integrated development environment

Dreamweaver CS6
Visual web development tools

SublimeText3 Mac version
God-level code editing software (SublimeText3)

Hot Topics
 How to recover expired WeChat files? Can expired WeChat files be recovered?
Feb 22, 2024 pm 02:46 PM
Open WeChat, select Settings in Me, select General and then select Storage Space, select Management in Storage Space, select the conversation in which you want to restore files and select the exclamation mark icon. Tutorial Applicable Model: iPhone13 System: iOS15.3 Version: WeChat 8.0.24 Analysis 1 First open WeChat and click the Settings option on the My page. 2 Then find and click General Options on the settings page. 3Then click Storage Space on the general page. 4 Next, click Manage on the storage space page. 5Finally, select the conversation in which you want to recover files and click the exclamation mark icon on the right. Supplement: WeChat files generally expire in a few days. If the file received by WeChat has not been clicked, the WeChat system will clear it after 72 hours. If the WeChat file has been viewed,
 How to fix Windows 11 keyboard not typing problem
Dec 28, 2023 pm 05:59 PM
Recently, some friends have encountered the problem of large characters on the win11 keyboard. They don't know which key to press to restore it. In fact, this may be because our keyboard is locked and we only need to unlock it. Which key should I press to recover if I can’t type on the win11 keyboard? 1. First, we press the “left shift+left alt+numlock” key combination on the keyboard. 2. Then, after opening the menu shown below, click the "Yes" button to enable the mouse keys. 3. Next, click the "Start Menu" or "Search" icon to open the taskbar. 4. After that, enter "osk" in the search box above to open the on-screen keyboard application. 5. Finally, click the "numlock" key in the lower right corner of the on-screen keyboard. Ps: If you are using a laptop, then
 How to recover browsing history in incognito mode
Feb 19, 2024 pm 04:22 PM
Private browsing is a very convenient way to browse and protect your privacy when surfing the Internet on your computer or mobile device. Private browsing mode usually prevents the browser from recording your visit history, saving cookies and cache files, and preventing the website you are browsing from leaving any traces in the browser. However, for some special cases, we may need to restore the browsing history of Incognito Browsing. First of all, we need to make it clear: the purpose of private browsing mode is to protect privacy and prevent others from obtaining the user’s online history from the browser. Therefore, incognito browsing
 How to restore chat spark on TikTok
Mar 16, 2024 pm 01:25 PM
On Douyin, a short video platform full of creativity and vitality, we can not only enjoy a variety of exciting content, but also have in-depth communications with like-minded friends. Among them, chat sparks are an important indicator of the intensity of interaction between the two parties, and they often inadvertently ignite the emotional bonds between us and our friends. However, sometimes due to some reasons, the chat spark may be disconnected. So what should we do if we want to restore the chat spark? This tutorial guide will bring you a detailed introduction to the content strategy, hoping to help everyone. How to restore the spark of Douyin chat? 1. Open the Douyin message page and select a friend to chat. 2. Send messages and chat to each other. 3. If you send messages continuously for 3 days, you can get the spark logo. On a 3-day basis, send pictures or videos to each other
 How to restore Xiaomi Cloud photo album to local
Feb 24, 2024 pm 03:28 PM
How to restore Xiaomi Cloud Photo Album to local? You can restore Xiaomi Cloud Photo Album to local in Xiaomi Cloud Photo Album APP, but most friends don’t know how to restore Xiaomi Cloud Photo Album to local. The next step is to restore Xiaomi Cloud Photo Album to local. Local method graphic tutorials, interested users come and take a look! How to restore Xiaomi cloud photo album to local 1. First open the settings function in Xiaomi phone and select [Personal Avatar] on the main interface; 2. Then enter the Xiaomi account interface and click the [Cloud Service] function; 3. Then jump to Xiaomi For the function of cloud service, select [Cloud Backup]; 4. Finally, in the interface as shown below, click [Cloud Album] to restore the album to local.
 Unable to open the Group Policy object on this computer
Feb 07, 2024 pm 02:00 PM
Occasionally, the operating system may malfunction when using a computer. The problem I encountered today was that when accessing gpedit.msc, the system prompted that the Group Policy object could not be opened because the correct permissions may be lacking. The Group Policy object on this computer could not be opened. Solution: 1. When accessing gpedit.msc, the system prompts that the Group Policy object on this computer cannot be opened because of lack of permissions. Details: The system cannot locate the path specified. 2. After the user clicks the close button, the following error window pops up. 3. Check the log records immediately and combine the recorded information to find that the problem lies in the C:\Windows\System32\GroupPolicy\Machine\registry.pol file
 How to restore default wallpaper in win10
Feb 10, 2024 pm 10:51 PM
Windows 10's May 2019 Update features a new, brighter default desktop background. It looks great - with the new light theme. If you use Windows 10’s dark theme, you may want a darker background. Strangely, the original Windows 10 desktop background has been removed from the latest version of Windows 10. You have to download it from the web or copy its files from an old Windows 10 PC. Although we were unable to find this wallpaper image on Microsoft's official website, you can download it from other sources. We found a copy of the original Windows 10 desktop wallpaper in 4K resolution on Imgur. Additionally, there are other sizes and more default walls
 Tutorial to restore win11 default avatar
Jan 02, 2024 pm 12:43 PM
If we change our system account avatar but don’t want it anymore, we can’t find how to change the default avatar in win11. In fact, we only need to find the folder of the default avatar to restore it. Restore the default avatar in win11 1. First click on the "Windows Logo" on the bottom taskbar 2. Then find and open "Settings" 3. Then enter "Account" on the left column 4. Then click on "Account Information" on the right 5. After opening, click "Browse Files" in the selected photo. 6. Finally, enter the "C:\ProgramData\Microsoft\UserAccountPictures" path to find the system default avatar picture.


