

Tutorial on how to use directx repair tool win10

When we use the win10 system to run the program, we will inevitably encounter some prompts that it cannot start normally. At this time, we can choose to use the directx repair tool to solve the problem, but for users who are not familiar with the directx repair tool , I don’t know how to use it at all. Today I will tell you about the tutorial on how to use the directx repair tool win10. Let’s take a look.
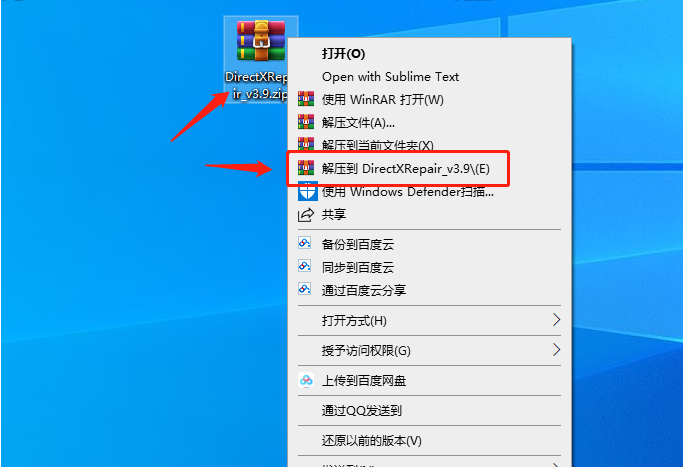
1. First download [DirectX Repair Tool Offline Enhanced Version] and decompress the compressed package
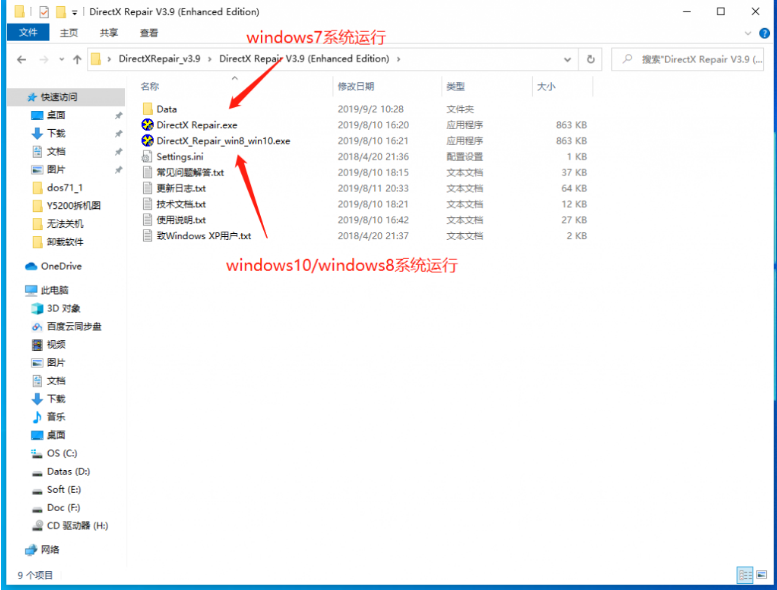
2. After decompression, there are two [DirectX Repair. exe] and [DirectX_Repair_win8_win10.exe] run the program. Windows7 users run [DirectX Repair.exe]; windows8.1 and windows10 users run [DirectX_Repair_win8_win10.exe];
3. Because it is a green tool, there is no need to install it. According to Double-click your own system to open it, and click [Detect and Repair].
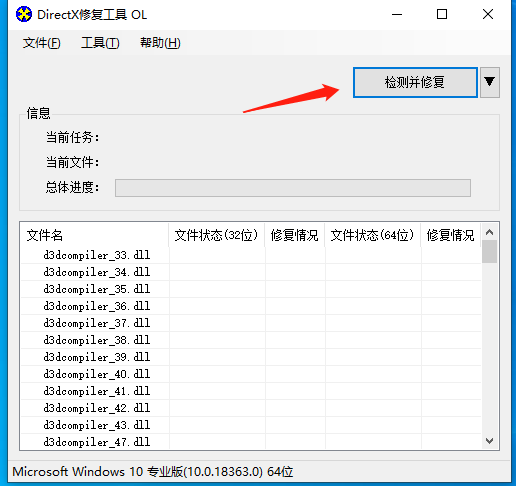
#4. After the repair is completed, there will be a prompt that the repair is completed. We click [Close] and then exit!
The above is the tutorial on how to use the directx repair tool win10. I hope it can help everyone.
The above is the detailed content of Tutorial on how to use directx repair tool win10. For more information, please follow other related articles on the PHP Chinese website!

Hot AI Tools

Undresser.AI Undress
AI-powered app for creating realistic nude photos

AI Clothes Remover
Online AI tool for removing clothes from photos.

Undress AI Tool
Undress images for free

Clothoff.io
AI clothes remover

AI Hentai Generator
Generate AI Hentai for free.

Hot Article
Hot Tools

Notepad++7.3.1
Easy-to-use and free code editor

SublimeText3 Chinese version
Chinese version, very easy to use

Zend Studio 13.0.1
Powerful PHP integrated development environment

Dreamweaver CS6
Visual web development tools

SublimeText3 Mac version
God-level code editing software (SublimeText3)
Hot Topics
 1377
1377
 52
52

 Solution to the problem that Win11 system cannot install Chinese language pack
Mar 09, 2024 am 09:48 AM
Solution to the problem that Win11 system cannot install Chinese language pack
Mar 09, 2024 am 09:48 AM
Solution to the problem that Win11 system cannot install Chinese language pack With the launch of Windows 11 system, many users began to upgrade their operating system to experience new functions and interfaces. However, some users found that they were unable to install the Chinese language pack after upgrading, which troubled their experience. In this article, we will discuss the reasons why Win11 system cannot install the Chinese language pack and provide some solutions to help users solve this problem. Cause Analysis First, let us analyze the inability of Win11 system to
 Solution for Win11 unable to install Chinese language pack
Mar 09, 2024 am 09:15 AM
Solution for Win11 unable to install Chinese language pack
Mar 09, 2024 am 09:15 AM
Win11 is the latest operating system launched by Microsoft. Compared with previous versions, Win11 has greatly improved the interface design and user experience. However, some users reported that they encountered the problem of being unable to install the Chinese language pack after installing Win11, which caused trouble for them to use Chinese in the system. This article will provide some solutions to the problem that Win11 cannot install the Chinese language pack to help users use Chinese smoothly. First, we need to understand why the Chinese language pack cannot be installed. Generally speaking, Win11
 Strategies to solve Win11's inability to install the Chinese language pack
Mar 08, 2024 am 11:51 AM
Strategies to solve Win11's inability to install the Chinese language pack
Mar 08, 2024 am 11:51 AM
Strategies to deal with Win11’s inability to install the Chinese language pack. With the launch of Windows 11, many users can’t wait to upgrade to this new operating system. However, some users have encountered difficulties when trying to install the Chinese language pack, preventing them from using the Chinese interface properly. In this article, we will discuss the problem that Win11 cannot install the Chinese language pack and propose some countermeasures. First, let’s explore why there are problems installing Chinese language packs on Win11. This may be due to the system's
 How to use exescope? Detailed usage tutorial
Mar 13, 2024 pm 10:40 PM
How to use exescope? Detailed usage tutorial
Mar 13, 2024 pm 10:40 PM
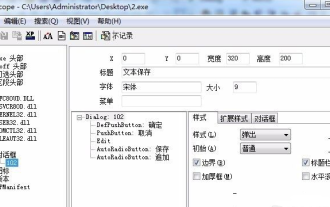
exescope is a powerful program resource editing tool that can easily convert the English version of the software into the Chinese version. So how to use the newly downloaded exescope? If you are also a novice user, come and take a look at the detailed tutorial below. Exescope usage tutorial 1. Open eXeScope, click on the file in the upper left corner, click [Open] in the pop-up options, and select the file you want to open. 2. After opening the software, you can see many controls. 3. You can directly modify the size, position, and content of each control by inputting data, or you can directly click on the dialog box editor above and directly drag the controls on the program interface. After adjusting the controls, click [Save].
 How to use Aisi Assistant-Aisi Assistant usage tutorial
Mar 06, 2024 pm 12:10 PM
How to use Aisi Assistant-Aisi Assistant usage tutorial
Mar 06, 2024 pm 12:10 PM
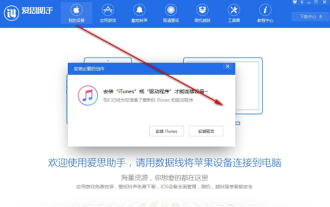
Many novice friends still don’t know how to use Aisi Assistant, so the editor below has brought a tutorial on how to use Aisi Assistant. Friends who need it can quickly take a look. 1. Operation interface, check whether necessary components are installed (as shown in the figure below); 2. My device window, read the relevant description information (as shown in the figure below); 3. If the link cannot be made, according to Instructions for related operations (as shown in the figure below); 4. Use the game window to quickly complete the experience of related popular games (as shown in the figure below); 5. Download and select the various ringtones you need to use (as shown in the figure below) shown); 6. Quickly download various high-definition wallpapers (as shown in the figure below); 7. Support the function of rooting and jailbreaking (as shown in the figure below). above
 How to use Enterprise WeChat - Tutorial on using Enterprise WeChat
Mar 04, 2024 pm 02:28 PM
How to use Enterprise WeChat - Tutorial on using Enterprise WeChat
Mar 04, 2024 pm 02:28 PM
Many friends don’t know how to use Enterprise WeChat, so the editor below will share the tutorial for using Enterprise WeChat. Let’s take a look. I believe it will be helpful to everyone. Step 1: Click the "Enterprise WeChat" icon to enter Enterprise WeChat. In the message section, we can join the group chat to chat with colleagues (as shown in the picture). Step 2: On the main interface of Enterprise WeChat, click "Contact Book" (as shown in the picture). Step 3: Enter the address book section, where we can view our contacts (as shown in the picture). Step 4: On the main interface of Enterprise WeChat, click "Workbench" (as shown in the picture). Step 5: Enter the workbench section, where we can carry out the company's daily small work (as shown in the picture). Step 6: On the main interface of Enterprise WeChat, click "Me" (as shown in the picture
 How to use shortcut keys to take screenshots in Win8?
Mar 28, 2024 am 08:33 AM
How to use shortcut keys to take screenshots in Win8?
Mar 28, 2024 am 08:33 AM
How to use shortcut keys to take screenshots in Win8? In our daily use of computers, we often need to take screenshots of the content on the screen. For users of Windows 8 system, taking screenshots through shortcut keys is a convenient and efficient operation method. In this article, we will introduce several commonly used shortcut keys to take screenshots in Windows 8 system to help you take screenshots more quickly. The first method is to use the "Win key + PrintScreen key" key combination to perform full
 How to use Thunder magnet link - Tutorial on using Thunder magnet link
Mar 05, 2024 pm 05:22 PM
How to use Thunder magnet link - Tutorial on using Thunder magnet link
Mar 05, 2024 pm 05:22 PM
Recently, many friends have asked the editor how to use Thunder Magnet Links. Next, let us learn the tutorial on using Thunder Magnet Links. I hope it can help everyone. Step 1: First, we open the installed Thunder and click the New button, as shown in the picture. Step 2: Then find a magnet link on the Internet, copy and paste it to the location shown in the picture below, and click OK, as shown in the picture. Step 3: The detailed download directory of the resource pops up. We check the resource to be downloaded, select the storage directory, and click Download Now, as shown in the figure. Step 4: Finally, we wait for the resources to download, as shown in the picture. The above is all the content on how to use Thunder magnet links brought to you by the editor. I hope it can be helpful to everyone.