

Tutorial on adjusting network speed to faster in win10

Slow network speed greatly interferes with customers' online surfing experience, so how to adjust the network speed faster in win10 system software? You can first adjust to the operation window, open the local group strategy editor according to the gpedit.msc instruction, then open the management method template, select Internet, and then enter the QOS packet scheduler process. Open the interface, set bandwidth control to 0 to limit broadband networks, and save the settings.
Tutorial on adjusting the Internet speed to a faster win10:
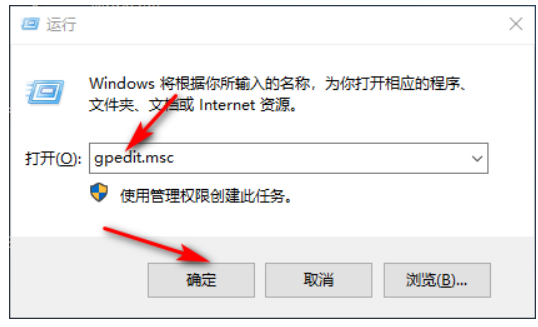
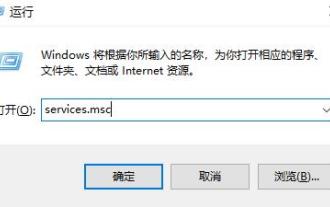
First, right-click the menu bar, select Operation, type gpedit.msc, and click OK.
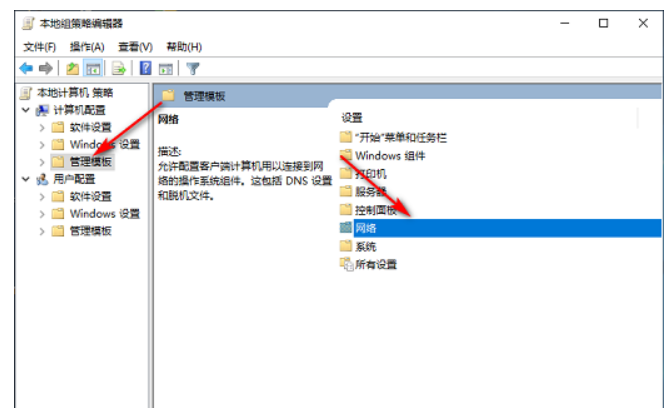
#2. After entering, select the management template and click Internet.
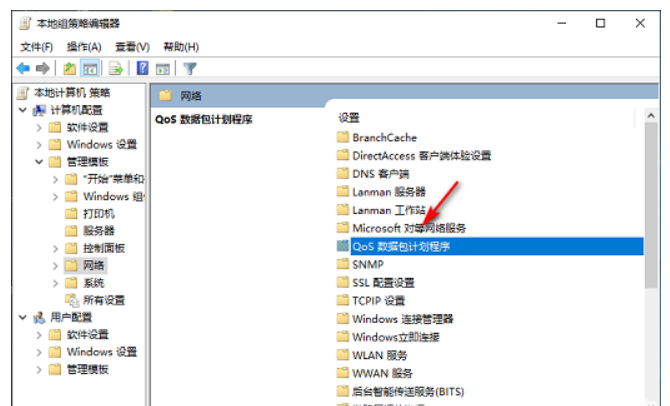
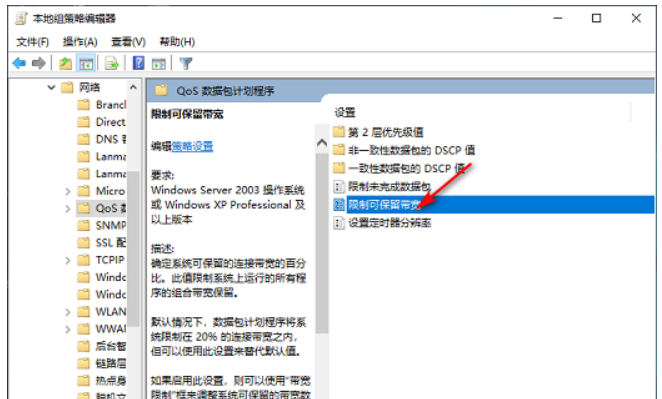
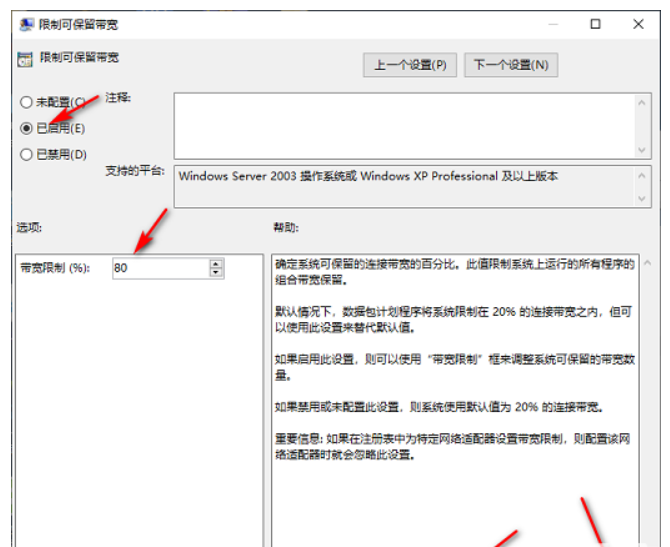
#3. Click on the QOS data package planning process on the right, and then double-click the mouse to open the restricted broadband network.
#4. After entering, select Open, set the broadband to 0, and finally click Use-OK.
Generally speaking, the above content is about the steps on how to adjust the network speed to the fastest speed in win10. do you know?
The above is the detailed content of Tutorial on adjusting network speed to faster in win10. For more information, please follow other related articles on the PHP Chinese website!

Hot AI Tools

Undresser.AI Undress
AI-powered app for creating realistic nude photos

AI Clothes Remover
Online AI tool for removing clothes from photos.

Undress AI Tool
Undress images for free

Clothoff.io
AI clothes remover

Video Face Swap
Swap faces in any video effortlessly with our completely free AI face swap tool!

Hot Article
Hot Tools

Notepad++7.3.1
Easy-to-use and free code editor

SublimeText3 Chinese version
Chinese version, very easy to use

Zend Studio 13.0.1
Powerful PHP integrated development environment

Dreamweaver CS6
Visual web development tools

SublimeText3 Mac version
God-level code editing software (SublimeText3)
Hot Topics


 Win11 computer automatic startup setting guide
Jan 15, 2024 pm 06:36 PM
Win11 computer automatic startup setting guide
Jan 15, 2024 pm 06:36 PM
We can save the time we spend every day by setting the system to automatically start up, which is very suitable for use in the office. However, many users do not know how to set up automatic startup on win11. In fact, you only need to create a scheduled task. , let’s take a look with the editor below. How to set the computer to automatically start up win11: 1. First, right-click and select "This PC" and click "Manage" 2. Then find "Task Scheduler" in the system tools 3. Then click "Create Basic Task" on the right 4. In the name Enter "Auto power on" 5, and then select the frequency of automatic power on. 6. Then set the specific time we need to automatically boot. 7. Then check "Start Program" as shown in the figure. 8. In a program or script
 Set up Win11 workgroup control?
Jul 01, 2023 am 09:57 AM
Set up Win11 workgroup control?
Jul 01, 2023 am 09:57 AM
How to set up a Win11 workgroup? Workgroup is the most common, simplest and most common resource management mode, which is to put different computers into different groups according to their functions to facilitate management. Recently, some users have asked how to set up a Win11 workgroup? Many friends don’t know how to operate in detail. The editor has compiled the steps to set up a Win11 workgroup below. If you are interested, follow the editor and take a look below! Win11 workgroup setting steps 1. Right-click this computer on the desktop, and select Properties in the menu item that opens; 2. Windows settings window, click on the domain or workgroup under the relevant link on the right; 3. System properties window, computer name option card, click To use the wizard to join the computer to a domain or job
 Detailed steps to turn off automatic updates in Win10
Jan 03, 2024 pm 04:14 PM
Detailed steps to turn off automatic updates in Win10
Jan 03, 2024 pm 04:14 PM
The win10 system is still being updated continuously. Some netizens feel that their current computers are in very good condition and therefore do not want to upgrade. It may be because they don’t know how to set win10 to never update, so we have brought a tutorial for you to learn together. How to set win10 to never update: 1. First press the shortcut key "win+r" to open Run and enter "services.msc". 2. Then find “windowsupdate” below. 3. Right-click the option and click "Properties" below. 4. Select "Disabled" as the startup type and click "Stop". 5. Finally, click "Apply" and "OK" in sequence.
 How to set my computer icon to the desktop in win10
Jun 29, 2023 am 11:20 AM
How to set my computer icon to the desktop in win10
Jun 29, 2023 am 11:20 AM
How do I set my computer icon to the desktop in win10? The win10 system is the most stable and easy-to-use system among Windows systems, and many friends are also using this computer system. However, in the win10 system, there are some settings that friends are not very comfortable with. For example, some friends reported that my computer icon is not on the desktop. In fact, I can set my computer icon to the desktop through simple settings. , below the editor will bring you a tutorial on how to set my computer icons to the desktop in win10. Tutorial on setting my computer icons to the desktop in win10 1. Right-click the desktop and select "Personalize" 2. Click "Theme" 3. Click on the desktop icon settings on the right 4. Check the box in front of "Computer". us
 How to set low power automatic shutdown in Win7
Jul 13, 2023 am 10:37 AM
How to set low power automatic shutdown in Win7
Jul 13, 2023 am 10:37 AM
Windows7 is an operating system developed by Microsoft, and its core version number is WindowsNT6.1. Many friends are forced to turn off their computers every time. They don’t know that Win7 system can set low-power automatic shutdown. Here is how to set low-power automatic shutdown in Win7 system. How to set low-power automatic shutdown in Win7: 1. First, click the Start button in the lower left corner of the desktop and select Control Panel. Then change the check method of the control panel to large icons, find the power option, and click to open; 2. Click to change the plan settings displayed by the current battery indicator, and then change the advanced power settings; 3. Find the battery-related settings and set Low Power Set the operation to Shut Down, and finally click OK to complete the operation.
 Share how to set the compatibility of Win7 system
Jan 02, 2024 pm 08:24 PM
Share how to set the compatibility of Win7 system
Jan 02, 2024 pm 08:24 PM
When we use win7 system computers every day, many users should have encountered software incompatibility, resulting in the inability to open the software. At this time, we need to set compatibility to be compatible with this software. So how to set compatibility in Win7 system? ? How to set compatibility in Win7 system 1. Right-click the incompatible software icon and click Compatibility Troubleshooting. 2. Wait for detection. 3. Select Try recommended settings. 4. Click "Start Program". 5. To solve the problem, select "Yes, please save these settings for this program." 6. The problem is not solved "No, try again using other settings".
 How to adjust the refresh rate of a Win11 computer monitor?
Dec 26, 2023 pm 04:37 PM
How to adjust the refresh rate of a Win11 computer monitor?
Dec 26, 2023 pm 04:37 PM
The higher the refresh rate of the computer, the smoother the display content. So when we feel that the screen is a little stuck, we can try to increase the refresh rate. So where is the refresh rate of the win11 computer monitor? How to set the refresh rate of the win11 computer monitor: 1. First open the "Start Menu" at the location shown in the icon. 2. Then find and open "Settings". 3. Then enter the "Screen" settings on the right. 4. Then open the "Advanced Monitor Settings" below. 5. Finally, you can set the computer monitor refresh rate in "Select Refresh Rate". 6. If we cannot modify the refresh rate, it may be that an incomplete version of the system is installed. 7. If you want to modify the refresh rate, you must reinstall the full version of win11.
 How to set Chinese language in Win10
Dec 29, 2023 am 10:30 AM
How to set Chinese language in Win10
Dec 29, 2023 am 10:30 AM
Many friends cannot read English when using the English version of win10, and it is very troublesome to use. In fact, we can set Chinese. There are many ways to set Chinese. Here are three commonly used methods. How to change win10 English to Chinese settings: Method 1: Get the Chinese and English shortcut key settings 1. Right-click a blank space on the desktop and select "Display Settings" or "Personalization", and click the small arrow in the upper left corner of the relevant panel that pops up. 2. You can also click the "Start" button and select "Settings" to enter directly. 3. Find and click "Time and Language" in the "Settings" panel. 4. Select "Region and Voice" in the menu on the left, find "Speech" on the right, click Chinese (People's Republic of China) and then click "Options". 5. In the pop-up "