

What should I do if Lenovo win10 automatic repair cannot be started?

When there is a problem with the computer, many users will choose automatic repair, but some Lenovo Win10 users reported that they cannot start after selecting automatic repair. What happened? Let’s learn how to perfectly solve the problem that Lenovo Win10 cannot automatically repair.
What should I do if Lenovo win10 automatic repair cannot be started?
1. Press the power button first, then press F10 after entering.
#2. Then after booting successfully, enter cmd in the search to open the command prompt.

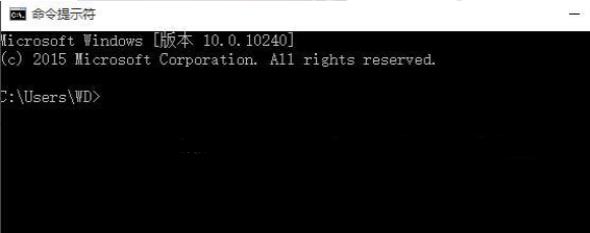
3. Type the code "bcdedit /setrecoveryenabled NO" in the command line and press Enter to disable the automatic repair feature.

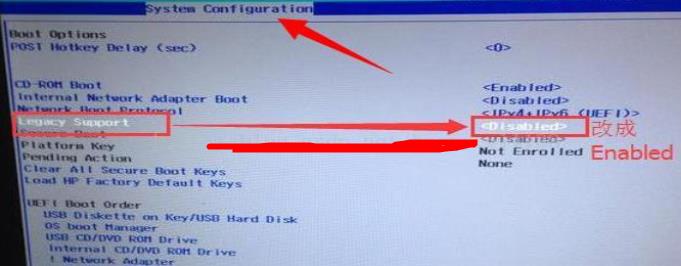
4. After entering the computer bios, switch to the system configuration interface and change LegacySupport to Disabled.
Restart UEFI mode and enter the system repair error prompt interface.
5. Record the wrong file path into the BIOS, switch to the traditional boot mode, insert the WinPE boot U disk,
Find the corresponding error file in the U disk WinPE system, and then transfer it to Other disk backups.
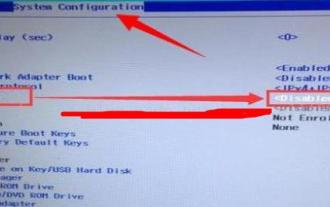
6. Finally, restart the computer, enter bios, switch to uefi startup mode, save the settings and restart the computer.
There is also a problem with your system that prevents it from starting. You can try to replace the system.

The above is the detailed content of What should I do if Lenovo win10 automatic repair cannot be started?. For more information, please follow other related articles on the PHP Chinese website!

Hot AI Tools

Undresser.AI Undress
AI-powered app for creating realistic nude photos

AI Clothes Remover
Online AI tool for removing clothes from photos.

Undress AI Tool
Undress images for free

Clothoff.io
AI clothes remover

AI Hentai Generator
Generate AI Hentai for free.

Hot Article
Hot Tools

Notepad++7.3.1
Easy-to-use and free code editor

SublimeText3 Chinese version
Chinese version, very easy to use

Zend Studio 13.0.1
Powerful PHP integrated development environment

Dreamweaver CS6
Visual web development tools

SublimeText3 Mac version
God-level code editing software (SublimeText3)
Hot Topics


 What to do if the computer shows that automatic repair cannot be started 'Attachment: After the computer is turned on, it keeps showing that the automatic repair is being prepared'
Feb 06, 2024 pm 05:01 PM
What to do if the computer shows that automatic repair cannot be started 'Attachment: After the computer is turned on, it keeps showing that the automatic repair is being prepared'
Feb 06, 2024 pm 05:01 PM
In the process of daily use of computers, many friends will encounter that after turning on the computer, the computer screen consistently displays that it is preparing to automatically repair. So what should we do at this time? What is automatic repair? Automatic Repair is a built-in feature of Windows that can be used to fix errors and crashes during system startup. However, when the computer encounters a fault that prevents this feature from functioning properly, a "Preparing for automatic repair" error may appear on startup. This error prevents users from accessing content such as programs, services, and files on the device. Why is there such a situation? The system files are damaged or mistakenly deleted. The downloaded/installed software, plug-ins, and drivers are incompatible with the system. The computer suddenly shut down due to power outage or other reasons causing disk damage. The system is affected by malware
 How to solve Lenovo Win10 automatic repair failure to boot?
Jul 10, 2023 pm 12:25 PM
How to solve Lenovo Win10 automatic repair failure to boot?
Jul 10, 2023 pm 12:25 PM
When there is a problem with the computer, many users will choose to automatically repair it. However, some Lenovo Win10 customers said that they were unable to boot after choosing automatic repair. What is the reason? Let’s take a look at the ultimate solution to Lenovo Win10 automatically repairing the problem of not booting. What to do if Lenovo win10 automatically repairs and cannot boot: 1. First press the power button, and then press F10 after entering. 2. Then after the traditional startup is successful, type cmd in the search and open cmd. 3. Type the code in it: bcdedit/setrecoveryenabledNO, and press the Enter key to turn off automatic recovery. 4. Enter the computer bios and switch to the system settings page, change LegacyS
 Tutorial to turn off the automatic repair function of win10
Dec 28, 2023 am 10:35 AM
Tutorial to turn off the automatic repair function of win10
Dec 28, 2023 am 10:35 AM
Win10 automatic repair is a remedy after computer failure, but many users don't know how to turn it off, which causes more trouble. Today I will show you how to turn off automatic repair. How to turn off Win10 automatic repair: 1. Press the shortcut key "Win+R" to open "Run" and enter cmd 2. Open the "Command Prompt" 3. Enter bcdedit/setrecoveryenabled at the command prompt NO press "Enter" to turn it off 4 , it can no longer be opened after it is closed. If you need to open it, enter cdedit/setrecoveryenabledYES.
 How to correctly use the win10 command prompt for automatic repair operations
Dec 30, 2023 pm 03:17 PM
How to correctly use the win10 command prompt for automatic repair operations
Dec 30, 2023 pm 03:17 PM
The longer the computer is used, the more likely it is to malfunction. At this time, friends need to use their own methods to repair it. So what is the easiest way to do it? Today I will bring you a tutorial on how to repair using the command prompt. How to use win10 automatic repair command prompt: 1. Press "Win+R" and enter cmd to open the "command prompt" 2. Enter chkdsk to view the repair command 3. If you need to view other places, you can also add other partitions such as "d" 4. Enter the execution command chkdskd:/F. 5. If it is occupied during the modification process, you can enter Y to continue.
 Unable to repair computer srttrail.txt problem: Win11's automatic repair function is invalid
Jan 09, 2024 am 08:49 AM
Unable to repair computer srttrail.txt problem: Win11's automatic repair function is invalid
Jan 09, 2024 am 08:49 AM
Recently, someone encountered the problem that Win11 automatic repair cannot repair your computer's srttrail.txt. In fact, this is a system file failure, and it can be solved by returning to the previous system. win11 automatic repair cannot repair your computer srttrail.txt: 1. First, we click "Advanced Options" in the error interface 2. Then enter "Troubleshooting" 2. Then click "Reset this PC" 3. Then select "Delete All" Content" 4. Finally, click "Reset" in the lower right corner and wait for the reset to complete to solve the problem.
 Win10 automatic repair cannot be reset after startup
Jan 11, 2024 pm 11:03 PM
Win10 automatic repair cannot be reset after startup
Jan 11, 2024 pm 11:03 PM
Many users will encounter problems when using computers. For example, they cannot turn on or restart after entering automatic repair. This problem is quite troublesome. Here is a solution for you, let’s take a look. What to do if win10 automatic repair fails to boot and reset: Method 1. Enter safe mode to disable the independent graphics card driver 1. Long press the power button to shut down 2. Press the power button to turn on 3. Repeat steps 1~2 three times 4. If the "Repair" interface appears on the screen , click "Advanced Repair Options" 5. Click "Troubleshoot" -> "Advanced Options" -> "Startup Settings" -> "Restart" 6. After the system restarts, press the number 4 corresponding to "Safe Mode" to enter Safe Mode 7. After entering safe mode, press Win+X and click
 How to delete wallpaper in win10?
Dec 23, 2023 pm 05:43 PM
How to delete wallpaper in win10?
Dec 23, 2023 pm 05:43 PM
When using our win10 system, the system will come with a lot of wallpapers that can be used, but many users do not want to use them and want to delete the wallpapers. In fact, just open the registry and delete the wallpaper part. . How to delete win10 wallpapers: 1. First enter in the Cortana search box, click 2 in the search results, navigate to 3, find the 5 wallpaper key values in the picture below, double-click to open, delete the path in the numerical data, click , you can restore the system's default 5 wallpapers without deleting the entire registry key. 4. If the user does not know how or is inconvenient to modify the registry, since the system can only retain 5 wallpaper records by default, you can open the Windows and Windows 10 folders under the path and go to this
 Win11 system cannot start normally after update? These tips may help you!
Mar 08, 2024 pm 01:06 PM
Win11 system cannot start normally after update? These tips may help you!
Mar 08, 2024 pm 01:06 PM
Win11 system cannot start normally after update? These tips may help you! With the release and update of Windows 11 system, many users may encounter the problem that the system cannot start normally after the update. This situation is both disturbing and anxiety-provoking. However, in fact, most problems can be solved with simple methods. This article will introduce some common methods and techniques to help you solve the problem of Win11 system not starting properly after updating. First of all, when you find that the Win11 system cannot start normally after updating,