 Common Problem
 Teach you how to deal with the blue screen after fixing the 360 vulnerability in win7 system
Teach you how to deal with the blue screen after fixing the 360 vulnerability in win7 system
There are many reasons for the blue screen of Windows 7. It may be incompatible software or programs, virus infection, etc. Recently, some people reported that a blue screen occurred after fixing the 360 vulnerability in the win7 system. They hope to find a solution to the win7 blue screen problem. Today, the editor will teach you how to solve the blue screen problem in win7 system after fixing the 360 vulnerability.
We can uninstall the newly installed software or update program of 360 to solve the problem. The specific steps are as follows:
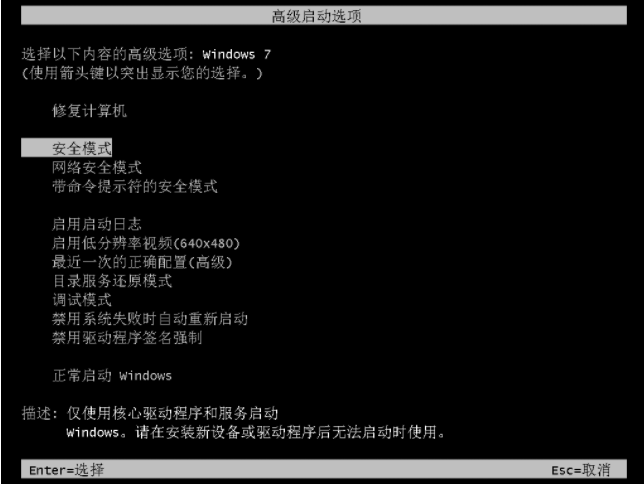
1. First, restart the computer. Press and hold f8 when the computer is turned on. After the startup item appears, We choose safe mode to enter.

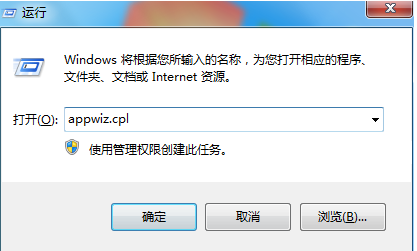
#2. After entering safe mode, click the Start menu bar, open the run window, enter appwiz.cpl, and click OK.

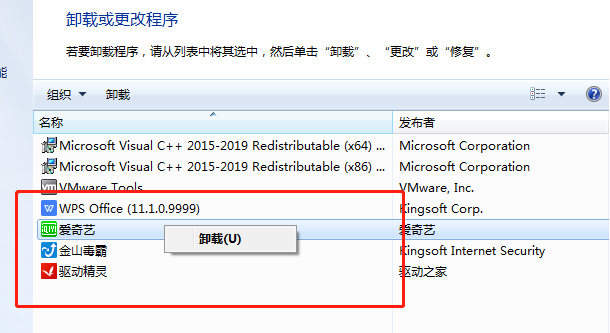
#3. Then click View installed updates, find the most recently installed update, click Uninstall, and then restart the computer.

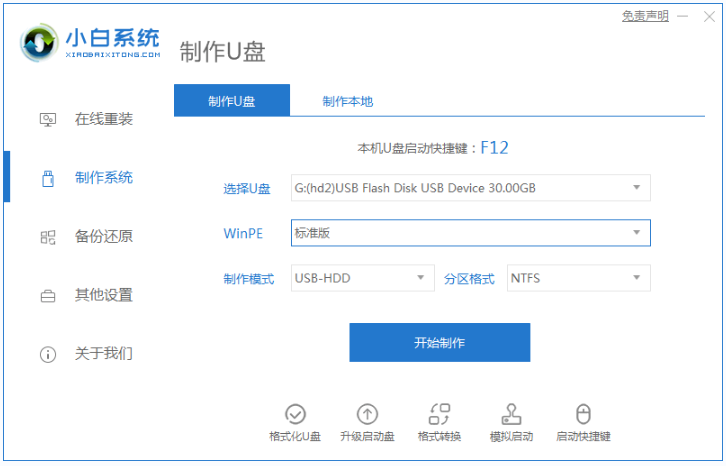
#4. If the blue screen problem still cannot be solved, we can also solve it by reinstalling the system through a USB disk. For specific steps to reinstall the system from USB flash drive, please refer to: Xiaobai USB flash drive reinstallation win7 system tutorial.

The above is the solution to the blue screen after fixing the 360 vulnerability in win7 system. I hope it can help everyone.
The above is the detailed content of Teach you how to deal with the blue screen after fixing the 360 vulnerability in win7 system. For more information, please follow other related articles on the PHP Chinese website!

Hot AI Tools

Undresser.AI Undress
AI-powered app for creating realistic nude photos

AI Clothes Remover
Online AI tool for removing clothes from photos.

Undress AI Tool
Undress images for free

Clothoff.io
AI clothes remover

AI Hentai Generator
Generate AI Hentai for free.

Hot Article

Hot Tools

Notepad++7.3.1
Easy-to-use and free code editor

SublimeText3 Chinese version
Chinese version, very easy to use

Zend Studio 13.0.1
Powerful PHP integrated development environment

Dreamweaver CS6
Visual web development tools

SublimeText3 Mac version
God-level code editing software (SublimeText3)

Hot Topics
 Detailed explanation of the steps to obtain Win11 system administrator permissions
Mar 08, 2024 pm 09:09 PM
Windows 11, as the latest operating system launched by Microsoft, is deeply loved by users. In the process of using Windows 11, sometimes we need to obtain system administrator rights in order to perform some operations that require permissions. Next, we will introduce in detail the steps to obtain system administrator rights in Windows 11. The first step is to click "Start Menu". You can see the Windows icon in the lower left corner. Click the icon to open the "Start Menu". In the second step, find and click "
 How to initialize the computer in win7
Jan 07, 2024 am 11:53 AM
The win7 system is a very excellent high-performance system. During the continuous use of win7, many friends are asking how to initialize the computer in win7! Today, the editor will bring you how to restore the factory settings of a win7 computer. Related information on how to initialize the computer in win7: Detailed instructions with pictures and text. Steps: 1. Open the "Start Menu" and enter. 2. Click to enter the settings at the bottom of the left side. 3. In the Win10 update and recovery settings interface, select. 4. Click below "Remove all content and reinstall Windows". 5. You can see the following "Initialization" settings, and then click. 6. Enter the "Your computer has multiple drives" setting option. There are two options here, you can choose according to the situation.
 How to delete installed language pack in win10 system
Jan 06, 2024 pm 10:37 PM
When we use the win10 operating system, in some cases we may need to delete the language pack in the system. At this time, just find the language option first, then choose to add a language pack. During this process, uncheck the language pack to be deleted and then delete it. How to delete the installed language pack in win10 system: 1. Use win+i to open settings and find the time and language options. 2. Select the "Language" option in the time and language options. 3. Select "Add Language" and go to the next step. 4. Uncheck the language pack when adding a language. After the addition is completed, you can download the language pack and voice pack separately;
 How to implement dual system switching in Win10 system
Jan 03, 2024 pm 05:41 PM
Many friends may not be used to the win system when they first come into contact with it. There are dual systems in the computer. At this time, you can actually switch between the two systems. Let's take a look at the detailed steps for switching between the two systems. How to switch between two systems in win10 system 1. Shortcut key switching 1. Press the "win" + "R" keys to open Run 2. Enter "msconfig" in the run box and click "OK" 3. In the open "System Configuration" In the interface, select the system you need and click "Set as Default". After completion, "Restart" can complete the switch. Method 2. Select switch when booting 1. When you have dual systems, a selection operation interface will appear when booting. You can use the keyboard " Up and down keys to select the system
 How to display file suffix under Win11 system? Detailed interpretation
Mar 09, 2024 am 08:24 AM
How to display file suffix under Win11 system? Detailed explanation: In the Windows 11 operating system, the file suffix refers to the dot after the file name and the characters after it, which is used to indicate the type of file. By default, the Windows 11 system hides the suffix of the file, so that you can only see the name of the file in the file explorer but cannot intuitively understand the file type. However, for some users, displaying file suffixes is necessary because it helps them better identify file types and perform related operations.
 How to install Windows 7 system on computer to Android phone
Jan 05, 2024 pm 06:41 PM
When we use the win7 operating system, we will inevitably encounter situations that require us to reinstall the system. So for the question of how to install the win7 system on an Android phone to a computer, the editor thinks that we first need to install a relevant emulator software on our phone, and then download the required operating system to our phone, and connect it to the computer to install it. operate. Let’s take a look at how the editor did it for detailed steps~ How to install win7 system on an Android phone on a computer 1. First download and install DriverDroid, and then set it up according to the setup wizard after running it. 2. Then note that the Android phone has obtained ROOT and needs to be connected to a computer during setup. 3. Move the bios file automatically downloaded by the phone to the image root directory (phone memory/D
 Windows 11 will offer the option to hide recommended items in the Start menu
Jan 02, 2024 pm 12:43 PM
Many friends will find that when using win11 system, there is a recommended item in the start menu, which occupies the lower part of the start menu, and the recommended items are basically all that we do not need to use, which is very troublesome. Recently, Microsoft stated that this feature will be hidden in the future. Let’s take a look at the specific situation. The win11 start menu will be able to hide recommended items 1. We can see that when the start menu is clicked, more than 30% of the space below the start menu is occupied by this "recommended item". 2. In the feedback center of win11, there are 8462 proposals for hiding recommended items, indicating that a large number of users request this feature. 3. According to foreign media reports, Microsoft is considering opening hidden recommended projects
 How to reinstall win10 system using CD
Dec 30, 2023 pm 01:57 PM
Recently, some friends reported that their win10 system crashed and could not be booted into safe mode to repair the system. What should I do? In fact, we can download a new system and install it using a CD. Today, the editor has brought detailed steps to solve the problem. , let’s take a look at the details together. Steps to reinstall the win10 system with a CD: 1. Insert the win10 CD, restart the computer, press F12, F11, Esc and other shortcut keys, select the DVD option, and press Enter. 2. When this interface appears, press any key to boot from CD or DVD; 3. Boot from the CD and enter the win10 installation interface, select language, input method, and confirm. 4. In this interface, directly click "Install Now" 5. When prompted to enter the product key, select Skip. 6. Select the version of the installation system


