
 Backend Development
Python Tutorial
Teach you step by step how to use Flask to build an ES search engine (preparatory part)
Backend Development
Python Tutorial
Teach you step by step how to use Flask to build an ES search engine (preparatory part)
Teach you step by step how to use Flask to build an ES search engine (preparatory part)
/1 Introduction/
## Elasticsearch is an open source search engine built on a full-text search engine library Apache Lucene™ Based on.

Elasticsearch and Python has become our concern The problem is (why should everything be related to Python?). ##/2 Python Interaction/ So, Python also provides a way to connect Elasticsearch's dependent libraries. Elasticsearch Operation object. 9200, please ensure that the local environment of Elasticsearch has been set up before initialization. Get document data based on IDpip install elasticsearch
def __init__(self, index_type: str, index_name: str, ip="127.0.0.1"):

    # self.es = Elasticsearch([ip], http_auth=('username', 'password'), port=9200)
    self.es = Elasticsearch("localhost:9200")
    self.index_type = index_type
    self.index_name = index_name
##def get_doc(self, uid):
return self.es.get(index=self.index_name, id=uid)
插入文档数据
def insert_one(self, doc: dict):
self.es.index(index=self.index_name, doc_type=self.index_type, body=doc)
def insert_array(self, docs: list):
for doc in docs:
self.es.index(index=self.index_name, doc_type=self.index_type, body=doc)搜索文档数据
def search(self, query, count: int = 30):
dsl = {
"query": {
"multi_match": {
"query": query,
"fields": ["title", "content", "link"]
}
},
"highlight": {
"fields": {
"title": {}
}
}
}
match_data = self.es.search(index=self.index_name, body=dsl, size=count)
return match_data
def __search(self, query: dict, count: int = 20): # count: 返回的数据大小
results = []
params = {
'size': count
}
match_data = self.es.search(index=self.index_name, body=query, params=params)
for hit in match_data['hits']['hits']:
results.append(hit['_source'])
return results删除文档数据
def delete_index(self):
try:
self.es.indices.delete(index=self.index_name)
except:
pass好啊,封装 search 类也是为了方便调用,整体贴一下。
from elasticsearch import Elasticsearch
class elasticSearch():
def __init__(self, index_type: str, index_name: str, ip="127.0.0.1"):
# self.es = Elasticsearch([ip], http_auth=('elastic', 'password'), port=9200)
self.es = Elasticsearch("localhost:9200")
self.index_type = index_type
self.index_name = index_name
def create_index(self):
if self.es.indices.exists(index=self.index_name) is True:
self.es.indices.delete(index=self.index_name)
self.es.indices.create(index=self.index_name, ignore=400)
def delete_index(self):
try:
self.es.indices.delete(index=self.index_name)
except:
pass
def get_doc(self, uid):
    return self.es.get(index=self.index_name, id=uid)
def insert_one(self, doc: dict):
    self.es.index(index=self.index_name, doc_type=self.index_type, body=doc)

def insert_array(self, docs: list):
    for doc in docs:
        self.es.index(index=self.index_name, doc_type=self.index_type, body=doc)
def search(self, query, count: int = 30):
dsl = {
"query": {
"multi_match": {
"query": query,
"fields": ["title", "content", "link"]
}
},
"highlight": {
"fields": {
"title": {}
}
}
}
match_data = self.es.search(index=self.index_name, body=dsl, size=count)
return match_data尝试一下把 Mongodb 中的数据插入到 ES 中。
import json
from datetime import datetime
import pymongo
from app.elasticsearchClass import elasticSearch

client = pymongo.MongoClient('127.0.0.1', 27017)
db = client['spider']
sheet = db.get_collection('Spider').find({}, {'_id': 0, })

es = elasticSearch(index_type="spider_data",index_name="spider")
es.create_index()

for i in sheet:
    data = {
            'title': i["title"],
            'content':i["data"],
            'link': i["link"],
            'create_time':datetime.now()
        }

es.insert_one(doc=data)到 ES 中查看一下,启动 elasticsearch-head 插件。
如果是 npm 安装的那么 cd 到根目录之后直接 npm run start 就跑起来了。
本地访问 http://localhost:9100/
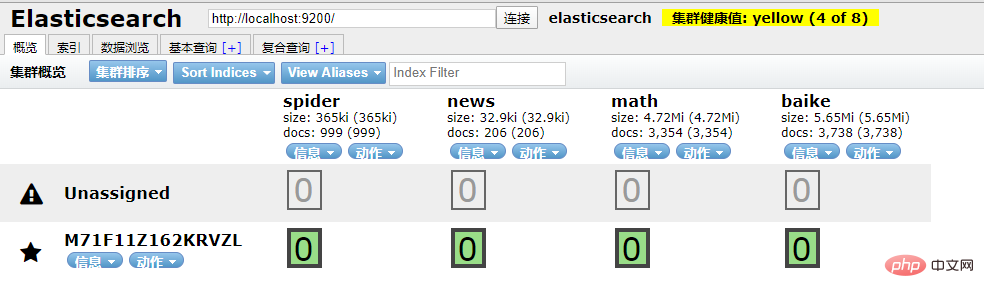
发现新加的 spider 数据文档确实已经进去了。
/3 爬虫入库/
要想实现 ES 搜索,首先要有数据支持,而海量的数据往往来自爬虫。
为了节省时间,编写一个最简单的爬虫,抓取 百度百科。
简单粗暴一点,先 递归获取 很多很多的 url 链接
import requests
import re
import time
exist_urls = []
headers = {
'User-Agent': 'Mozilla/5.0 (Windows NT 6.1) AppleWebKit/537.36 (KHTML, like Gecko) Chrome/62.0.3202.62 Safari/537.36',
}
def get_link(url):
try:
response = requests.get(url=url, headers=headers)
response.encoding = 'UTF-8'
html = response.text
link_lists = re.findall('.*?<a target=_blank href="/item/([^:#=<>]*?)".*?</a>', html)
return link_lists
except Exception as e:
pass
finally:
exist_urls.append(url)
# 当爬取深度小于10层时,递归调用主函数,继续爬取第二层的所有链接
def main(start_url, depth=1):
link_lists = get_link(start_url)
if link_lists:
unique_lists = list(set(link_lists) - set(exist_urls))
for unique_url in unique_lists:
unique_url = 'https://baike.baidu.com/item/' + unique_url
with open('url.txt', 'a+') as f:
f.write(unique_url + '\n')
f.close()
if depth < 10:
main(unique_url, depth + 1)
if __name__ == '__main__':
start_url = 'https://baike.baidu.com/item/%E7%99%BE%E5%BA%A6%E7%99%BE%E7%A7%91'
main(start_url)把全部 url 存到 url.txt 文件中之后,然后启动任务。
# parse.py
from celery import Celery
import requests
from lxml import etree
import pymongo
app = Celery('tasks', broker='redis://localhost:6379/2')
client = pymongo.MongoClient('localhost',27017)
db = client['baike']
@app.task
def get_url(link):
    item = {}
    headers = {'User-Agent':'Mozilla/5.0 (Macintosh; Intel Mac OS X 10_9_2) AppleWebKit/537.36 (KHTML, like Gecko) Chrome/34.0.1847.131 Safari/537.36'}
    res = requests.get(link,headers=headers)
    res.encoding = 'UTF-8'
    doc = etree.HTML(res.text)
    content = doc.xpath("//div[@class='lemma-summary']/div[@class='para']//text()")
    print(res.status_code)
    print(link,'\t','++++++++++++++++++++')
    item['link'] = link
    data = ''.join(content).replace(' ', '').replace('\t', '').replace('\n', '').replace('\r', '')
    item['data'] = data
    if db['Baike'].insert(dict(item)):
        print("is OK ...")
    else:
print('Fail')run.py 飞起来
from parse import get_url

def main(url):
    result = get_url.delay(url)
    return result

def run():
    with open('./url.txt', 'r') as f:
        for url in f.readlines():
            main(url.strip('\n'))

if __name__ == '__main__':
run()黑窗口键入
celery -A parse worker -l info -P gevent -c 10
哦豁 !! 你居然使用了 Celery 任务队列,gevent 模式,-c 就是10个线程刷刷刷就干起来了,速度杠杠的 !!
啥?分布式? 那就加多几台机器啦,直接把代码拷贝到目标服务器,通过 redis 共享队列协同多机抓取。
这里是先将数据存储到了 MongoDB 上(个人习惯),你也可以直接存到 ES 中,但是单条单条的插入速度堪忧(接下来会讲到优化,哈哈)。
使用前面的例子将 Mongo 中的数据批量导入到 ES 中,OK !!!
到这一个简单的数据抓取就已经完毕了。
好啦,现在 ES 中已经有了数据啦,接下来就应该是 Flask web 的操作啦,当然,Django,FastAPI 也很优秀。嘿嘿,你喜欢 !!
关于FastAPI 的文章可以看这个系列文章:
1、(入门篇)简析Python web框架FastAPI——一个比Flask和Tornada更高性能的API 框架
2、(进阶篇)Python web框架FastAPI——一个比Flask和Tornada更高性能的API 框架
3、(完结篇)Python web框架FastAPI——一个比Flask和Tornada更高性能的API 框架
/4 Flask 项目结构/
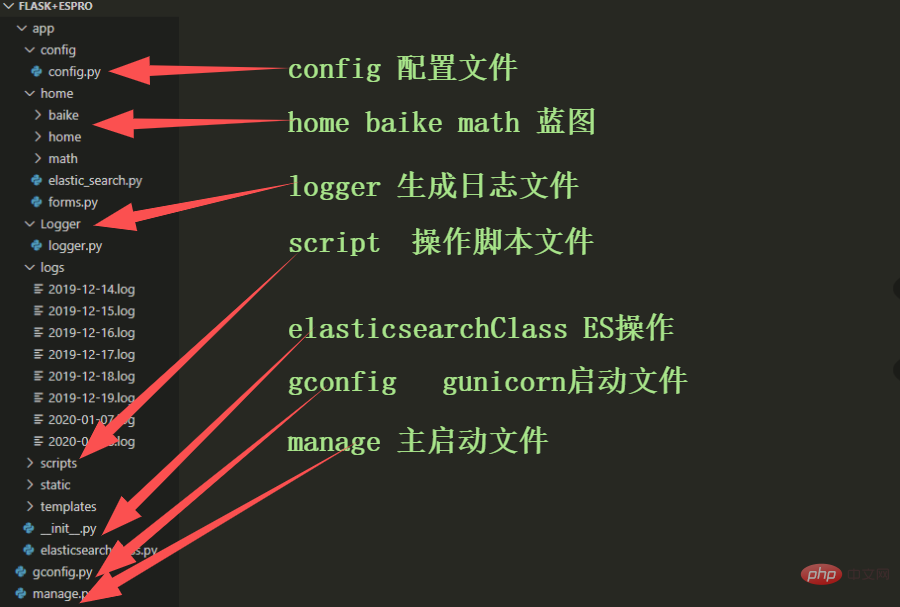
这样一来前期工作就差不多了,接下来剩下的工作主要集中于 Flask 的实际开发中,蓄力中 !!
The above is the detailed content of Teach you step by step how to use Flask to build an ES search engine (preparatory part). For more information, please follow other related articles on the PHP Chinese website!

Hot AI Tools

Undresser.AI Undress
AI-powered app for creating realistic nude photos

AI Clothes Remover
Online AI tool for removing clothes from photos.

Undress AI Tool
Undress images for free

Clothoff.io
AI clothes remover

AI Hentai Generator
Generate AI Hentai for free.

Hot Article
Hot Tools

Notepad++7.3.1
Easy-to-use and free code editor

SublimeText3 Chinese version
Chinese version, very easy to use

Zend Studio 13.0.1
Powerful PHP integrated development environment

Dreamweaver CS6
Visual web development tools

SublimeText3 Mac version
God-level code editing software (SublimeText3)
Hot Topics
 1384
1384
 52
52

 How to build simple and easy-to-use web applications with React and Flask
Sep 27, 2023 am 11:09 AM
How to build simple and easy-to-use web applications with React and Flask
Sep 27, 2023 am 11:09 AM
How to use React and Flask to build simple and easy-to-use web applications Introduction: With the development of the Internet, the needs of web applications are becoming more and more diverse and complex. In order to meet user requirements for ease of use and performance, it is becoming increasingly important to use modern technology stacks to build network applications. React and Flask are two very popular frameworks for front-end and back-end development, and they work well together to build simple and easy-to-use web applications. This article will detail how to leverage React and Flask
 Django vs. Flask: A comparative analysis of Python web frameworks
Jan 19, 2024 am 08:36 AM
Django vs. Flask: A comparative analysis of Python web frameworks
Jan 19, 2024 am 08:36 AM
Django and Flask are both leaders in Python Web frameworks, and they both have their own advantages and applicable scenarios. This article will conduct a comparative analysis of these two frameworks and provide specific code examples. Development Introduction Django is a full-featured Web framework, its main purpose is to quickly develop complex Web applications. Django provides many built-in functions, such as ORM (Object Relational Mapping), forms, authentication, management backend, etc. These features allow Django to handle large
 Start from scratch and guide you step by step to install Flask and quickly establish a personal blog
Feb 19, 2024 pm 04:01 PM
Start from scratch and guide you step by step to install Flask and quickly establish a personal blog
Feb 19, 2024 pm 04:01 PM
Starting from scratch, I will teach you step by step how to install Flask and quickly build a personal blog. As a person who likes writing, it is very important to have a personal blog. As a lightweight Python Web framework, Flask can help us quickly build a simple and fully functional personal blog. In this article, I will start from scratch and teach you step by step how to install Flask and quickly build a personal blog. Step 1: Install Python and pip Before starting, we need to install Python and pi first
 Guide to installing the Flask framework: Detailed steps to help you install Flask correctly
Feb 18, 2024 pm 10:51 PM
Guide to installing the Flask framework: Detailed steps to help you install Flask correctly
Feb 18, 2024 pm 10:51 PM
Flask framework installation tutorial: Teach you step by step how to correctly install the Flask framework. Specific code examples are required. Introduction: Flask is a simple and flexible Python Web development framework. It's easy to learn, easy to use, and packed with powerful features. This article will lead you step by step to correctly install the Flask framework and provide detailed code examples for reference. Step 1: Install Python Before installing the Flask framework, you first need to make sure that Python is installed on your computer. You can start from P
 Flask and Intellij IDEA integration: Python web application development tips (Part 2)
Jun 17, 2023 pm 01:58 PM
Flask and Intellij IDEA integration: Python web application development tips (Part 2)
Jun 17, 2023 pm 01:58 PM
The first part introduces basic Flask and Intellij IDEA integration, project and virtual environment settings, dependency installation, etc. Next we will continue to explore more Python web application development tips to build a more efficient working environment: Using FlaskBlueprintsFlaskBlueprints allows you to organize your application code for easier management and maintenance. Blueprint is a Python module that packages
 Flask vs FastAPI: The best choice for efficient Web API development
Sep 27, 2023 pm 09:01 PM
Flask vs FastAPI: The best choice for efficient Web API development
Sep 27, 2023 pm 09:01 PM
FlaskvsFastAPI: The best choice for efficient development of WebAPI Introduction: In modern software development, WebAPI has become an indispensable part. They provide data and services that enable communication and interoperability between different applications. When choosing a framework for developing WebAPI, Flask and FastAPI are two choices that have attracted much attention. Both frameworks are very popular and each has its own advantages. In this article, we will look at Fl
 Comparing the performance of Gunicorn and uWSGI for Flask application deployment
Jan 17, 2024 am 08:52 AM
Comparing the performance of Gunicorn and uWSGI for Flask application deployment
Jan 17, 2024 am 08:52 AM
Flask application deployment: Comparison of Gunicorn vs suWSGI Introduction: Flask, as a lightweight Python Web framework, is loved by many developers. When deploying a Flask application to a production environment, choosing the appropriate Server Gateway Interface (SGI) is a crucial decision. Gunicorn and uWSGI are two common SGI servers. This article will describe them in detail.
 Flask-RESTful and Swagger: Best practices for building RESTful APIs in Python web applications (Part 2)
Jun 17, 2023 am 10:39 AM
Flask-RESTful and Swagger: Best practices for building RESTful APIs in Python web applications (Part 2)
Jun 17, 2023 am 10:39 AM
Flask-RESTful and Swagger: Best Practices for Building RESTful APIs in Python Web Applications (Part 2) In the previous article, we explored the best practices for building RESTful APIs using Flask-RESTful and Swagger. We introduced the basics of the Flask-RESTful framework and showed how to use Swagger to build documentation for a RESTful API. Book
