Use EasyPOI to elegantly export Excel template data (including pictures)
Preface
Recently, a reader asked questions about easypoi, so I took the time to compile an article.
Text
EasyPOI function is just like the name Easy. The main function is easy, so that a person who has never been exposed to POI can easily write Excel export and Excel template export. , Excel import, Word template export. Through simple annotations and template language (familiar expression syntax), previously complex writing methods can be completed.
This article mainly uses simple analysis to let readers know how to write Excel templates and how to use EasyPOI to export Excel data that meets their needs, thereby simplifying coding. At the same time, this article will also explain some uncommon functions such as the image export function, so that readers can avoid pitfalls.
Version and dependency instructions
EasyPOI4.0.0 and later versions depend on Apache POI 4.0.0 and later future versions. Therefore, in the maven configuration, the version numbers of the two must match.
It should be noted that Apache POI 4.0.0 has significant changes compared to the previous version. If the Excel operation part of the previous code depends on the old version, it is not recommended to use 4.0.0 and later. Version. Of course, if the previous code does not involve or rarely involves the details of creating WorkBook, there is no problem in using the new version.
The project I need to rewrite is based on JEECG version 3.7 and relies on version 3.9 of Apache POI. The highest version of jeasypoi maintained by JEECG is only 2.2.0, and this version does not support the template export image function. Speaking of which, I want to complain about the following JEECG team. Since I don’t plan to maintain jeasypoi, why not just use the official EasyPOI directly in the project? How many pits has the 2.2.0 version of jeasypoi dug for developers?
In order to be compatible with the old version and want to use the image export function brought by EasyPOI, the EasyPOI version I finally adopted is 3.3.0, and the corresponding Apache POI dependency is 3.15.
Maven configuration is as follows:
<properties>
    <poi.version>3.15</poi.version>
    <easypoi.version>3.3.0</easypoi.version>
</properties>

<dependencies>
    <dependency>
        <groupId>org.apache.poi</groupId>
        <artifactId>poi</artifactId>
        <version>${poi.version}</version>
    </dependency>
    <dependency>
        <groupId>org.apache.poi</groupId>
        <artifactId>poi-ooxml</artifactId>
        <version>${poi.version}</version>
    </dependency>
    <dependency>
        <groupId>org.apache.poi</groupId>
        <artifactId>poi-ooxml-schemas</artifactId>
        <version>${poi.version}</version>
    </dependency>
    <dependency>
        <groupId>org.apache.poi</groupId>
        <artifactId>poi-scratchpad</artifactId>
        <version>${poi.version}</version>
    </dependency>
    <dependency>
        <groupId>cn.afterturn</groupId>
        <artifactId>easypoi-web</artifactId>
        <version>${easypoi.version}</version>
    </dependency>
</dependencies>Design of Excel template
We use EasyPOI The template export function does not want to design the style of the Excel report through coding, so the first step is to design the Excel template and distinguish which parts are fixed and which need to be filled in a loop. EasyPOI has its own expression language. For a detailed introduction to each expression, please refer to the reference link below.
A simple Excel report template
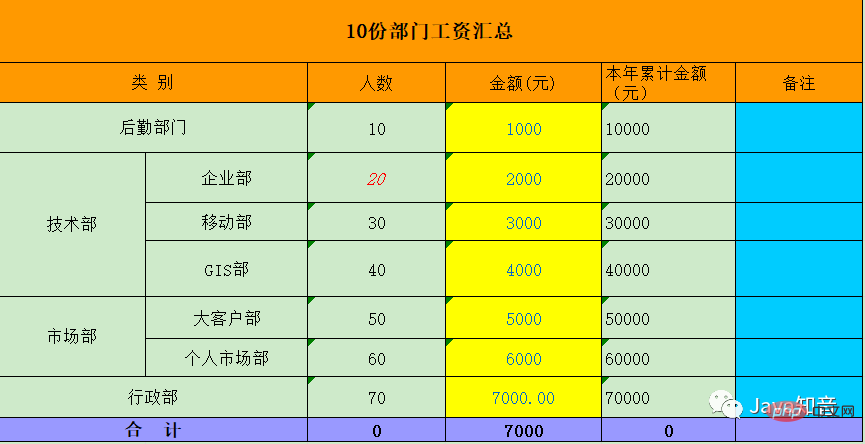
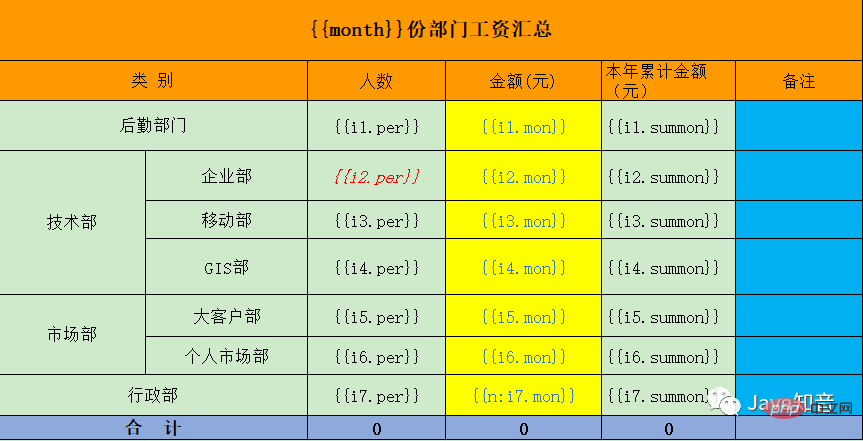
Some simple templates will not be explained in detail here, only the renderings and Template configuration content. When readers understand how to create complex templates and fill in values, simple ones will be understood quickly.
First look at the report renderings:

Then look at the actual template:

After looking at the above two pictures, have you already felt the power of the template export function?
A complex Excel report template
The template to be introduced below is more complicated and not as common as In that case, one line is one record, so the configuration of the template will be introduced in detail, and some expressions of EasyPOI will be briefly introduced.
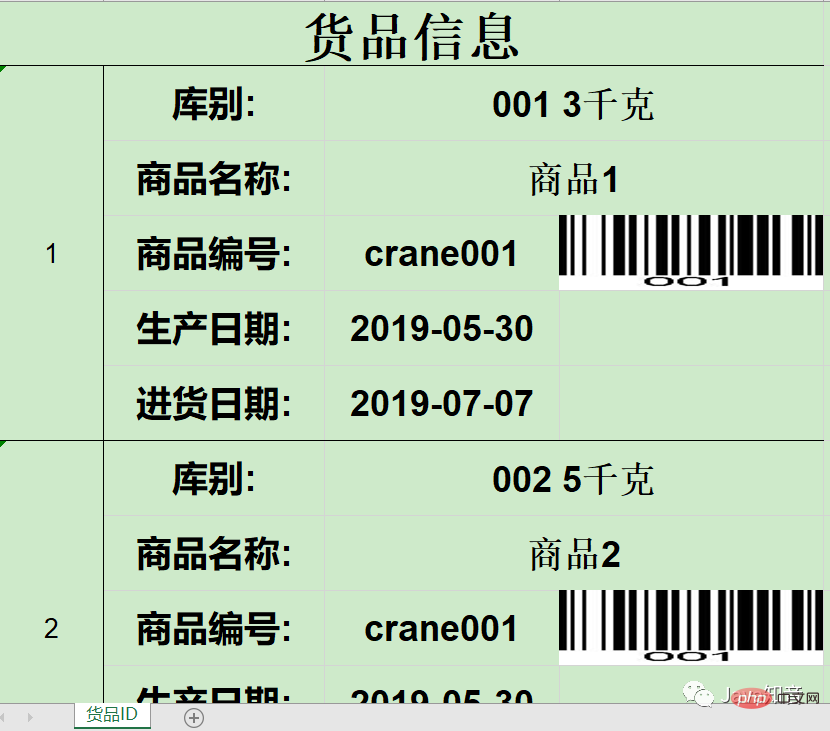
Let’s look at the renderings first:

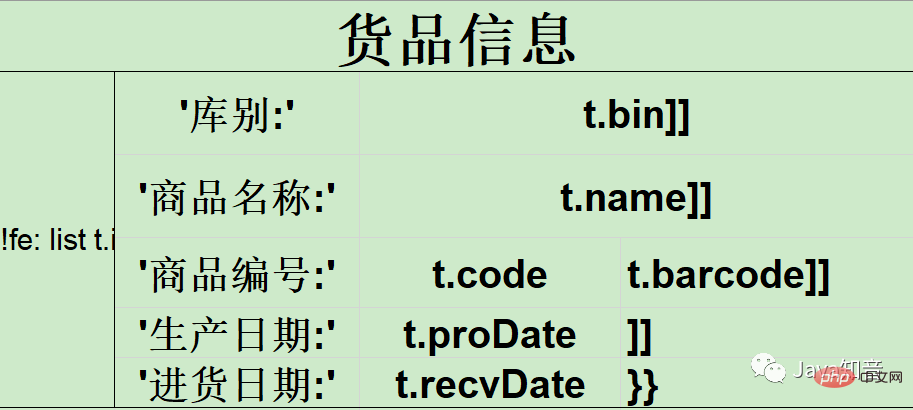
Then look at the template:

These two Comparing the picture 1, do you feel that knowledge changes your destiny?
Analysis of Complex Template Design
From the template pictures and renderings of the product information, we found that the entire template actually It is divided into upper and lower parts. The upper part is the unchanged header information, and the lower part is the cyclically inserted product detail information. So our focus is on the grammar in the second half.
The first column of the lower part is not shown completely, it is actually {{!fe: list t.id.
Note, there is no }} symbol here! According to the official documentation of EasyPOI, {{}} represents an expression, and the value inside is obtained based on the expression. If you look carefully at the picture, you can find that the closing symbol {{}} of the expression appears in the lower right corner of the picture. That is to say, starting from the first column {{ and ending at the lower right corner}}, everything in between is part of the expression.
Because the entire template information is part of the expression, even ordinary strings need to be specially marked. The subexpressions in the expression are explained one by one below.
!fe: Traverse data without creating rows.
This sentence in the official document may be a bit confusing for everyone to understand. What does not create a row mean? In fact, not creating a row is relative to creating a row, and the expression for creating a row is fe:.
Just like each record in the database corresponds to an entity object, creating row means that each row is an entity object. The attributes of this entity object are wrapped with {{}} expressions.
Not creating row means that there is only one entity object Object in the entire expression, but this Object is special. It is spliced together by N Entities in the list. Each Entity not only refers to the model itself, but also includes the Excel style, such as how many cells it occupies, the coordinates of the cells, the arrangement order, etc.
list A custom name that represents the data collection in the expression. The code uses list as the key to obtain the collection of values from Map
list is easy to understand. It is just a placeholder and can be chosen casually. When EasyPOI parses the list, it will know that there is a set of values of the key in Map
Search the Java Zhiyin public account, reply "Backend Interview", and we will send you a Java interview question guide .pdf
## t is a predefined value that represents any object in the collection.
We can roughly feel from the template that each object in the list is called t, and t.name represents the name attribute of t, so the name t can be called casually. Anyway, it is the same as list. , functions as a placeholder. But in fact this is a big pit! If you replace t with another value such as g, write g.name g.code, etc. elsewhere in the template, it will ultimately not be parsed! The official documentation does not emphasize this point, but the author only discovered it after actually stepping on the trap!]] Newline character Multi-line traversal export.
The official explanation of this symbol is also baffling. What is a newline character and multi-line traversal export? In fact, what it means is that when the expression contains this symbol, the content after the line will not be parsed, regardless of whether there is other content or style behind it. This symbol must be written in the last column of each row, otherwise the number of rows and columns will be different, and a null pointer exception will be reported when EasyPOI performs internal assignment.‘’ Single quotes represent constant values ‘’ For example, ‘1’, then the output is 1
The introduction here in the official documentation also has pitfalls. '' represents a constant value, but in fact it is wrong to only have this in Excel, because when Excel encounters ' in a cell, it will think that the following are all strings, so you have to write '' library type: ' in the cell. , so that what is displayed is 'Library type:', not the string library type:'. After the above analysis, the template in the picture is actually similar to the following:{{!fe: list t.id ‘库别:’ t.bin 换行 ‘商品名称:’ t.name 换行 ‘商品编号:’ t.code t.barcode 换行 ‘生产日期:’ t.proDate 换行 ‘进货日期:’ t.recvDate}}
如果list中有多条记录,上述字符串就再循环拼接一些内容,最终都在一个{{}}表达式中。
至此,模板的设计已剖析完毕,读者可根据自己的需求结合官方文档自行设计模板。下面将对模板赋值进行介绍。
准备模板数据
从上节的描述中可知,只需要准备一个Map
Map<String, Object> total = new HashMap<>();
List<Map<String, Object>> mapList = new ArrayList<>();
for (int i = 1; i <= 5; i++) {
    Map<String, Object> map = new HashMap<>();
    map.put("id", i + "");
    map.put("bin", "001 1000千克");
    map.put("name", "商品" + i);
    map.put("code", "goods" + i);
    map.put("proDate", "2019-05-30");
    map.put("recvDate", "2019-07-07");

    // 插入图片
    ByteArrayOutputStream byteArrayOut = new ByteArrayOutputStream();
    BufferedImage bufferImg = ImageIO.read(BarcodeUtil.generateToStream("001"));
    ImageIO.write(bufferImg, "jpg", byteArrayOut);
    ImageEntity imageEntity = new ImageEntity(byteArrayOut.toByteArray(), 200, 1000);
    map.put("barcode", imageEntity);

    mapList.add(map);
}
total.put("list", mapList);图片数据导出
上述代码中需要特殊关注的是图片导出部分。EasyPOI导出图片有两种方式,一种是通过图片的Url,还有一种是获取图片的byte[],毕竟图片的本质就是byte[]。因为笔者的项目中图片不是存放在数据库之中,而是需要根据查询结果动态生成条码,所以通过byte[]导出图片。
ImageEntity是EasyPOI内置的一个JavaBean,用于设定图片的宽度和高度、导出方式、RowSpan和ColumnSpan等。调试EasyPOI的源码可知,当设置了RowSpan或者ColumnSpan之后,图片的高度设置就失效了,图片大小会自动填充图片所在的单元格。
图片导出的坑点在于导出图片的大小。假设我们将四个单元格合成为一个,希望导出的图片能填充合并之后的单元格,但是对不起,EasyPOI暂时做不到,它只会填充合并之前左上角的单元格,具体原因如下源码所示:
//BaseExportService.java
ClientAnchor anchor;
if (type.equals(ExcelType.HSSF)) {
    anchor = new HSSFClientAnchor(0, 0, 0, 0, (short) cell.getColumnIndex(), cell.getRow().getRowNum(), (short) (cell.getColumnIndex() + 1),
            cell.getRow().getRowNum() + 1);
} else {
    anchor = new XSSFClientAnchor(0, 0, 0, 0, (short) cell.getColumnIndex(), cell.getRow().getRowNum(), (short) (cell.getColumnIndex() + 1),
            cell.getRow().getRowNum() + 1);
}可以看到,在创建图片插入位置的时候已经指定了图片的跨度为1行1列,即左上角的单元格。如果之前又设置了RowSpan或者ColumnSpan,那么图片高度的设置也会失效,最终导致导出的图片非常小。
搜索Java知音公众号,回复“后端面试”,送你一份Java面试题宝典.pdf
个人认为ImageEntity提供的RowSpan或者ColumnSpan的set方法并没有什么用,因为我们动态创建的合并单元格并不能被赋值。所以,导出图片的最好方式就是直接指定它的高度,因为宽度会自动填充单元格,模板中单元格的宽度要合适。
//ExcelExportOfTemplateUtil.java
if (img.getRowspan()>1 || img.getColspan() > 1){
    img.setHeight(0);
    PoiMergeCellUtil.addMergedRegion(cell.getSheet(),cell.getRowIndex(),
            cell.getRowIndex() + img.getRowspan() - 1, cell.getColumnIndex(), cell.getColumnIndex() + img.getColspan() -1);
}将数据导出至模板
以上准备工作全部完成后就可以将模板和数据进行组装了,或者说是渲染,代码如下所示:
public static void exportByTemplate(String templateName, Map<String, Object> data, OutputStream fileOut) {
    TemplateExportParams params = new TemplateExportParams("export/template/" + templateName, true);
    try {
        Workbook workbook = ExcelExportUtil.exportExcel(params, data);
        workbook.write(fileOut);
    } catch (Exception e) {
        LogUtil.error("", e);
    }
}总结
网上针对EasyPOI的介绍多限于最基本的行插入功能,但实际上Excel模板的需求可能各式各样。本文只是抛砖引玉,对EasyPOI中的部分概念做了详细介绍,希望帮助大家少踩坑。
如果想详细了解EasyPOI的各种功能,参考链接中的文档说明及测试项目源码就是最好的学习资料。希望大家都能得心应手地使用EasyPOI,大大提升开发效率!
参考链接
EasyPOI官方文档
https://opensource.afterturn.cn/doc/easypoi.html
EasyPOI测试项目
https://gitee.com/lemur/easypoi-test
一些坑
近日有网友求助我解决EasyPOI的复杂模板配置问题,通过解决该网友的问题发现了EasyPOI中的几个坑点,补充说明几个问题。
How to configure the complex templates supported by EasyPOI has been described in the section Analysis of Complex Template Design. The configuration of this template is absolutely correct, but there are three points that are not clearly stated. It is easy for everyone to make mistakes when copying the gourd:
{{!fe: list needs to be in a separate in the column. In the EasyPOI source code, the number of rows required for each element in the list is determined based on the row and column span of the cell. For example, in the above picture, the span of the cell is 5 rows and 1 column. In other words, each element in the list will occupy 5 rows in the future. If you feel that this column does not conform to the style of the custom template, you can set the column width of the column to 0, but you must have {{!fe: list. There cannot be any empty cells between the starting and ending symbols {{}} of the object! The code will directly throw an exception when it parses that the cell is empty. If you want the cell to be empty, you have to write an empty string: ''''. Line break character]] must occupy the last cell of each row! For example, if there are 10 cells in the first row and only the first 5 are used in the second row, then you cannot directly write the line break character ]] at the end of the 5th one. Instead, you need to merge 6-10 cells and then write enter]]. Refer to the last column of the production date row in the picture above. The reason for this setting is that EasyPOI requires the number of cells in each row to be exactly the same, because the column span of each cell is determined in the source code. If the ]] line break character is used in advance, the number of columns will be different from other rows, then It gets messed up when assigning values, and index exceptions will occur.
The above is the detailed content of Use EasyPOI to elegantly export Excel template data (including pictures). For more information, please follow other related articles on the PHP Chinese website!

Hot AI Tools

Undresser.AI Undress
AI-powered app for creating realistic nude photos

AI Clothes Remover
Online AI tool for removing clothes from photos.

Undress AI Tool
Undress images for free

Clothoff.io
AI clothes remover

AI Hentai Generator
Generate AI Hentai for free.

Hot Article

Hot Tools

Notepad++7.3.1
Easy-to-use and free code editor

SublimeText3 Chinese version
Chinese version, very easy to use

Zend Studio 13.0.1
Powerful PHP integrated development environment

Dreamweaver CS6
Visual web development tools

SublimeText3 Mac version
God-level code editing software (SublimeText3)

Hot Topics
 1378
1378
 52
52
 How to create timeline in Excel to filter pivot tables and charts
Mar 22, 2025 am 11:20 AM
This article will guide you through the process of creating a timeline for Excel pivot tables and charts and demonstrate how you can use it to interact with your data in a dynamic and engaging way. You've got your data organized in a pivo
 Excel formula to find top 3, 5, 10 values in column or row
Apr 01, 2025 am 05:09 AM
This tutorial demonstrates how to efficiently locate the top N values within a dataset and retrieve associated data using Excel formulas. Whether you need the highest, lowest, or those meeting specific criteria, this guide provides solutions. Findi
 All you need to know to sort any data in Google Sheets
Mar 22, 2025 am 10:47 AM
Mastering Google Sheets Sorting: A Comprehensive Guide Sorting data in Google Sheets needn't be complex. This guide covers various techniques, from sorting entire sheets to specific ranges, by color, date, and multiple columns. Whether you're a novi
 Regex to extract strings in Excel (one or all matches)
Mar 28, 2025 pm 12:19 PM
In this tutorial, you'll learn how to use regular expressions in Excel to find and extract substrings matching a given pattern. Microsoft Excel provides a number of functions to extract text from cells. Those functions can cope with most
 Add a dropdown list to Outlook email template
Apr 01, 2025 am 05:13 AM
This tutorial shows you how to add dropdown lists to your Outlook email templates, including multiple selections and database population. While Outlook doesn't directly support dropdowns, this guide provides creative workarounds. Email templates sav
 How to enable templates in Gmail — quick setup guide
Mar 21, 2025 pm 12:03 PM
This guide shows you two easy ways to enable email templates in Gmail: using Gmail's built-in settings or installing the Shared Email Templates for Gmail Chrome extension. Gmail templates are a huge time-saver for frequently sent emails, eliminating
 How to schedule send in Outlook
Mar 22, 2025 am 09:57 AM
Wouldn't it be convenient if you could compose an email now and have it sent at a later, more opportune time? With Outlook's scheduling feature, you can do just that! Imagine that you are working late at night, inspired by a brilliant ide
 How to remove / split text and numbers in Excel cell
Apr 01, 2025 am 05:07 AM
This tutorial demonstrates several methods for separating text and numbers within Excel cells, utilizing both built-in functions and custom VBA functions. You'll learn how to extract numbers while removing text, isolate text while discarding numbers


