
 Operation and Maintenance
Nginx
Nginx super simple tutorial, just read this article to get started
Operation and Maintenance
Nginx
Nginx super simple tutorial, just read this article to get started
Nginx super simple tutorial, just read this article to get started
Introduction to Nginx
1.1 What is Nginx
Nginx is a high-performance http and reverse proxy server, which is characterized by small memory usage and strong concurrency capabilities. Nginx is specially developed for performance optimization. Performance is its most important consideration. It can withstand the test of high load. Reports indicate that it can support up to 50,000 concurrent connections.
1.2 Reverse proxy
Forward proxy: Configure the proxy server in the browser and access the Internet through the proxy server.
Reverse proxy: Send the request to the reverse proxy server, and the reverse proxy server selects the target server to obtain the data, and then returns it to the client. At this time, the reverse proxy server and the target server are one and the same to the outside world. server, what is exposed is the proxy server address.
1.3 Load Balancing
If the number of requests is too large and cannot be handled by a single server, we increase the number of servers and then distribute the requests to each On the server, the original request is concentrated on a single server and the request is distributed to multiple servers, which is load balancing.
1.4 Separation of dynamic and static pages
In order to speed up the parsing speed of the server, dynamic pages and static pages can be handed over to different servers for parsing to speed up the parsing speed. Reduce the pressure on a single server.
Second Nginx installation
Nginx requires several dependency packages, namely pcre, openssl, zlib, you need to install these dependencies before installing nginx.
2.1 Install pcre dependencies
- ##Use command to download
pcre
Compressed package
1 |
|
Extract the compressed file
1 |
|
Enter the decompressed file Directory, execute the following command
1 |
|
Use the following command to compile and install
1 |
|
- Check the installed
pcre
version number
1 |
|
2.2 安装openssl,zlib等依赖
1 |
|
2.3 安装nginx
nginx官网下载nginx,官网地址:https://nginx.org/download/;将压缩包拖到服务器上;
使用命令
tar -xvf nginx-1.12.2.tar.gz解压压缩包;使用命令
./configure检查;使用命令
make && make isntall编译安装;
安装成功后,在usr会多出来一个文件夹,local/nginx,在nginx的sbin文件夹下有启动脚本。
2.4 启动nginx
在/usr/local/nginx/sbin文件夹下,使用以下命令启动
1 |
|
然后浏览器访问服务器ip,nginx默认端口是80,出现以下页面则证明nginx安装成功;
2.5 Nginx常用的命令
使用这些命令时需要进入/usr/local/nginx/sbin文件夹
查看
nginx的版本号
1 |
|
启动
nginx
1 |
|
关闭
nginx
1 |
|
重新加载
nginx
1 |
|
2.6 Nginx的配置文件
nginx的配置文件在/usr/local/nginx/conf中的nginx.conf。我们将nginx.conf中注释的内容删除一下。
1 2 3 4 5 6 7 8 9 10 11 12 13 14 15 16 17 18 19 20 21 22 23 24 25 26 27 28 29 30 31 |
|
nginx的配置文件包含三部门。
1.全局块
从配置文件开始到events块之间的内容,主要会设置一些nginx服务器整体运行的配置指令。
1 |
|
这个代表nginx处理并发的关键配置,值越大,处理并发能力越强。但是会受到硬件、软件等约束。
2.events块
events块涉及的指令主要影响nginx服务器与用户网络的连接。
1 |
|
这个代表nginx支持的最大连接数。
3.http全局块
nginxThe most frequent part of server configuration. httpGlobal block contains http block and server block.
Three Nginx configuration reverse proxy
3.1 ngix proxy process
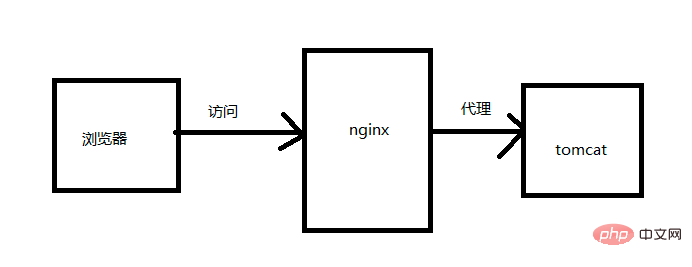
Local browser accesses nginx server, nginx server reverse proxy tomcat server, when we request nginx Direct access to tomcat. The installation of tomcat will not be discussed here. I installed tomcat and nginx on the same server.
3.2 配置ip和域名的绑定关系
由于我们的nginx没有域名,为了演示,因此我们在本地host文件中配置nginx服务器ip和域名进行绑定。这个host文件的具体位置在C:\Windows\System32\drivers\etc。在host文件中增加一句配置:
1 |
|
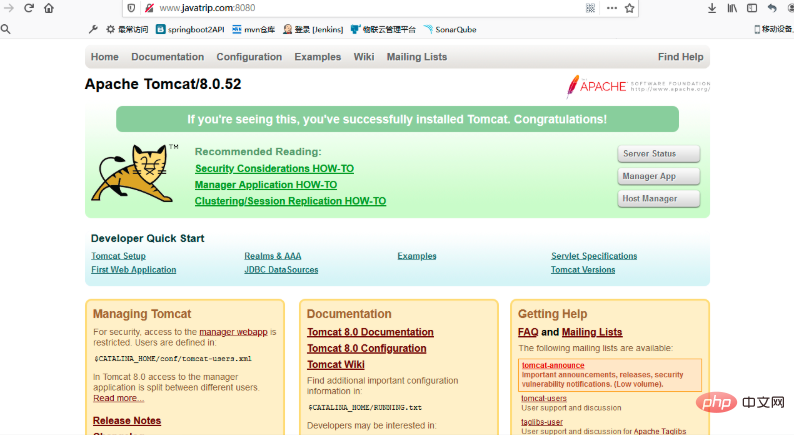
前面的ip是服务器的ip地址,后面的域名是我随便起的用于绑定这个ip的一个域名。配置好之后,我们使用域名访问一下tomcat,如果能请求到tomcat默认页面,则配置成功。
3.3 在nginx配置请求转发
1 2 3 4 5 6 7 8 9 |
|
我们将以上默认的配置文件做个修改:
1 2 3 4 5 6 7 8 9 10 |
|
以上这段配置的意思就是请求是47.104.xxx.xxx:80,都会转发至47.104.xxx.xxx:8080。
现在浏览器访问www.javatrip.com,发现直接转发到了tomcat上了,这样简单的反向代理就完成了。
3.4 根据请求后缀分发
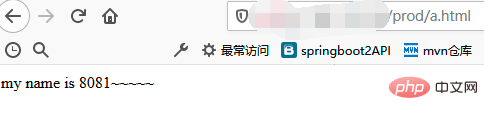
我们再解压一个tomcat,端口号设置为8081,分别在两个tomcat下webapps目录下面新建dev和prod目录,然后在该目录下写一个文件。
将请求www.javatrip.com:7001/dev转发到tomcat8080,将请求www.javatrip.com:7001/prod转发到tomcat8081。现在我们的nginx监听的端口号是7001。打开nginx的配置文件,新建一个server如下:
1 2 3 4 5 6 7 8 9 10 11 12 |
|
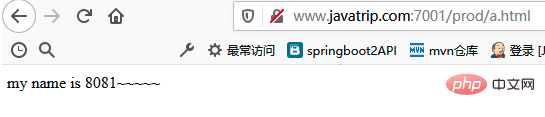
然后试试效果,分别访问www.javatrip.com:7001/dev/a.html和www.javatrip.com:7001/prod/a.html,效果如下:

其中,配置转发的时候用到了~,其含义内容如下:
= 严格匹配。如果这个查询匹配,那么将停止搜索并立即处理此请求。
~ is a case-sensitive match (regular expressions available)
!~ is a case-sensitive non-match
~* is case-insensitive matching (regular expressions available)
## !~* is a case-insensitive mismatch
- ^~ If this prefix is used with a regular string, then tells
nginx
if the path matches Then regular expressions are not tested.
Four Nginx configuration load balancing
4.1 What is load balancing
Load Balance means balancing and allocating loads (work tasks, access requests) to multiple operating units (servers, components) for execution. It is the ultimate solution to solve high performance, single point of failure (high availability), and scalability (horizontal scaling).
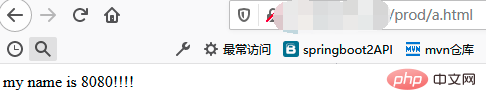
Now what we want to achieve is to distribute the requests to two tomcats respectively by accessing www.javatrip.com:7001/prod/a.html. First, we willtomcat8080 Create a new folder prod on and put a file a.html in it. In this way, both tomcat8081 and tomcat8080 will have a prod file plus a a.html file inside.
4.2 配置nginx.conf
首先,在http块中配置两个tomcat的服务列表
1 2 3 4 |
|
其次,在server块中配置规则:
1 2 3 4 5 6 7 8 9 10 |
|
4.3 测试效果
访问地址:www.javatrip.com:7001/prod/a.html,多刷新几次。发现有的请求到tomcat8080上,有的请求到tomcat8081上。
4.4 nginx支持的几种负载策略
轮询(默认):每个请求按时间顺序逐一分配到不同的服务器,如果服务器down了,会自动剔除。
1 2 3 4 |
|
weight(权重):默认为1,权重越高,分配的请求越多。
1 2 3 4 |
|
ip hash:每个请求按访问ip的hash结果分配,这样每个访客固定访问一个后台服务器,可以解决
session的问题。
1 2 3 4 5 |
|
fair(第三方):按后端响应时间进行分配,响应时间越短分配的请求越多。
1 2 3 4 5 |
|
由于动静分离在实际开发中也不常用,就不再写了。本篇文章做为一个nginx入门,到这里就基本完结了。最后留给大家一个问题思考一下:如何保证nginx的高可用?
The above is the detailed content of Nginx super simple tutorial, just read this article to get started. For more information, please follow other related articles on the PHP Chinese website!

Hot AI Tools

Undresser.AI Undress
AI-powered app for creating realistic nude photos

AI Clothes Remover
Online AI tool for removing clothes from photos.

Undress AI Tool
Undress images for free

Clothoff.io
AI clothes remover

Video Face Swap
Swap faces in any video effortlessly with our completely free AI face swap tool!
Hot Article
Hot Tools

Notepad++7.3.1
Easy-to-use and free code editor

SublimeText3 Chinese version
Chinese version, very easy to use

Zend Studio 13.0.1
Powerful PHP integrated development environment

Dreamweaver CS6
Visual web development tools

SublimeText3 Mac version
God-level code editing software (SublimeText3)
Hot Topics
 1392
1392
 52
36
110
52
36
110

 How to configure cloud server domain name in nginx
Apr 14, 2025 pm 12:18 PM
How to configure cloud server domain name in nginx
Apr 14, 2025 pm 12:18 PM
How to configure an Nginx domain name on a cloud server: Create an A record pointing to the public IP address of the cloud server. Add virtual host blocks in the Nginx configuration file, specifying the listening port, domain name, and website root directory. Restart Nginx to apply the changes. Access the domain name test configuration. Other notes: Install the SSL certificate to enable HTTPS, ensure that the firewall allows port 80 traffic, and wait for DNS resolution to take effect.
 How to check nginx version
Apr 14, 2025 am 11:57 AM
How to check nginx version
Apr 14, 2025 am 11:57 AM
The methods that can query the Nginx version are: use the nginx -v command; view the version directive in the nginx.conf file; open the Nginx error page and view the page title.
 How to start nginx server
Apr 14, 2025 pm 12:27 PM
How to start nginx server
Apr 14, 2025 pm 12:27 PM
Starting an Nginx server requires different steps according to different operating systems: Linux/Unix system: Install the Nginx package (for example, using apt-get or yum). Use systemctl to start an Nginx service (for example, sudo systemctl start nginx). Windows system: Download and install Windows binary files. Start Nginx using the nginx.exe executable (for example, nginx.exe -c conf\nginx.conf). No matter which operating system you use, you can access the server IP
 How to check whether nginx is started
Apr 14, 2025 pm 01:03 PM
How to check whether nginx is started
Apr 14, 2025 pm 01:03 PM
How to confirm whether Nginx is started: 1. Use the command line: systemctl status nginx (Linux/Unix), netstat -ano | findstr 80 (Windows); 2. Check whether port 80 is open; 3. Check the Nginx startup message in the system log; 4. Use third-party tools, such as Nagios, Zabbix, and Icinga.
 How to check the name of the docker container
Apr 15, 2025 pm 12:21 PM
How to check the name of the docker container
Apr 15, 2025 pm 12:21 PM
You can query the Docker container name by following the steps: List all containers (docker ps). Filter the container list (using the grep command). Gets the container name (located in the "NAMES" column).
 How to configure nginx in Windows
Apr 14, 2025 pm 12:57 PM
How to configure nginx in Windows
Apr 14, 2025 pm 12:57 PM
How to configure Nginx in Windows? Install Nginx and create a virtual host configuration. Modify the main configuration file and include the virtual host configuration. Start or reload Nginx. Test the configuration and view the website. Selectively enable SSL and configure SSL certificates. Selectively set the firewall to allow port 80 and 443 traffic.
 How to start containers by docker
Apr 15, 2025 pm 12:27 PM
How to start containers by docker
Apr 15, 2025 pm 12:27 PM
Docker container startup steps: Pull the container image: Run "docker pull [mirror name]". Create a container: Use "docker create [options] [mirror name] [commands and parameters]". Start the container: Execute "docker start [Container name or ID]". Check container status: Verify that the container is running with "docker ps".
 How to run nginx apache
Apr 14, 2025 pm 12:33 PM
How to run nginx apache
Apr 14, 2025 pm 12:33 PM
To get Nginx to run Apache, you need to: 1. Install Nginx and Apache; 2. Configure the Nginx agent; 3. Start Nginx and Apache; 4. Test the configuration to ensure that you can see Apache content after accessing the domain name. In addition, you need to pay attention to other matters such as port number matching, virtual host configuration, and SSL/TLS settings.
