
 Operation and Maintenance
Linux Operation and Maintenance
Three ways to interrupt the lower half of Linux drivers
Operation and Maintenance
Linux Operation and Maintenance
Three ways to interrupt the lower half of Linux drivers
Three ways to interrupt the lower half of Linux drivers
What is the lower half of the interrupt
When an interrupt is generated, the interrupt handler will be entered.
But the interrupt handler must be fast, asynchronous, and simple to respond quickly to the hardware and complete those time-critical operations.
Therefore, for other tasks that have relatively loose time requirements, they should be postponed until the interrupt is activated before running .
In this way, the entire interrupt processing process is divided into two parts:
The first part is the interrupt handler ( The upper half), the kernel completes the immediate response to hardware interrupts through its asynchronous execution. The other part of the interrupt processing flow, bottom half(bottom half)
Next The half task is mainly to perform interrupt-related work, which is not completed by the interrupt service routine itself.
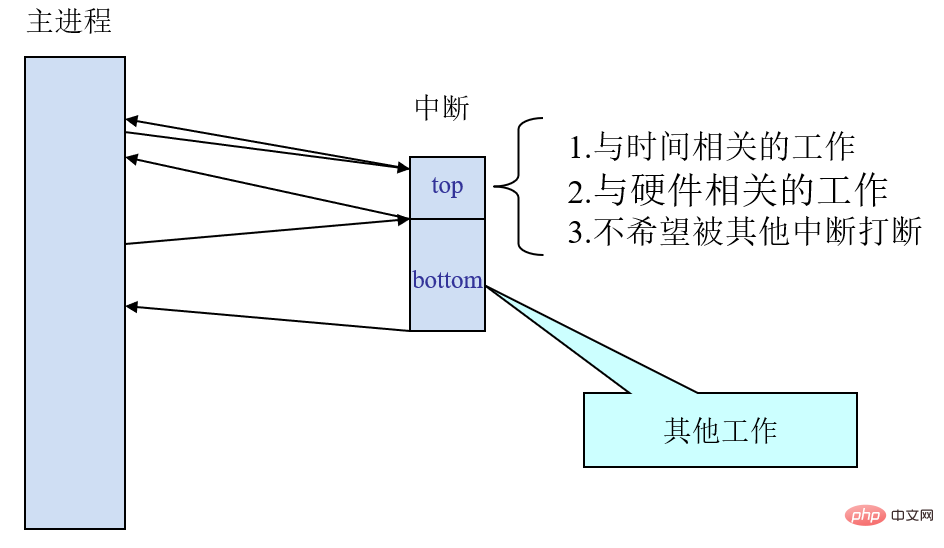
Lower half It is not necessary to specify an exact time, just postpone these tasks a little longer so that they can be done when the system is not too busyAnd After the interruption and recovery, can be executed.
The main difference between the upper and lower halves:
The upper half refers to Interrupt handler, The lower half refers to some tasks that can be postponed although they are related to interrupts.
The upper half of the interrupt cannot be interrupted by the same type of interrupt, while the lower half can still be interrupted by interrupts.
#Usually the lower half will run as soon as the interrupt handler returns. The first half is simple and fast, disable some or all interruptions during execution.
The second half will be executed later, and all interrupts can be responded to during execution.
Linux, there are three main ways to implement the lower half of the interrupt:
Soft interrupt tasklet ##Work queue
softirq
softirq is a softirq, the code is located in kernel/softirq.cIn the file;
softirq_action structure:
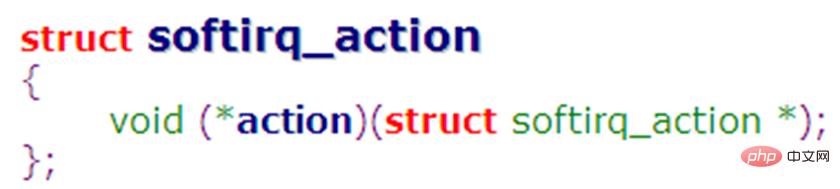
softirq.c A softirq vector array softirq_vec is defined:
static struct softirq_action softirq_vec[NR_SOFTIRQS] __cacheline_aligned_in_smp;
    enum
    {
       HI_SOFTIRQ=0, /*用于高优先级的tasklet*/
       TIMER_SOFTIRQ, /*用于定时器的下半部*/
       NET_TX_SOFTIRQ, /*用于网络层发包*/
       NET_RX_SOFTIRQ, /*用于网络层收报*/
       BLOCK_SOFTIRQ,
       BLOCK_IOPOLL_SOFTIRQ,
       TASKLET_SOFTIRQ, /*用于低优先级的tasklet*/
       SCHED_SOFTIRQ,
       HRTIMER_SOFTIRQ,
       RCU_SOFTIRQ, /* Preferable RCU should always be the last softirq */
       NR_SOFTIRQS
};NR_SOFTIRQS, which is an enumeration constant.
include/linux/interrupt.h .
Several key points in using soft interrupts:
一个软中断不会抢占另外一个软中断。 惟一可以抢占软中断的是中断处理程序。 其他的软中断可以在其他处理器上同时执行。
相关接口
注册软中断
void open_softirq(int nr, void (*action)(struct softirq_action *))
即注册对应类型的处理函数到全局数组softirq_vec中。
触发软中断
void raise_softirq(unsigned int nr)
实际上即以软中断类型nr作为偏移量会置位irq_stat[cpu_id]的成员变量__softirq_pending.
__softirq_pending字段中的每一个bit,对应着某一个软中断,某个bit被置位,说明有相应的软中断等待处理。
这也是同一类型软中断可以在多个cpu上并行运行的根本原因。
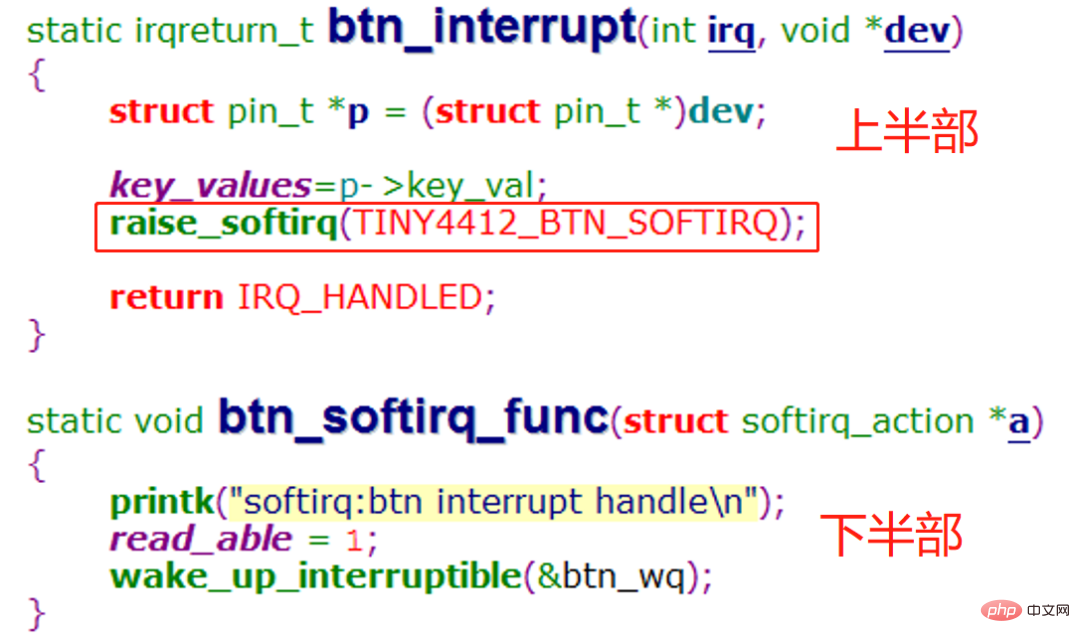
软中断实例
以一个按键驱动的中断处理为例,将按键驱动的中断处理分成上下两部分:
The upper part: Read the key value and trigger the soft interrupt The lower part: Wake up Process
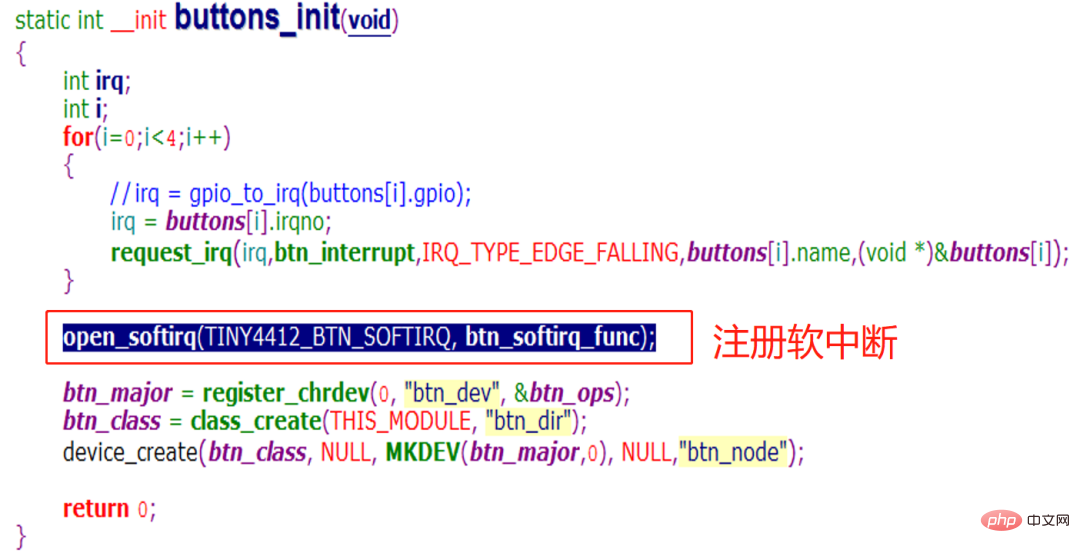
Soft interrupt registration, in the driver's entry function, register the soft interrupt:
Added enumeration constants:
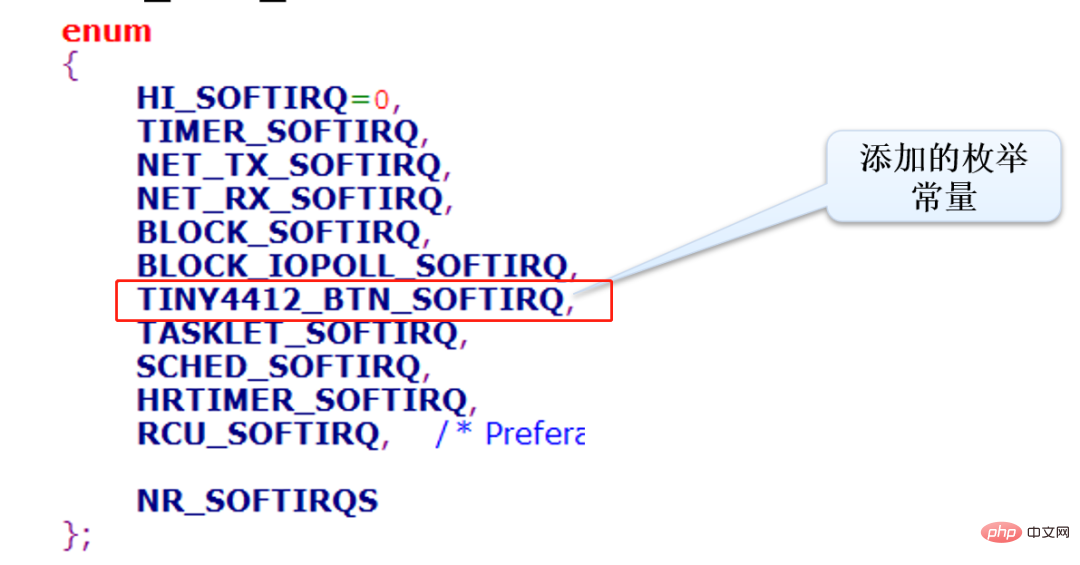
As you can see, using soft interrupts requires modifying the kernel, and adding an enumeration is a bit cumbersome.
Therefore, we usually do not recommend increasing the number of soft interrupts without authorization. If new soft interrupts are needed, try to implement them as soft interrupt-based taskletsform.
tasklet
##tasklet is the use of soft interruptA kind of lower half mechanism implemented.
Is it better to usesoft interrupt or tasklet?
softirq or tasklet is actually very simple:
通常你应该用 tasklet。就像我们在前面看到的,软中断资源有限,也麻烦,而且软中断的使用者屈指可数。它只在那些执行频率很高和连续性要求很高的情况下才需要。而tasklet却有更广泛的用途。大多数情况下用 tasklet效果都不错,而且它们还非常容易使用。因为tasklet是通过软中断实现的,所以它们本身也是软中断。
tasklet使用
tasklet的使用步骤如下:
1、编写tasklet处理函数(下半部)
void my_tasklet_fun (unsigned long data)
2、声明tasklet
//静态
DECLARE_TASKLET(my_tasklet,my_tasklet_fun,data);
//动态
Struct  tasklet_struct xxx;
tasklet_init(&xxx,tasklet_handler,dev)
3、调度 tasklet
tasklet_schedule(&my_tasklet);
登记my_tasklet, 然后允许系统在合适的时间调度它。
tasklet实例
以按键中断驱动为例:
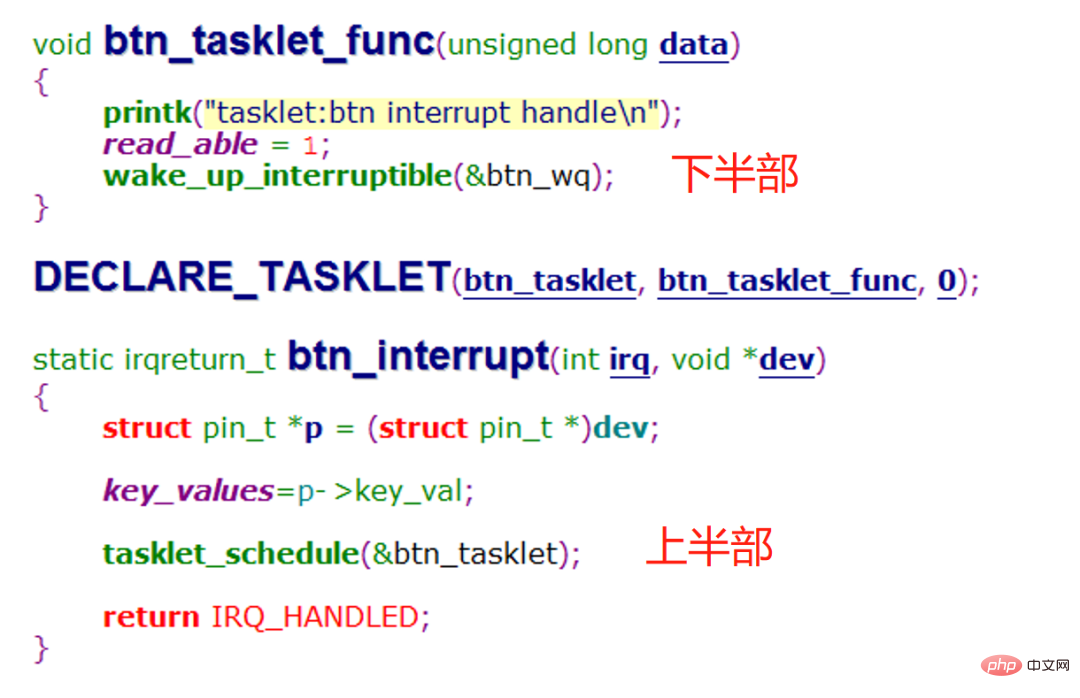
First use DECLARE_TASKLET to statically declare a tasklet, specify its lower half function as btn_tasklet_func, and interrupt the service After the function (upper half) obtains the key value, it calls tasklet_schedulescheduling.
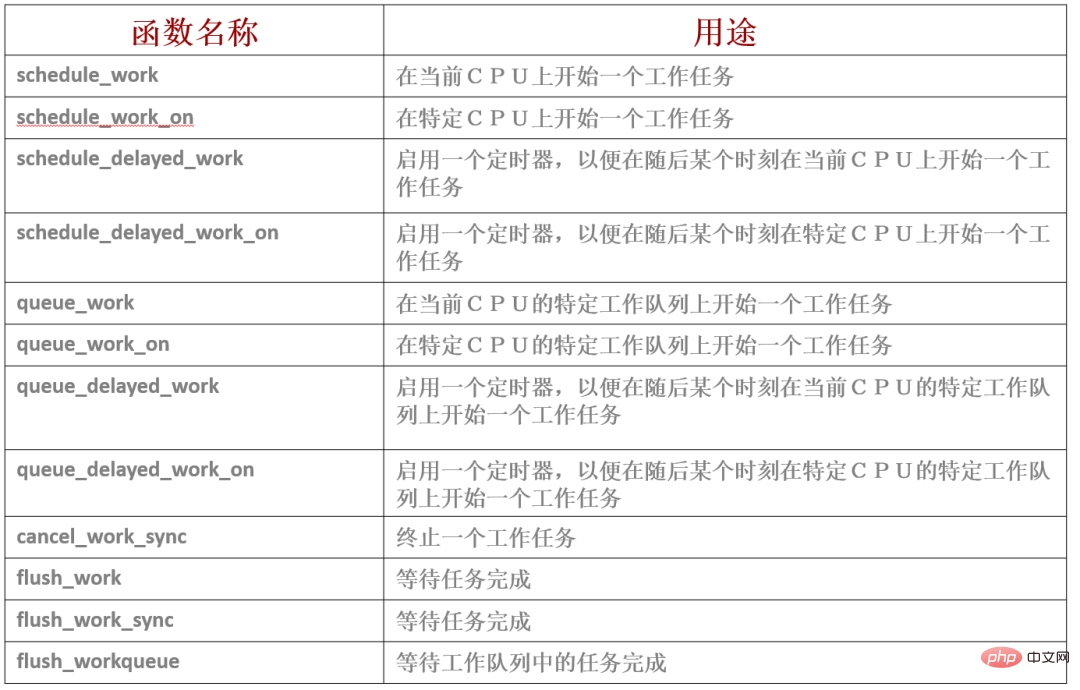
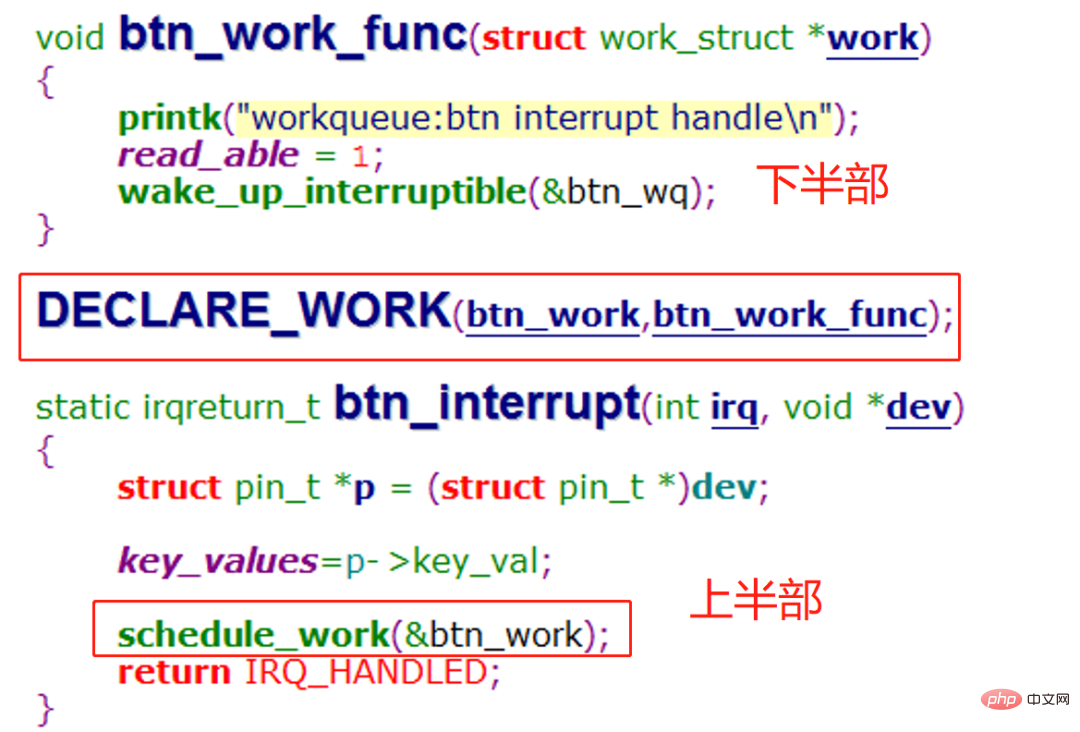
work queue
work queue is work queue, It is also a type that interrupts the lower half.
Work queue Defer the second half of the work to a kernel thread for execution - work always runs in the process context .
Two important points:
Use work queues if the deferred work requires sleep. Otherwise, usesoftirqortasklets.##Work queues is suitable for allocating a large amount of memory and obtaining a semaphore. , or perform blockedI/O.
work queue is similar to tasklet:
The above is the detailed content of Three ways to interrupt the lower half of Linux drivers. For more information, please follow other related articles on the PHP Chinese website!

Hot AI Tools

Undresser.AI Undress
AI-powered app for creating realistic nude photos

AI Clothes Remover
Online AI tool for removing clothes from photos.

Undress AI Tool
Undress images for free

Clothoff.io
AI clothes remover

Video Face Swap
Swap faces in any video effortlessly with our completely free AI face swap tool!

Hot Article
Hot Tools

Notepad++7.3.1
Easy-to-use and free code editor

SublimeText3 Chinese version
Chinese version, very easy to use

Zend Studio 13.0.1
Powerful PHP integrated development environment

Dreamweaver CS6
Visual web development tools

SublimeText3 Mac version
God-level code editing software (SublimeText3)
Hot Topics
 1387
1387
 52
52

 How to use docker desktop
Apr 15, 2025 am 11:45 AM
How to use docker desktop
Apr 15, 2025 am 11:45 AM
How to use Docker Desktop? Docker Desktop is a tool for running Docker containers on local machines. The steps to use include: 1. Install Docker Desktop; 2. Start Docker Desktop; 3. Create Docker image (using Dockerfile); 4. Build Docker image (using docker build); 5. Run Docker container (using docker run).
 How to view the docker process
Apr 15, 2025 am 11:48 AM
How to view the docker process
Apr 15, 2025 am 11:48 AM
Docker process viewing method: 1. Docker CLI command: docker ps; 2. Systemd CLI command: systemctl status docker; 3. Docker Compose CLI command: docker-compose ps; 4. Process Explorer (Windows); 5. /proc directory (Linux).
 What to do if the docker image fails
Apr 15, 2025 am 11:21 AM
What to do if the docker image fails
Apr 15, 2025 am 11:21 AM
Troubleshooting steps for failed Docker image build: Check Dockerfile syntax and dependency version. Check if the build context contains the required source code and dependencies. View the build log for error details. Use the --target option to build a hierarchical phase to identify failure points. Make sure to use the latest version of Docker engine. Build the image with --t [image-name]:debug mode to debug the problem. Check disk space and make sure it is sufficient. Disable SELinux to prevent interference with the build process. Ask community platforms for help, provide Dockerfiles and build log descriptions for more specific suggestions.
 What computer configuration is required for vscode
Apr 15, 2025 pm 09:48 PM
What computer configuration is required for vscode
Apr 15, 2025 pm 09:48 PM
VS Code system requirements: Operating system: Windows 10 and above, macOS 10.12 and above, Linux distribution processor: minimum 1.6 GHz, recommended 2.0 GHz and above memory: minimum 512 MB, recommended 4 GB and above storage space: minimum 250 MB, recommended 1 GB and above other requirements: stable network connection, Xorg/Wayland (Linux)
 vscode cannot install extension
Apr 15, 2025 pm 07:18 PM
vscode cannot install extension
Apr 15, 2025 pm 07:18 PM
The reasons for the installation of VS Code extensions may be: network instability, insufficient permissions, system compatibility issues, VS Code version is too old, antivirus software or firewall interference. By checking network connections, permissions, log files, updating VS Code, disabling security software, and restarting VS Code or computers, you can gradually troubleshoot and resolve issues.
 Can vscode be used for mac
Apr 15, 2025 pm 07:36 PM
Can vscode be used for mac
Apr 15, 2025 pm 07:36 PM
VS Code is available on Mac. It has powerful extensions, Git integration, terminal and debugger, and also offers a wealth of setup options. However, for particularly large projects or highly professional development, VS Code may have performance or functional limitations.
 What is vscode What is vscode for?
Apr 15, 2025 pm 06:45 PM
What is vscode What is vscode for?
Apr 15, 2025 pm 06:45 PM
VS Code is the full name Visual Studio Code, which is a free and open source cross-platform code editor and development environment developed by Microsoft. It supports a wide range of programming languages and provides syntax highlighting, code automatic completion, code snippets and smart prompts to improve development efficiency. Through a rich extension ecosystem, users can add extensions to specific needs and languages, such as debuggers, code formatting tools, and Git integrations. VS Code also includes an intuitive debugger that helps quickly find and resolve bugs in your code.
 How to back up vscode settings and extensions
Apr 15, 2025 pm 05:18 PM
How to back up vscode settings and extensions
Apr 15, 2025 pm 05:18 PM
How to back up VS Code configurations and extensions? Manually backup the settings file: Copy the key JSON files (settings.json, keybindings.json, extensions.json) to a safe location. Take advantage of VS Code synchronization: enable synchronization with your GitHub account to automatically back up all relevant settings and extensions. Use third-party tools: Back up configurations with reliable tools and provide richer features such as version control and incremental backups.
