
 Operation and Maintenance
Linux Operation and Maintenance
RISC-V Linux assembly startup process analysis
Operation and Maintenance
Linux Operation and Maintenance
RISC-V Linux assembly startup process analysis
RISC-V Linux assembly startup process analysis
The assembly startup part of RISC-V Linux is relatively simple and not too complicated. There are two core parts: page table creation and redirection. Page table creation is written in C language. Today we will analyze the assembly part first. We will first take you to analyze the overall assembly startup process, and then analyze redirection.
Note: This article is based on the linux5.10.111 kernel
Assembly startup process
Let’s start with an overall analysis of what the compilation does, and get a general framework.
Path: arch/riscv/kernel/head.S, the entrance is ENTRY(_start_kernel)
Start from ENTRY(_start_kernel) to perform some initialization before startup and the main work before establishing the page table:
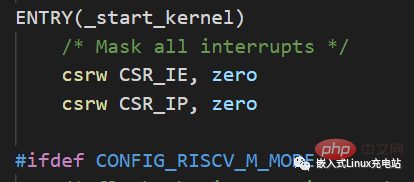
Close all interrupts
/* 关闭所有中断 */
    csrw CSR_IE, zero
csrw CSR_IP, zeroLoad global pointer gp
/* 加载全局指针gp */
.option push
.option norelax
    la gp, __global_pointer$
.option popdisable FPU
/* 禁用 FPU 以检测内核空间中浮点的非法使用*/
    li t0, SR_FS
csrc CSR_STATUS, t0Select a core to start
/* 选择一个核启动 */
    la a3, hart_lottery
    li a2, 1
    amoadd.w a3, a2, (a3)
bnez a3, .Lsecondary_startClear bss Segment
/* 清除bss */
    la a3, __bss_start
    la a4, __bss_stop
ble a4, a3, clear_bss_doneSave hart id and dtb address
/* 保存hatr id和dtb地址,hart id保存到a0,dtb地址保存到a1 */
    mv s0, a0
    mv s1, a1
la a2, boot_cpu_hartidSet sp pointer
la sp, init_thread_union + THREAD_SIZE
After the above work is completed, the creation of the temporary page table will start, and jump to the C function setup_vm to create the temporary page table
    mv a0, s1
call setup_vm // 跳转到C函数setup_vm,setup_vm会创建临时页表Redirect
#ifdef CONFIG_MMU
    la a0, early_pg_dir
    call relocate	//重定向,实际就是开启MMU
#endifSet the exception vector address and reload the C environment
    call setup_trap_vector
/* 重载C环境 */
    la tp, init_task
    sw zero, TASK_TI_CPU(tp)
la sp, init_thread_union + THREAD_SIZEFinally jump to the C function start_kernel, start the C language part initialization, and the assembly part is executed
tail start_kernel
Complete _start_kernel assembly code:
ENTRY(_start_kernel)
	/* 关闭所有中断 */
	csrw CSR_IE, zero
	csrw CSR_IP, zero

	/* 在源码中,这里有一个M模式处理的宏,这里没有用到,直接跳过*/

	/* 加载全局指针gp */
.option push
.option norelax
	la gp, __global_pointer$
.option pop

	/* 禁用 FPU 以检测内核空间中浮点的非法使用*/
	li t0, SR_FS
	csrc CSR_STATUS, t0

#ifdef CONFIG_SMP
	li t0, CONFIG_NR_CPUS
	blt a0, t0, .Lgood_cores
	tail .Lsecondary_park
.Lgood_cores:
#endif

	/* 选择一个核启动 */
	la a3, hart_lottery
	li a2, 1
	amoadd.w a3, a2, (a3)
	bnez a3, .Lsecondary_start

	/* 清除bss */
	la a3, __bss_start
	la a4, __bss_stop
	ble a4, a3, clear_bss_done
clear_bss:
	REG_S zero, (a3)
	add a3, a3, RISCV_SZPTR
	blt a3, a4, clear_bss
clear_bss_done:

	/* 保存hatr id和dtb地址,hart id保存到a0,dtb地址保存到a1 */
	mv s0, a0
	mv s1, a1
	la a2, boot_cpu_hartid
	REG_S a0, (a2)

	/* 初始化页表,然后重定向到虚拟地址 */
	la sp, init_thread_union + THREAD_SIZE
	mv a0, s1
	call setup_vm // 跳转到C函数setup_vm,setup_vm会创建临时页表
#ifdef CONFIG_MMU
	la a0, early_pg_dir
	call relocate	//重定向,实际就是开启MMU
#endif /* CONFIG_MMU */

	call setup_trap_vector
	/* 重载C环境 */
	la tp, init_task
	sw zero, TASK_TI_CPU(tp)
	la sp, init_thread_union + THREAD_SIZE

#ifdef CONFIG_KASAN
	call kasan_early_init
#endif
	/* Start the kernel */
	call soc_early_init
	tail start_kernel	//跳转到C函数start_kernel,开始C语言部分初始化
A very important part of assembly is the creation of page tables, which determines whether subsequent programs can continue to run. After setup_vm creates the page table, it will start to execute relocate redirection. This redirection mainly turns on mmu. The assembly of relocate is analyzed below.
relocate
relocate redirection, which is to enable mmu. The operation of turning on mmu is to write the address and permissions of the first-level page table into the satp register. This is considered to turn on mmu.
#ifdef CONFIG_MMU
    la a0, early_pg_dir //跳转到relocate前,先把第一级页表early_pg_dir的地址存入a0
    call relocate		//跳转到relocate,开启MMU
#endifrelocate有两次开启mmu的操作,第一次开启mmu使用的是setup_vm()建立的trampoline_gd_dir页表,这页表保存的是kernel的前2M内存。第二次开启MMU使用的是early_pg_dir页表,这个页表映射了整个kernel内存以及dtb的4M空间。
如果trampoline_pg_dir或者early_pg_dir这两个页表的映射没弄好的话,开启MMU的时候就会失败,所以页表的建立十分关键。页表创建后续再深究,下面分析relocate汇编代码。
计算返回地址
返回地址就是
ra加上虚拟地址和物理地址之间的偏移量,这个是固定偏移量。PAGE_OFFSET是kernel入口地址对应的虚拟地址,_start就是kernel入口地址的虚拟地址,PAGE_OFFSET-_start就得到它们之间的偏移,然后再和ra相加,就是返回地址。
/* Relocate return address */
	li a1, PAGE_OFFSET
	la a2, _start
	sub a1, a1, a2
	add ra, ra, a1
将异常入口
1f的虚拟地址写入stvec寄存器因为一旦开启MMU,地址都变成了虚拟地址,原来访问的都是物理地址,开启MMU时,地址发生了改变,
VA != PA,从而进入异常,所以要先设置异常入口地址,此时的异常入口为1f。
/* Point stvec to virtual address of intruction after satp write */
	la a2, 1f
	add a2, a2, a1
	csrw CSR_TVEC, a2
提前计算切换到 early_pg_dir页表要写入satp的值
再进入relocate之前,就已经把early_pg_dir赋值给a0了,所以a0是early_pg_dir。srl是逻辑右移,mmu使用的是sv39,虚拟地址39位,物理地址56位:
 低12位是偏移量,所以
PAGE_SHIFT等于12,将early_pg_dir地址右移12位存到a2。根据satp寄存器定义:
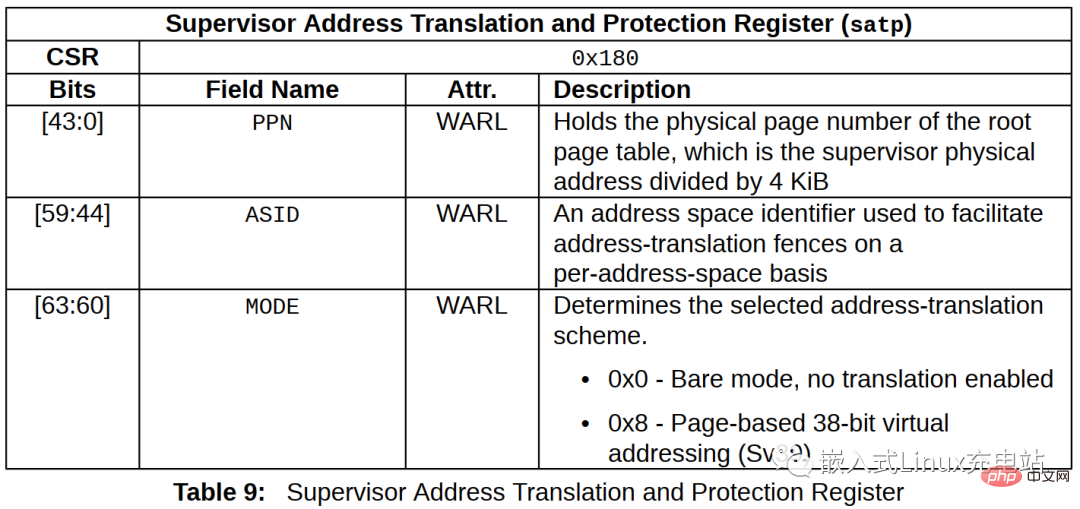
MODE equals 0x8 means using sv39 mmu, 0x0 means no address translation , that is, MMU is not enabled. Here STAP_MODE is sv39, which is 0x8. After ORing the early_pg_dir address and SATP_MODE, you can get the value written into the satp register, and finally save it to a2.
/* Compute satp for kernel page tables, but don't load it yet */
	srl a2, a0, PAGE_SHIFT
	li a1, SATP_MODE	//sv39 mmu
	or a2, a2, a1
第一次开启MMU,使用trampoline_pg_dir页表
satp值的计算和上述是一样的。开启MMU之前,通过sfence.vma命令先刷新TLB。此时开启MMU,就会进入下面的标号为1的汇编段
	la a0, trampoline_pg_dir
	srl a0, a0, PAGE_SHIFT
	or a0, a0, a1
	sfence.vma
	csrw CSR_SATP, a0
进入异常1f段,重新设置异常入口为.Lsecondary_park,然后切换到early_pg_dir页表,相当于第二次开启MMU。此时,如果之前建立的early_pg_dir页表不对,则会就进入.Lsecondary_park。.Lsecondary_park里面是个wfi指令,是个死循环。
完整relocate汇编代码:
relocate:
	/* Relocate return address */
	li a1, PAGE_OFFSET
	la a2, _start
	sub a1, a1, a2
	add ra, ra, a1

	/* Point stvec to virtual address of intruction after satp write */
	la a2, 1f
	add a2, a2, a1
	csrw CSR_TVEC, a2

	/* Compute satp for kernel page tables, but don't load it yet */
	srl a2, a0, PAGE_SHIFT
	li a1, SATP_MODE
	or a2, a2, a1

	/*
	 * Load trampoline page directory, which will cause us to trap to
	 * stvec if VA != PA, or simply fall through if VA == PA.  We need a
	 * full fence here because setup_vm() just wrote these PTEs and we need
	 * to ensure the new translations are in use.
	 */
	la a0, trampoline_pg_dir
	srl a0, a0, PAGE_SHIFT
	or a0, a0, a1
	sfence.vma
	csrw CSR_SATP, a0
.align 2
1:
	/* Set trap vector to spin forever to help debug */
	la a0, .Lsecondary_park
	csrw CSR_TVEC, a0

	/* Reload the global pointer */
.option push
.option norelax
	la gp, __global_pointer$
.option pop

	/*
	 * Switch to kernel page tables.  A full fence is necessary in order to
	 * avoid using the trampoline translations, which are only correct for
	 * the first superpage.  Fetching the fence is guarnteed to work
	 * because that first superpage is translated the same way.
	 */
	csrw CSR_SATP, a2
	sfence.vma

	ret
总结
以上就是RISC-V Linux的汇编启动流程,虽说RISC-V的指令不复杂,但要理解这个汇编启动的部分,还是需要一点基础和时间。另外,大多数人工作中基本用不上汇编,只有真正用上了理解才会比较深。希望本文能够帮助到有需要的人。
The above is the detailed content of RISC-V Linux assembly startup process analysis. For more information, please follow other related articles on the PHP Chinese website!

Hot AI Tools

Undresser.AI Undress
AI-powered app for creating realistic nude photos

AI Clothes Remover
Online AI tool for removing clothes from photos.

Undress AI Tool
Undress images for free

Clothoff.io
AI clothes remover

AI Hentai Generator
Generate AI Hentai for free.

Hot Article
Hot Tools

Notepad++7.3.1
Easy-to-use and free code editor

SublimeText3 Chinese version
Chinese version, very easy to use

Zend Studio 13.0.1
Powerful PHP integrated development environment

Dreamweaver CS6
Visual web development tools

SublimeText3 Mac version
God-level code editing software (SublimeText3)
Hot Topics
 1378
1378
 52
52

 How to start nginx in Linux
Apr 14, 2025 pm 12:51 PM
How to start nginx in Linux
Apr 14, 2025 pm 12:51 PM
Steps to start Nginx in Linux: Check whether Nginx is installed. Use systemctl start nginx to start the Nginx service. Use systemctl enable nginx to enable automatic startup of Nginx at system startup. Use systemctl status nginx to verify that the startup is successful. Visit http://localhost in a web browser to view the default welcome page.
 How to check whether nginx is started
Apr 14, 2025 pm 01:03 PM
How to check whether nginx is started
Apr 14, 2025 pm 01:03 PM
How to confirm whether Nginx is started: 1. Use the command line: systemctl status nginx (Linux/Unix), netstat -ano | findstr 80 (Windows); 2. Check whether port 80 is open; 3. Check the Nginx startup message in the system log; 4. Use third-party tools, such as Nagios, Zabbix, and Icinga.
 How to solve nginx403
Apr 14, 2025 am 10:33 AM
How to solve nginx403
Apr 14, 2025 am 10:33 AM
How to fix Nginx 403 Forbidden error? Check file or directory permissions; 2. Check .htaccess file; 3. Check Nginx configuration file; 4. Restart Nginx. Other possible causes include firewall rules, SELinux settings, or application issues.
 How to start nginx server
Apr 14, 2025 pm 12:27 PM
How to start nginx server
Apr 14, 2025 pm 12:27 PM
Starting an Nginx server requires different steps according to different operating systems: Linux/Unix system: Install the Nginx package (for example, using apt-get or yum). Use systemctl to start an Nginx service (for example, sudo systemctl start nginx). Windows system: Download and install Windows binary files. Start Nginx using the nginx.exe executable (for example, nginx.exe -c conf\nginx.conf). No matter which operating system you use, you can access the server IP
 How to solve nginx403 error
Apr 14, 2025 pm 12:54 PM
How to solve nginx403 error
Apr 14, 2025 pm 12:54 PM
The server does not have permission to access the requested resource, resulting in a nginx 403 error. Solutions include: Check file permissions. Check the .htaccess configuration. Check nginx configuration. Configure SELinux permissions. Check the firewall rules. Troubleshoot other causes such as browser problems, server failures, or other possible errors.
 How to solve nginx304 error
Apr 14, 2025 pm 12:45 PM
How to solve nginx304 error
Apr 14, 2025 pm 12:45 PM
Answer to the question: 304 Not Modified error indicates that the browser has cached the latest resource version of the client request. Solution: 1. Clear the browser cache; 2. Disable the browser cache; 3. Configure Nginx to allow client cache; 4. Check file permissions; 5. Check file hash; 6. Disable CDN or reverse proxy cache; 7. Restart Nginx.
 How to check whether nginx is started?
Apr 14, 2025 pm 12:48 PM
How to check whether nginx is started?
Apr 14, 2025 pm 12:48 PM
In Linux, use the following command to check whether Nginx is started: systemctl status nginx judges based on the command output: If "Active: active (running)" is displayed, Nginx is started. If "Active: inactive (dead)" is displayed, Nginx is stopped.
 How to clean nginx error log
Apr 14, 2025 pm 12:21 PM
How to clean nginx error log
Apr 14, 2025 pm 12:21 PM
The error log is located in /var/log/nginx (Linux) or /usr/local/var/log/nginx (macOS). Use the command line to clean up the steps: 1. Back up the original log; 2. Create an empty file as a new log; 3. Restart the Nginx service. Automatic cleaning can also be used with third-party tools such as logrotate or configured.
