
 Operation and Maintenance
Linux Operation and Maintenance
Don't know how to use Linux firewall software IPtables! What kind of operation and maintenance person are you?
Operation and Maintenance
Linux Operation and Maintenance
Don't know how to use Linux firewall software IPtables! What kind of operation and maintenance person are you?
Don't know how to use Linux firewall software IPtables! What kind of operation and maintenance person are you?

Connection tracking (conntrack)
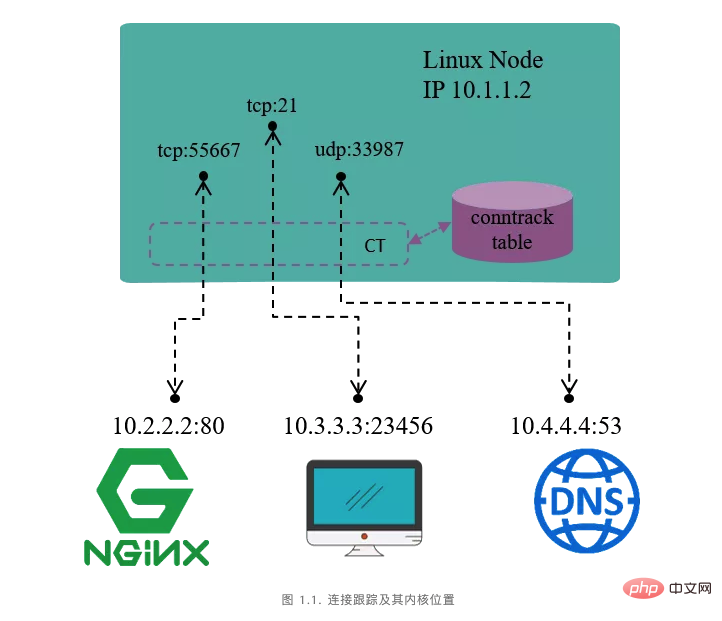
The connection for the machine to access the external HTTP service (destination port 80) The connection for the external access to the FTP service within the machine (destination port 21) The connection of the machine to access the external DNS service (destination port 53)
Extract tuple information from the data packet, identify the data flow (flow) and the corresponding connection ( connection). #Maintain a status database (conntrack table) for all connections, such as the creation time of the connection, the number of packets sent, the number of bytes sent, etc. #Recycle expired connections (GC). # Provide services for higher-level functions (such as NAT).
In the TCP/IP protocol, connection is a Layer 4 concept. TCP is connection-oriented, and all packets sent require a response (ACK) from the peer, and there is a retransmission mechanism. UDP is connectionless, and the packets sent do not require a response from the peer, and there is no retransmission mechanism. In conntrack(CT), a data flow (flow) defined by a tuple (tuple) represents a connection (connection). We will see later that three-layer protocols such as UDP and even ICMP also have connection records in CT, but not all protocols will be connected.
Netfilter
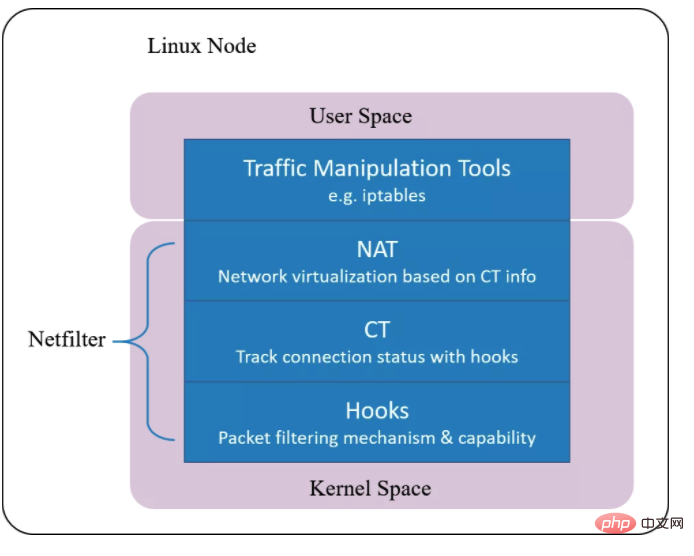
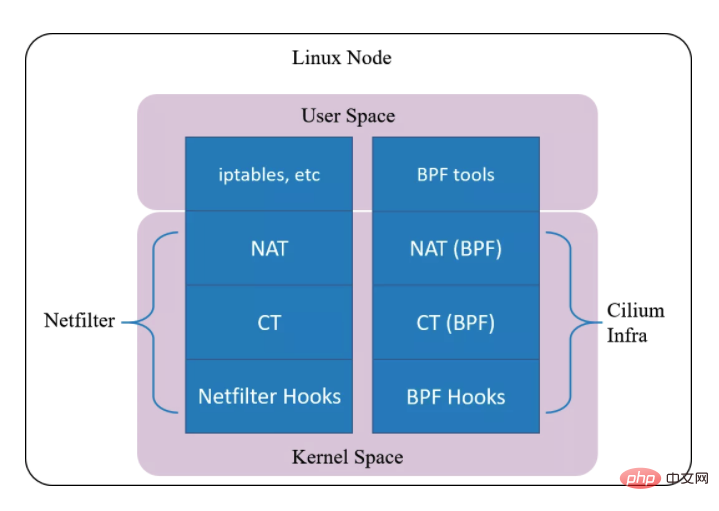
Implement the packet interception function based on BPF hook (equivalent to the hook mechanism in netfilter) Based on BPF hook, implement a new set of conntrack and NAT. Therefore, even if Netfilter is uninstalled, it will not affect Cilium's support for Kubernetes ClusterIP, NodePort, ExternalIPs and LoadBalancer. . Since this connection tracking mechanism is independent of Netfilter, its conntrack and NAT information are not stored in the kernel (that is, Netfilter's) conntrack table and NAT table.Therefore, conventional conntrack/netstats/ss/lsof and other tools cannot be seen. You must use Cilium commands, for example: ##
$ cilium bpf nat list$ cilium bpf ct list global
Iptables
filter table: used to filter data packets. Specific rule requirements determine how to process a data packet. nat table: mainly used to modify the IP address and port number information of data packets. mangle table: Mainly used to modify the service type and life cycle of data packets, set tags for data packets, and implement traffic shaping, policy routing, etc. #raw table: Mainly used to decide whether to perform status tracking on data packets.
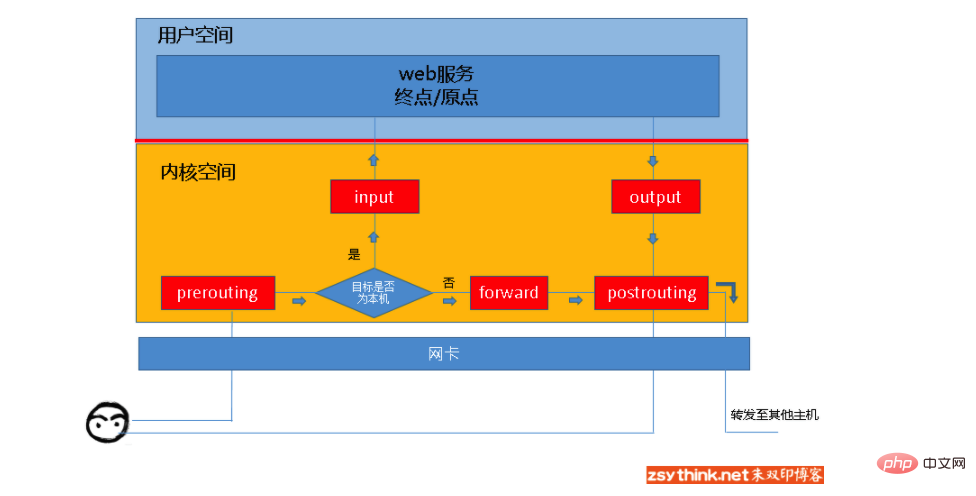
input chain: The rules in this chain will be applied when a packet is received that accesses the local address. output chain: When the machine sends a packet out, the rules in this chain will be applied. forward chain: When receiving a data packet that needs to be forwarded to other addresses, the rules in this chain will be applied. Note that if you need to implement forward forwarding, you need to enable it. The ip_forward function in the Linux kernel. prerouting chain: The rules in this chain will be applied before routing packets. postrouting chain: The rules in this chain will be applied after routing the packet.
The message to a certain process of the local machine: PREROUTING –> INPUT. Messages forwarded by this machine: PREROUTING –> FORWARD –> POSTROUTING. A message (usually a response message) is sent by a process on the local machine: OUTPUT –> POSTROUTING.
Query rules
-t: Table name -n: Do not resolve IP address -v: Will display counter information, the number and size of packets -x: Options Represents the exact value of the display counter ##--line-numbers: The serial number of the display rule (abbreviated as --line) In addition, when searching for public accounts on Linux, this is how you should learn to reply "monkey" in the background to get a surprise gift package. -L:链名
#iptables -t filter -nvxL DOCKER --lineChain DOCKER (1 references)num pkts bytes target prot opt in out source destination1 5076 321478 ACCEPT tcp -- !docker0 docker0 0.0.0.0/0 172.17.0.2 tcp dpt:84432 37233 54082508 ACCEPT tcp -- !docker0 docker0 0.0.0.0/0 172.17.0.2 tcp dpt:223 1712 255195 ACCEPT tcp -- !docker0 docker0 0.0.0.0/0 172.17.0.3 tcp dpt:90004 0 0 ACCEPT tcp -- !docker0 docker0 0.0.0.0/0 172.17.0.3 tcp dpt:80005 40224 6343104 ACCEPT tcp -- !docker0 docker0 0.0.0.0/0 172.17.0.4 tcp dpt:34436 21034 2227009 ACCEPT tcp -- !docker0 docker0 0.0.0.0/0 172.17.0.5 tcp dpt:33067 58 5459 ACCEPT tcp -- !docker0 docker0 0.0.0.0/0 172.17.0.6 tcp dpt:808 826 70081 ACCEPT tcp -- !docker0 docker0 0.0.0.0/0 172.17.0.6 tcp dpt:4439 10306905 1063612492 ACCEPT tcp -- !docker0 docker0 0.0.0.0/0 172.17.0.9 tcp dpt:330610 159775 12297727 ACCEPT tcp -- !docker0 docker0 0.0.0.0/0 172.17.0.7 tcp dpt:11111
增加规则
命令语法:iptables -t 表名 -A 链名 匹配条件 -j 动作示例:iptables -t filter -A INPUT -s 192.168.1.146 -j DROP
命令语法:iptables -t 表名 -I 链名 匹配条件 -j 动作示例:iptables -t filter -I INPUT -s 192.168.1.146 -j ACCEPT
命令语法:iptables -t 表名 -I 链名 规则序号 匹配条件 -j 动作示例:iptables -t filter -I INPUT 5 -s 192.168.1.146 -j REJECT
删除规则
命令语法:iptables -t 表名 -D 链名 规则序号示例:iptables -t filter -D INPUT 3
命令语法:iptables -t 表名 -D 链名 匹配条件 -j 动作示例:iptables -t filter -D INPUT -s 192.168.1.146 -j DROP
命令语法:iptables -t 表名 -F 链名示例:iptables -t filter -F INPUT
修改规则
命令语法:iptables -t 表名 -R 链名 规则序号 规则原本的匹配条件 -j 动作示例:iptables -t filter -R INPUT 3 -s 192.168.1.146 -j ACCEPT
命令语法:iptables -t 表名 -P 链名 动作示例:iptables -t filter -P FORWARD ACCEPT
保存规则
方式一
service iptables save
#配置好yum源以后安装iptables-serviceyum install -y iptables-services#停止firewalldsystemctl stop firewalld#禁止firewalld自动启动systemctl disable firewalld#启动iptablessystemctl start iptables#将iptables设置为开机自动启动,以后即可通过iptables-service控制iptables服务systemctl enable iptables
方式二
iptables-save > /etc/sysconfig/iptables
加载规则
iptables-restore < /etc/sysconfig/iptables
匹配条件
#示例如下iptables -t filter -I INPUT -s 192.168.1.111,192.168.1.118 -j DROPiptables -t filter -I INPUT -s 192.168.1.0/24 -j ACCEPTiptables -t filter -I INPUT ! -s 192.168.1.0/24 -j ACCEPT
#示例如下iptables -t filter -I OUTPUT -d 192.168.1.111,192.168.1.118 -j DROPiptables -t filter -I INPUT -d 192.168.1.0/24 -j ACCEPTiptables -t filter -I INPUT ! -d 192.168.1.0/24 -j ACCEPT
#示例如下iptables -t filter -I INPUT -p tcp -s 192.168.1.146 -j ACCEPTiptables -t filter -I INPUT ! -p udp -s 192.168.1.146 -j ACCEPT
#示例如下iptables -t filter -I INPUT -p icmp -i eth4 -j DROPiptables -t filter -I INPUT -p icmp ! -i eth4 -j DROP
#示例如下iptables -t filter -I OUTPUT -p icmp -o eth4 -j DROPiptables -t filter -I OUTPUT -p icmp ! -o eth4 -j DROP
扩展匹配条件
tcp扩展模块
–sport:用于匹配 tcp 协议报文的源端口,可以使用冒号指定一个连续的端口范围。 –dport:用于匹配 tcp 协议报文的目标端口,可以使用冒号指定一个连续的端口范围。 –tcp-flags:用于匹配报文的tcp头的标志位。 –syn:用于匹配 tcp 新建连接的请求报文,相当于使用 <span style="outline: 0px;font-size: 17px;">–tcp-flags SYN,RST,ACK,FIN SYN</span>。
#示例如下iptables -t filter -I OUTPUT -d 192.168.1.146 -p tcp -m tcp --sport 22 -j REJECTiptables -t filter -I INPUT -s 192.168.1.146 -p tcp -m tcp --dport 22:25 -j REJECTiptables -t filter -I INPUT -s 192.168.1.146 -p tcp -m tcp --dport :22 -j REJECTiptables -t filter -I INPUT -s 192.168.1.146 -p tcp -m tcp --dport 80: -j REJECTiptables -t filter -I OUTPUT -d 192.168.1.146 -p tcp -m tcp ! --sport 22 -j ACCEPTiptables -t filter -I INPUT -p tcp -m tcp --dport 22 --tcp-flags SYN,ACK,FIN,RST,URG,PSH SYN -j REJECTiptables -t filter -I OUTPUT -p tcp -m tcp --sport 22 --tcp-flags SYN,ACK,FIN,RST,URG,PSH SYN,ACK -j REJECTiptables -t filter -I INPUT -p tcp -m tcp --dport 22 --tcp-flags ALL SYN -j REJECTiptables -t filter -I OUTPUT -p tcp -m tcp --sport 22 --tcp-flags ALL SYN,ACK -j REJECTiptables -t filter -I INPUT -p tcp -m tcp --dport 22 --syn -j REJECT
udp 扩展模块
–sport:匹配udp报文的源地址。 –dport:匹配udp报文的目标地址。
#示例iptables -t filter -I INPUT -p udp -m udp --dport 137 -j ACCEPTiptables -t filter -I INPUT -p udp -m udp --dport 137:157 -j ACCEPT
icmp 扩展模块
–icmp-type:匹配icmp报文的具体类型。
#示例iptables -t filter -I INPUT -p icmp -m icmp --icmp-type 8/0 -j REJECTiptables -t filter -I INPUT -p icmp --icmp-type 8 -j REJECTiptables -t filter -I OUTPUT -p icmp -m icmp --icmp-type 0/0 -j REJECTiptables -t filter -I OUTPUT -p icmp --icmp-type 0 -j REJECTiptables -t filter -I INPUT -p icmp --icmp-type "echo-request" -j REJECT
multiport 扩展模块
-p tcp -m multiport –sports 用于匹配报文的源端口,可以指定离散的多个端口号,端口之间用”逗号”隔开。 -p udp -m multiport –dports 用于匹配报文的目标端口,可以指定离散的多个端口号,端口之间用”逗号”隔开。
#示例如下iptables -t filter -I OUTPUT -d 192.168.1.146 -p udp -m multiport --sports 137,138 -j REJECTiptables -t filter -I INPUT -s 192.168.1.146 -p tcp -m multiport --dports 22,80 -j REJECTiptables -t filter -I INPUT -s 192.168.1.146 -p tcp -m multiport ! --dports 22,80 -j REJECTiptables -t filter -I INPUT -s 192.168.1.146 -p tcp -m multiport --dports 80:88 -j REJECTiptables -t filter -I INPUT -s 192.168.1.146 -p tcp -m multiport --dports 22,80:88 -j REJECT
iprange 模块
–src-range:指定连续的源地址范围。 –dst-range:指定连续的目标地址范围。
#示例iptables -t filter -I INPUT -m iprange --src-range 192.168.1.127-192.168.1.146 -j DROPiptables -t filter -I OUTPUT -m iprange --dst-range 192.168.1.127-192.168.1.146 -j DROPiptables -t filter -I INPUT -m iprange ! --src-range 192.168.1.127-192.168.1.146 -j DROP
牛逼啊!接私活必备的 N 个开源项目!赶快收藏
string 模块
–algo:指定对应的匹配算法,可用算法为bm、kmp,此选项为必需选项。 –string:指定需要匹配的字符串
#示例
iptables -t filter -I INPUT -m string --algo bm --string "OOXX" -j REJECT
time 模块
–timestart:用于指定时间范围的开始时间,不可取反。 –timestop:用于指定时间范围的结束时间,不可取反。 –weekdays:用于指定”星期几”,可取反。 –monthdays:用于指定”几号”,可取反。 –datestart:用于指定日期范围的开始日期,不可取反。 –datestop:用于指定日期范围的结束时间,不可取反。
#示例
iptables -t filter -I OUTPUT -p tcp --dport 80 -m time --timestart 09:00:00 --timestop 19:00:00 -j REJECT
iptables -t filter -I OUTPUT -p tcp --dport 443 -m time --timestart 09:00:00 --timestop 19:00:00 -j REJECT
iptables -t filter -I OUTPUT -p tcp --dport 80  -m time --weekdays 6,7 -j REJECT
iptables -t filter -I OUTPUT -p tcp --dport 80  -m time --monthdays 22,23 -j REJECT
iptables -t filter -I OUTPUT -p tcp --dport 80  -m time ! --monthdays 22,23 -j REJECT
iptables -t filter -I OUTPUT -p tcp --dport 80  -m time --timestart 09:00:00 --timestop 18:00:00 --weekdays 6,7 -j REJECT
iptables -t filter -I OUTPUT -p tcp --dport 80  -m time --weekdays 5 --monthdays 22,23,24,25,26,27,28 -j REJECT
iptables -t filter -I OUTPUT -p tcp --dport 80  -m time --datestart 2017-12-24 --datestop 2017-12-27 -j REJECT
connlimit 模块
–connlimit-above:单独使用此选项时,表示限制每个IP的链接数量。 –connlimit-mask:此选项不能单独使用,在使用–connlimit-above选项时,配合此选项,则可以针对”某类IP段内的一定数量的IP”进行连接数量的限制,如果不明白可以参考上文的详细解释。
#示例
iptables -I INPUT -p tcp --dport 22 -m connlimit --connlimit-above 2 -j REJECT
iptables -I INPUT -p tcp --dport 22 -m connlimit --connlimit-above 20 --connlimit-mask 24 -j REJECT
iptables -I INPUT -p tcp --dport 22 -m connlimit --connlimit-above 10 --connlimit-mask 27 -j REJECT
limit 模块
–limit-burst:类比”令牌桶”算法,此选项用于指定令牌桶中令牌的最大数量。 –limit:类比”令牌桶”算法,此选项用于指定令牌桶中生成新令牌的频率,可用时间单位有second、minute 、hour、day。
#示例,注意,如下两条规则需配合使用
#令牌桶中最多能存放3个令牌,每分钟生成10个令牌(即6秒钟生成一个令牌)。
iptables -t filter -I INPUT -p icmp -m limit --limit-burst 3 --limit 10/minute -j ACCEPT
#默认将icmp包丢弃
iptables -t filter -A INPUT -p icmp -j REJECT
state 扩展模块
NEW: The status of the first packet in the connection is NEW. We can understand that the status of the first packet in the new connection is NEW. ESTABLISHED: We can understand the status of the packet after the NEW status packet as ESTABLISHED, indicating that the connection has been established. RELATED: Literally understood, RELATED is translated as relationship, but this is still not easy to understand. Let’s give an example. For example, in the FTP service, the FTP server will create two processes, one command process and one data process. The command process is responsible for command transmission between the server and the client (we can understand this transmission process as a so-called "connection" in state, temporarily called "command connection"). The data process is responsible for data transmission between the server and the client (we temporarily call this process "data connection"). However, the specific data to be transmitted is controlled by the command. Therefore, the messages in the "data connection" are "related" to the "command connection". Then, the packets in the "data connection" may be in the RELATED state, because these packets are related to the packets in the "command connection". (Note: If you want to perform connection tracking for ftp, you need to load the corresponding kernel module nf_conntrack_ftp separately. If you want to load it automatically, you can configure the /etc/sysconfig/iptables-config file) INVALID: If a packet cannot be identified, or the packet does not have any status, then the status of the packet is INVALID. We can actively block messages with INVALID status. UNTRACKED: When the status of the packet is untracked, it means that the packet has not been tracked. When the status of the packet is Untracked, it usually means that the relevant connection cannot be found. .
iptables -t filter -I INPUT -m state --state ESTABLISHED -j ACCEPT
mangle 表
TOS:用来设置或改变数据包的服务类型域。这常用来设置网络上的数据包如何被路由等策略。注意这个操作并不完善,有时得不所愿。它在Internet 上还不能使用,而且很多路由器不会注意到这个域值。换句话说,不要设置发往 Internet 的包,除非你打算依靠 TOS 来路由,比如用 iproute2。 TTL:用来改变数据包的生存时间域,我们可以让所有数据包只有一个特殊的 TTL。它的存在有 一个很好的理由,那就是我们可以欺骗一些ISP。为什么要欺骗他们呢?因为他们不愿意让我们共享一个连接。那些 ISP 会查找一台单独的计算机是否使用不同的 TTL,并且以此作为判断连接是否被共享的标志。 MARK 用来给包设置特殊的标记。iproute 2能识别这些标记,并根据不同的标记(或没有标记) 决定不同的路由。用这些标记我们可以做带宽限制和基于请求的分类。
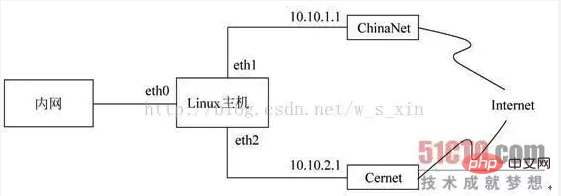
iptables -t mangle -A PREROUTING -i eth0 -p tcp --dport 80 -j MARK --set-mark 1;
iptables -t mangle -A PREROUTING -i eth0 -p udp --dprot 53 -j MARK --set-mark 2;
ip rule add from all fwmark 1 table 10
ip rule add from all fwmark 2 table 20
ip route add default via 10.10.1.1 dev eth1 table 10
ip route add default via 10.10.2.1 dev eth2 table 20
Custom chain
创建自定义链
#在filter表中创建IN_WEB自定义链
iptables -t filter -N IN_WEB
引用自定义链
#在INPUT链中引用刚才创建的自定义链
iptables -t filter -I INPUT -p tcp --dport 80 -j IN_WEB
重命名自定义链
#将IN_WEB自定义链重命名为WEB
iptables -E IN_WEB WEB
删除自定义链
1、自定义链没有被引用。 2、自定义链中没有任何规则。
#第一步:清除自定义链中的规则
iptables -t filter -F WEB
#第二步:删除自定义链
iptables -t filter -X WEB
LOG 动作
kern.warning /var/log/iptables.log
service rsyslog restart
–log-level 选项可以指定记录日志的日志级别,可用级别有 emerg,alert,crit,error,warning,notice,info,debug。 –log-prefix 选项可以给记录到的相关信息添加”标签”之类的信息,以便区分各种记录到的报文信息,方便在分析时进行过滤。–log-prefix 对应的值不能超过 29 个字符。
iptables -I INPUT -p tcp --dport 22 -m state --state NEW -j LOG --log-prefix "want-in-from-port-22"

Reference link
https://www.zsythink.net/archives/category/Operation and maintenance related/ iptables/ ##https://my.oschina.net/mojiewhy/blog/3039897 -
https://www.frozentux.net/iptables-tutorial/cn/iptables-tutorial-cn-1.1.19.html#MARKTARGET https://mp.weixin.qq.com/s/NOxY4ZC7Cay4LCWlMkVx8A
The above is the detailed content of Don't know how to use Linux firewall software IPtables! What kind of operation and maintenance person are you?. For more information, please follow other related articles on the PHP Chinese website!

Hot AI Tools

Undresser.AI Undress
AI-powered app for creating realistic nude photos

AI Clothes Remover
Online AI tool for removing clothes from photos.

Undress AI Tool
Undress images for free

Clothoff.io
AI clothes remover

AI Hentai Generator
Generate AI Hentai for free.

Hot Article
Hot Tools

Notepad++7.3.1
Easy-to-use and free code editor

SublimeText3 Chinese version
Chinese version, very easy to use

Zend Studio 13.0.1
Powerful PHP integrated development environment

Dreamweaver CS6
Visual web development tools

SublimeText3 Mac version
God-level code editing software (SublimeText3)
Hot Topics


 deepseek web version entrance deepseek official website entrance
Feb 19, 2025 pm 04:54 PM
deepseek web version entrance deepseek official website entrance
Feb 19, 2025 pm 04:54 PM
DeepSeek is a powerful intelligent search and analysis tool that provides two access methods: web version and official website. The web version is convenient and efficient, and can be used without installation; the official website provides comprehensive product information, download resources and support services. Whether individuals or corporate users, they can easily obtain and analyze massive data through DeepSeek to improve work efficiency, assist decision-making and promote innovation.
 How to install deepseek
Feb 19, 2025 pm 05:48 PM
How to install deepseek
Feb 19, 2025 pm 05:48 PM
There are many ways to install DeepSeek, including: compile from source (for experienced developers) using precompiled packages (for Windows users) using Docker containers (for most convenient, no need to worry about compatibility) No matter which method you choose, Please read the official documents carefully and prepare them fully to avoid unnecessary trouble.
 BITGet official website installation (2025 beginner's guide)
Feb 21, 2025 pm 08:42 PM
BITGet official website installation (2025 beginner's guide)
Feb 21, 2025 pm 08:42 PM
BITGet is a cryptocurrency exchange that provides a variety of trading services including spot trading, contract trading and derivatives. Founded in 2018, the exchange is headquartered in Singapore and is committed to providing users with a safe and reliable trading platform. BITGet offers a variety of trading pairs, including BTC/USDT, ETH/USDT and XRP/USDT. Additionally, the exchange has a reputation for security and liquidity and offers a variety of features such as premium order types, leveraged trading and 24/7 customer support.
 Ouyi okx installation package is directly included
Feb 21, 2025 pm 08:00 PM
Ouyi okx installation package is directly included
Feb 21, 2025 pm 08:00 PM
Ouyi OKX, the world's leading digital asset exchange, has now launched an official installation package to provide a safe and convenient trading experience. The OKX installation package of Ouyi does not need to be accessed through a browser. It can directly install independent applications on the device, creating a stable and efficient trading platform for users. The installation process is simple and easy to understand. Users only need to download the latest version of the installation package and follow the prompts to complete the installation step by step.
 Get the gate.io installation package for free
Feb 21, 2025 pm 08:21 PM
Get the gate.io installation package for free
Feb 21, 2025 pm 08:21 PM
Gate.io is a popular cryptocurrency exchange that users can use by downloading its installation package and installing it on their devices. The steps to obtain the installation package are as follows: Visit the official website of Gate.io, click "Download", select the corresponding operating system (Windows, Mac or Linux), and download the installation package to your computer. It is recommended to temporarily disable antivirus software or firewall during installation to ensure smooth installation. After completion, the user needs to create a Gate.io account to start using it.
 Ouyi Exchange Download Official Portal
Feb 21, 2025 pm 07:51 PM
Ouyi Exchange Download Official Portal
Feb 21, 2025 pm 07:51 PM
Ouyi, also known as OKX, is a world-leading cryptocurrency trading platform. The article provides a download portal for Ouyi's official installation package, which facilitates users to install Ouyi client on different devices. This installation package supports Windows, Mac, Android and iOS systems. Users can choose the corresponding version to download according to their device type. After the installation is completed, users can register or log in to the Ouyi account, start trading cryptocurrencies and enjoy other services provided by the platform.
 gate.io official website registration installation package link
Feb 21, 2025 pm 08:15 PM
gate.io official website registration installation package link
Feb 21, 2025 pm 08:15 PM
Gate.io is a highly acclaimed cryptocurrency trading platform known for its extensive token selection, low transaction fees and a user-friendly interface. With its advanced security features and excellent customer service, Gate.io provides traders with a reliable and convenient cryptocurrency trading environment. If you want to join Gate.io, please click the link provided to download the official registration installation package to start your cryptocurrency trading journey.
 How to Install phpMyAdmin with Nginx on Ubuntu?
Feb 07, 2025 am 11:12 AM
How to Install phpMyAdmin with Nginx on Ubuntu?
Feb 07, 2025 am 11:12 AM
This tutorial guides you through installing and configuring Nginx and phpMyAdmin on an Ubuntu system, potentially alongside an existing Apache server. We'll cover setting up Nginx, resolving potential port conflicts with Apache, installing MariaDB (
