
 Operation and Maintenance
Nginx
How to use Nginx for compression and decompression of HTTP requests
Operation and Maintenance
Nginx
How to use Nginx for compression and decompression of HTTP requests
How to use Nginx for compression and decompression of HTTP requests

How to use Nginx to compress and decompress HTTP requests
Nginx is a high-performance web server and reverse proxy server that is powerful and flexible. When processing HTTP requests, you can use the gzip and gunzip modules provided by Nginx to compress and decompress the requests to reduce the amount of data transmission and improve the request response speed. This article will introduce the specific steps of how to use Nginx to compress and decompress HTTP requests, and provide corresponding code examples.
- Configuring the gzip module
First you need to enable the gzip module in the Nginx configuration file. Open your Nginx configuration file (usually located at /etc/nginx/nginx.conf or /usr/local/nginx/conf/nginx.conf), find the http block, and add the following Configuration:
http {
  gzip on;
  gzip_types text/plain text/css application/javascript;
  gzip_min_length 1024;
  gzip_comp_level 1;
}The meaning of the above configuration is as follows:
gzip on;means enabling the gzip module.gzip_typesIndicates the file types that need to be compressed. Here we have selected text files, CSS files and JavaScript files. You can configure it according to your needs.gzip_min_lengthIndicates that only files whose length exceeds this value will be compressed.gzip_comp_levelIndicates the compression level. The higher the level, the better the compression effect, but the more CPU resources it takes up.
- Configuring the gunzip module
If you need to decompress the received request, you also need to enable the gunzip module. Find the http block in the same configuration file and add the following configuration:
http {
  gunzip on;
}- Apply the configuration and restart Nginx
After saving the Nginx configuration file, execute the following command to apply the configuration and Restart the Nginx service:
sudo service nginx reload
Please make sure you have sufficient permissions.
- Verify compression and decompression
Now you have configured Nginx’s compression and decompression modules. You can verify that these features are working by sending an HTTP request to Nginx.
First, use the curl tool to send a GET request to the configured Nginx service:
curl -H "Accept-Encoding: gzip, deflate" -I http://localhost
The -H "Accept-Encoding: gzip, deflate" in the command means tell The server can accept gzip or deflate compression methods. -I indicates that only the response header information is obtained, without obtaining the complete response body.
If everything is normal, you will see information similar to the following in the response header:
Content-Encoding: gzip
This means that the server has compressed the response body into gzip format for transmission.
Next, you can use the following command to send a decompressed request:
curl --compressed -I http://localhost
--compressed in the command means telling the server that the response received has been compressed , need to be decompressed.
If everything goes well, you will see information similar to the following in the response header:
Content-Encoding:
This means that the server has decompressed the response body and transmitted it in its original format.
Through the above steps and verification, you have successfully configured Nginx's gzip and gunzip modules to implement compression and decompression of HTTP requests.
Summary
This article introduces how to use Nginx to compress and decompress HTTP requests, and provides related configuration and command examples. Using Nginx's gzip and gunzip modules can help you reduce the amount of data transmission and improve the response speed of requests. Through proper configuration and use, the performance and user experience of web applications can be improved. If you encounter problems during use, you can refer to Nginx's official documentation or ask for help. I hope the content of this article is helpful to you!
Reference link:
- Nginx official documentation: http://nginx.org/en/docs/
- Gzip module configuration guide: https://nginx .org/en/docs/http/ngx_http_gzip_module.html
- Gunzip module configuration guide: https://nginx.org/en/docs/http/ngx_http_gunzip_module.html
The above is the detailed content of How to use Nginx for compression and decompression of HTTP requests. For more information, please follow other related articles on the PHP Chinese website!

Hot AI Tools

Undresser.AI Undress
AI-powered app for creating realistic nude photos

AI Clothes Remover
Online AI tool for removing clothes from photos.

Undress AI Tool
Undress images for free

Clothoff.io
AI clothes remover

AI Hentai Generator
Generate AI Hentai for free.

Hot Article
Hot Tools

Notepad++7.3.1
Easy-to-use and free code editor

SublimeText3 Chinese version
Chinese version, very easy to use

Zend Studio 13.0.1
Powerful PHP integrated development environment

Dreamweaver CS6
Visual web development tools

SublimeText3 Mac version
God-level code editing software (SublimeText3)
Hot Topics
 1377
1377
 52
52

 How to allow external network access to tomcat server
Apr 21, 2024 am 07:22 AM
How to allow external network access to tomcat server
Apr 21, 2024 am 07:22 AM
To allow the Tomcat server to access the external network, you need to: modify the Tomcat configuration file to allow external connections. Add a firewall rule to allow access to the Tomcat server port. Create a DNS record pointing the domain name to the Tomcat server public IP. Optional: Use a reverse proxy to improve security and performance. Optional: Set up HTTPS for increased security.
 7-zip maximum compression rate setting, how to compress 7zip to the minimum
Jun 18, 2024 pm 06:12 PM
7-zip maximum compression rate setting, how to compress 7zip to the minimum
Jun 18, 2024 pm 06:12 PM
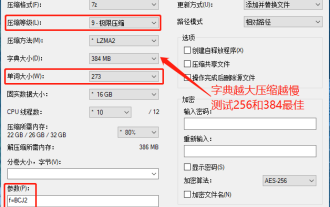
I found that the compressed package downloaded from a download website will be larger than the original compressed package after decompression. The difference is tens of Kb for a small one and several dozen Mb for a large one. If it is uploaded to a cloud disk or paid space, it does not matter if the file is small. , if there are many files, the storage cost will be greatly increased. I studied it specifically and can learn from it if necessary. Compression level: 9-Extreme compression Dictionary size: 256 or 384, the more compressed the dictionary, the slower it is. The compression rate difference is larger before 256MB, and there is no difference in compression rate after 384MB. Word size: maximum 273 Parameters: f=BCJ2, test and add parameter compression rate will be higher
 Set query parameters for HTTP requests using Golang
Jun 02, 2024 pm 03:27 PM
Set query parameters for HTTP requests using Golang
Jun 02, 2024 pm 03:27 PM
To set query parameters for HTTP requests in Go, you can use the http.Request.URL.Query().Set() method, which accepts query parameter names and values as parameters. Specific steps include: Create a new HTTP request. Use the Query().Set() method to set query parameters. Encode the request. Execute the request. Get the value of a query parameter (optional). Remove query parameters (optional).
 How to generate URL from html file
Apr 21, 2024 pm 12:57 PM
How to generate URL from html file
Apr 21, 2024 pm 12:57 PM
Converting an HTML file to a URL requires a web server, which involves the following steps: Obtain a web server. Set up a web server. Upload HTML file. Create a domain name. Route the request.
 How to deploy nodejs project to server
Apr 21, 2024 am 04:40 AM
How to deploy nodejs project to server
Apr 21, 2024 am 04:40 AM
Server deployment steps for a Node.js project: Prepare the deployment environment: obtain server access, install Node.js, set up a Git repository. Build the application: Use npm run build to generate deployable code and dependencies. Upload code to the server: via Git or File Transfer Protocol. Install dependencies: SSH into the server and use npm install to install application dependencies. Start the application: Use a command such as node index.js to start the application, or use a process manager such as pm2. Configure a reverse proxy (optional): Use a reverse proxy such as Nginx or Apache to route traffic to your application
 Can nodejs be accessed from the outside?
Apr 21, 2024 am 04:43 AM
Can nodejs be accessed from the outside?
Apr 21, 2024 am 04:43 AM
Yes, Node.js can be accessed from the outside. You can use the following methods: Use Cloud Functions to deploy the function and make it publicly accessible. Use the Express framework to create routes and define endpoints. Use Nginx to reverse proxy requests to Node.js applications. Use Docker containers to run Node.js applications and expose them through port mapping.
 How to deploy and maintain a website using PHP
May 03, 2024 am 08:54 AM
How to deploy and maintain a website using PHP
May 03, 2024 am 08:54 AM
To successfully deploy and maintain a PHP website, you need to perform the following steps: Select a web server (such as Apache or Nginx) Install PHP Create a database and connect PHP Upload code to the server Set up domain name and DNS Monitoring website maintenance steps include updating PHP and web servers, and backing up the website , monitor error logs and update content.
 How to use Fail2Ban to protect your server from brute force attacks
Apr 27, 2024 am 08:34 AM
How to use Fail2Ban to protect your server from brute force attacks
Apr 27, 2024 am 08:34 AM
An important task for Linux administrators is to protect the server from illegal attacks or access. By default, Linux systems come with well-configured firewalls, such as iptables, Uncomplicated Firewall (UFW), ConfigServerSecurityFirewall (CSF), etc., which can prevent a variety of attacks. Any machine connected to the Internet is a potential target for malicious attacks. There is a tool called Fail2Ban that can be used to mitigate illegal access on the server. What is Fail2Ban? Fail2Ban[1] is an intrusion prevention software that protects servers from brute force attacks. It is written in Python programming language
